Jan 28, 2015

Tomato Rice - a one pot meal!


There’s nothing as comforting as a one-pot meal on busy weekdays or on lazy weekends. Infact if I had it my entirely my way I would have only cooked one-pot meals all the time and be done with my cooking. But sometimes the husband doesn’t prefer that and wants his rice separate, curry and thoran and blah blah all separate…oh! well, thank god he isn’t very choosy and picky about his food, but there are certain things that he’d rather have the traditional way.

When I say one-pot, I mean just that, from start to finish the entire dish is cooked in just one single pan and well if your pan is fancy enough just serve it right out of that ;-)


2 years ago, the beautiful summer of 2013 we had a lovely and flourishing vegetable garden that my wonderful dad grew in our backyard  and we had a bounty full of vegetables for almost an entire year. Tomatoes grew like wild fire and we had so much that we had to infact give away so many bags of tomatoes to our neighbors and friends. We ate the juicy red fruit raw in salads, made pickles, chutneys , masala curries and even froze a whole lot and still we had plenty more.


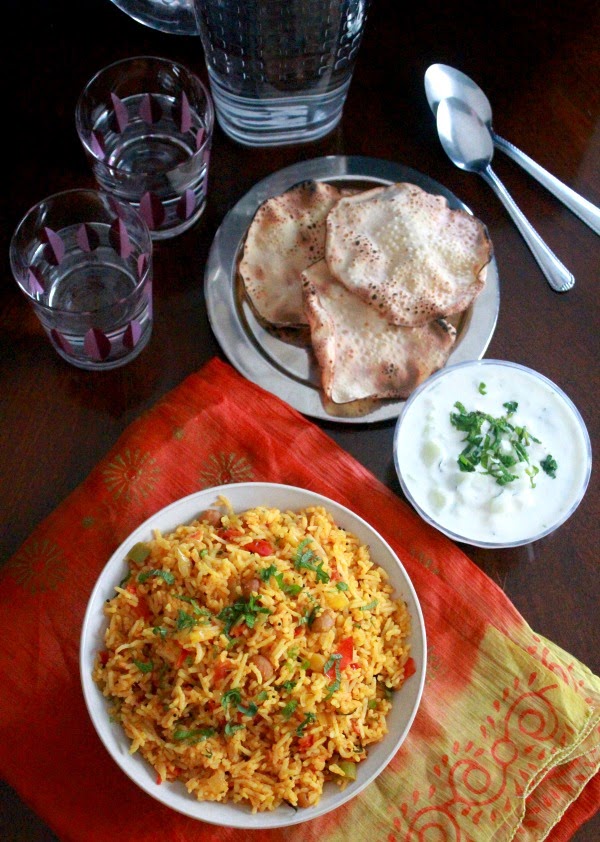
This Tomato rice was one of the many dishes we made with our organic Tomatoes. And yes, these pics were taken 2 yrs ago when I made this dish with our garden bounty but I still make it exactly like this with any tomato whenever we are in the mood for some tomato rice.


Spicy Tomato Rice

You’ll Need
3 cups Basmati Rice
5 ½ cups water
6-7 large Red Tomatoes, chopped
1 large Red Onion, chopped finely
4 Green Chillies, slit lengthwise
1 Tablespoon Ginger-garlic paste
For tempering
Whole spices – 2 cardamom, 1 cinnamon stick, 4 cloves, 4 black pepper, 1  star anise, 1 bay leaf
2 Tablespoons Oil
2 Tablespoons whole Peanuts
1 tesapoon Cumin Seeds
3 Dry Red chillies
8-10 Curry leaves
Spices used
½  teaspoon Turmeric powder
2 teaspoons Kashmiri Chilli powder / regular Red chilli powder
1  teaspoon Garam Masala powder
A pinch of Hing (Asafoetida powder)
Salt – to taste
2 teaspoons chopped Coriander leaves for garnish 
1 teaspoon chopped Mint leaves for garnish 

Directions:
1. In a large pan, heat oil and add the whole spices, roast until fragrant. Add the peanuts and roast until they turn slightly brown. Then add Cumin seeds, Dry red chillies and curry leaves.
2. Add the Ginger garlic paste and sauté for a minute. Add chopped red onions and green chillies. Add a pinch of salt and sauté until the onions turn soft and pink.
3. Add turmeric powder, red chilli powder, garam masala and hing and mix well. Then add in the chopped tomatoes and cook until tomatoes are soft. Do not over cook.
4. Finally add the Basmati rice, mix it well with the tomato- masala mix and then add water. Cook until the rice is cooked through. Garnish with some fresh coriander and mint leaves on top and serve hot.


This dish is definitely a one-pot meal and it's spicy, tangy and just wonderful. Just serve it with some cucumber raita and pappad and you’re done. Oh! Btw, we had it with chutta pappadam (not fried ones)…I love chutta pappadam, just place the dried pappadam over a flame until it bubbles and curls up a bit. Don’t make it too charred though… :-)

-Manju

Jan 25, 2015

Goan Shrimp Curry....a recipe feature for Anokhi Media


Who doesn't enjoy a good plate of rice with some warm and mildly spiced seafood dish. My family just loves seafood. It's always on our weekend special menu ;-) Our most favorite ones are those cooked with some coconut based gravy. It turns out creamy, not overly spicy, mildly tangy and just perfect with some rice.
I had prepared this Shrimp curry a while ago and for some reason it was left in my drafts.

Anokhi Media is a popular South-Asian online magazine and I was so honored when they asked me to write for them. I did not think twice about which recipe to share with the magazine and they were more than happy to share this awesome Goan Shrimp Curry on their site.

So dear readers, please do stop by Anokhi Media for the Recipe. See you all again soon!

-Manju 

Jan 15, 2015

Jungle Animals themed Cake


I'm so excited to share my first cake this New Year....a super fun, extremely cute and bright Jungle Animals themed tiered cake. Ridhaan's mom is my very good friend and she had asked me to do his birthday cake many months before. Although I wasn't sure if I would be able to make it (due to some other matters) I finally decided to go ahead. Her only request was for a Mango Mousse filling and some animals to go on the cake to match with the Animal themed birthday party she had in mine. Rest all was left to me and sky was the limit....

I'm proud of this cake for several reasons.
(a) This is my first non-fondant tiered cake with a smooth fondant-like finish. It took a lot of time to get the sides smooth and edges straight but it was worth it. There were some imperfections but let's say I decorated over them...hehe :-P These are very important factors in the word of beautiful cakes so it mattered a lot to me as well and I'm glad it worked well.
(b) This was my first tiered cake with a creamy Mousse filling. Mousse fillings are generally very soft and people don't recommend them for tiered cakes or even for cakes that need to sit out for a long time. But I tried it and it worked fine. Maybe I should thank the freezing temperatures here in Minnesota for that!
(c) My first cake with actual sugar figurines that you can eat! :-D

The Cakes were Vanilla White Cake with creamy Mango Mousse Filling covered with color tinted Vanilla Buttercream with marshmallow fondant accents for decoration and figurines. 

Until now I've never really tried making edible figurines, except for the Clowns I made for Lil'Appu's 1st Birthday Cake. Usually I just keep a plastic toy topper or a themed candle topper and just decorate the rest of the cake. But this time I felt with the animal theme it would be great to have some cute looking animals on the cake, so I went ahead with making them.
I made a Giraffe, Zebra, Elephant and Lion. I wish I had made the giraffe neck longer, but other than that I was happy with the rest of the animal figurines. These were made almost a week in advance and they hardened perfectly. 


My son used to come back daily from daycare and go stare at the animals...he just loved them. He is so used to me making cakes for friends that he doesn't touch or disturb my 'cake stuff' and for some reason he thinks he can go for the party anyways and eat the cake and decorations there (which is usually true)...so after the cake is cut its a whole different story, he wants everything first ;-D 
He kept requesting that I make a Monkey as well and I told him we'll make one directly on the cake. I don't know if he understood, but he kept waiting for the monkey every single day :)

The Tree toppers were a last minute addition. After I placed the animals on the cake with the Lion on top I just felt it needed something more...I thought about placing a Sun, but then the colors of the Lion and sun would be almost same (yellow-orange) , so finally decided to place the same trees that I had placed around the cake. Well, you can call them Coconut trees although the leaves should have been longer ;-) It's all in the imagination....hehe! If you notice I even gave small scale like texture to the stem of the tree to give it a proper 3D tree look. I decorated the cake board with chocolate buttercream to give it a muddy ground like appearance and it looked pretty good.

Then there were vines, some grass, more leaves, coconut trees and flowers to complete the overall look of the cake. I wanted the Monkey to be hanging from the tail on a vine and that's how I did it.


My fun animals :)


My friend had already bought the candle that would go on the cake so we placed that at the venue. Here are some pics of the beautiful Cake Table and cake cutting :)


Here's how the cake slice looked like! It really was yumm if I may say so.....ahem!


I'm still waiting for some more pics that the photographer at the party had taken....I'm sure my friend is waiting for those more than me :-P 
The party was super fun, the decorations were perfect and colorful and the food was awesome and not to mention how lovely the cake was...hehe! 
Lil'Ridhaan happily ate up the sugar Elephant and lil'Appu went for the Lion, but I don't have pics of any of that...hopefully the photographer took some :)

Will share more fun cake stories in upcoming posts...until then take care and bye bye!

-Manju


Jan 13, 2015

Sukhiyan, sweet lentil fritters....a Kerala special snack!


When I think of Sukhiyan I remember Sreeja ammayi's mom. Vanaja aunty is always called as Shasthamangalathile aunty, she is so often called that that I sometimes have no clue what her real name is ;-) Shashthamangalam is a place in Trivandrum, Kerala and Vanaja aunty lives there with her husband. 
Her daughter, our Sreeja ammayi is Manish's mom's brother's wife....Well, anyways Manish's family have been family friends with them for a very very long time and later became relatives and the friendship still stands strong.

After Manish and I got married we had gone to their home several times and every time we went there aunty was ready with Sukhiyan. I love these sweet lentil fritters but these are so rarely made in my home and even in local bakeries it's a rare find these days. So whenever she made them for us with a cup of sweet hot tea, I couldn't resist enjoying myself to a good bunch of these!
Even if we go there unannounced in the middle of the day, she'll make something quickly and would never let us leave without eating and Sukhiyan was almost always her go-to palaharam to make, I just love such people who attracts you with food ;-)

Even though I really enjoyed eating them I never tried making them at home. When my sis-in-law, Malli came home for a vacation, she decided to make these. I was simply excited and went about clicking pics as she made them. So, these were technically made by her and they were super yumm! She even calls them Modakam, so apparently it has a lot of names :)


I have no clue of the origin of it's name but it is popularly called Sukhiyan or Suhiyan and it is a very simple and easy snack to make. Boiled green moong daal is mixed with melted jaggery that's flavored with a pinch of elaichi (cardamom powder), rolled into balls, dipped in batter and deep fried. I could just eat the rolled lentil balls as it is, but there's nothing like a crispy fritter :-) The batter is the same as the one used for Pazhampozhi (plantain fritters).

The ratio of Green moong dal to Jaggery is approx 2:1 respectively. We don't measure it exactly but just add enough melted jaggery that'll help the cooked lentils stick together and form a ball easily. Some like to flavor the jaggery with cardamom powder, dried ginger powder, cinnamon etc...but I prefer it simply flavored with a little cardamom powder. A cup of hot sweet tea and a bowlful of these Sukhiyan...aaah! Let me daydream for a moment :)


Sukhiyan, sweet lentil fritters

You’ll need
1 cup Boiled Green lentils (Moong daal)
½ cup melted Jaggery
½ cup fresh grated Coconut
¼ tsp cardamom powder
For batter
1 cup  All purpose flour (Maida)
1 Tblsp Rice Flour (Ari podi)
¼ tsp Turmeric powder
1 tsp Sugar
A pinch of Salt
¼ cup Water (more or less as needed)
Oil for deep frying


Directions
1. Cook the Green moong daal: Soak the moong daal in cold water for ½ hour. Add to a pressure cooker with enough water to immerse the daal and Pressure cook for 1 whistle. Turn off the heat after 1 whistle and let it cool down by itself. Once cooled open the lid and check if the daal is cooked. Drain off any excess water.
2. Melt the jaggery in a hot pan and add ¼ tsp cardamom powder for flavor. Add the grated coconut and mix well and keep aside to cool slightly. (If you feel the jaggery might be gritty, strain it and then add grated coconut)
3. Make the batter by mixing together all-purpose flour, rice flour, turmeric powder, sugar and salt with enough water to form a smooth batter. Batter should neither be too runny nor too thick.
4. Mix the cooked green moong daal with the melted jaggery and mix together gently. While still warm  start rolling them into equal sized balls .
5.  Heat oil for deep frying and once ready, dip each moong daal ball into the batter and immerse into hot oil. Fry until they turn golden brown.

6. Serve the Sukhiyan hot with a nice cup of hot tea/coffee :)


Hope you'll be tempted to try these someday. It's really good and despite the frying, I like to think I'm eating a protein rich snack ;-) My little son too enjoyed these and I want to try making more naadan palaharam for him to show him the food his parents grew up eating and enjoying :-)

-Manju

Jan 2, 2015

Baked Turkey Meatballs in a Berry BBQ Sauce

Welcome to the first post this New Year. I'm not much into making resolutions, but I make plans/goals (well a somber resolution I guess ;-) ). Just few small plans of what I should achieve or what my family should achieve in the new year and generally try to achieve atleast those goals. I love a fresh start to anything and like to consider the New Year as a perfect way to make yourself believe in starting afresh to several things that you slept over in the previous year.

Well, last year I had shared a quick and simple recipe for baked Turkey meatballs. I find them so easy to make and so versatile that it can be transformed into an appetizer or entree as required. I have used them in soups, spicy masala gravy dishes and also transformed them into a bunch of appetizer dishes.

One of our favorite was this Berry BBQ sauce that I made to coat the meatballs with. It was fruity, spicy, sweet yet tart, in all it was a fusion of all kinds of flavors. I actually made the Berry BBQ sauce using some leftover homemade Mixed Berry compote....yes, fruit compote which I used for some cupcakes :-) 
I love fusion flavors like Mango chicken, Orange chicken etc...so that's how this idea came to my mind to convert the mixed berry compote into a bbq sauce.


I made this once to take to a friends place for a casual get-together and she came back asking for the recipe and wanted me to quickly share it on the blog. I wasn't sure if I would get it on the blog so fast, so I gave her the recipe and she promptly tried it and gave a full thumbs up on the recipe.
I again took these for a Thanksgiving potluck and there too everyone raved about the taste and wanted to know how it was made :)

The inspiration for the BBQ berry sauce is Asha's recipe and I spiced it up a bit based on our tastes and availability of ingredients and added some herbs for bit more flavor. It's a very adaptable recipe and I can't wait to try out more varities with it.


Baked Turkey Meatballs in Berry BBQ Sauce
Makes: 35-40 meatballs

You’ll Need
For Turkey Meatballs
1 Lb Ground Turkey
¼ cup Breadcrumbs 
¼ cup grated/powdered Parmesan cheese 
½ cup chopped Red Onions
1 clove minced Garlic
1 large Egg
½ cup chopped Cilantro leaves
1 Tblsp Mint leaves
2 tsp crushed Black Pepper
¼ tsp Salt

For Berry BBQ Sauce
1 cup Mixed Berry Compote (Grinded to a puree) **
1 Tblsp Canola/Olive Oil
1/2 tsp Cumin seeds
1/2 tsp Fennel seeds
1 Red Onion finely diced
2 Tblsp Minced Ginger
2-3 tsp Garam Masala
4 Green chillies thinly sliced / 2 tsp Red Chilli powder
4 Tblsp Lime juice/Lemon juice
4 Tblsp White Vinegar
2 Tblsp Molasses / Jaggery
2 Tblsp Worcestershire Sauce/Soy Sauce
Corriander Leaves / Mint Leaves as needed for Garnish

Directions
For Baked Turkey Meatballs
1. Pre-heat oven to 400 F.
2. Combine all the ingredients in a large bowl and mix well with hands until properly incorporated.
3. Use a melon baller to scoop out equal sized balls and place them on a baking sheet covered with wax/parchment paper. This makes about 35-40 mini meatballs. Use an icecream scoop or Tablespoon for bigger meatballs.
4. Bake in oven for 13-15 mins.  (Do not over-bake). Let the meatballs cool on a wire rack.

For Berry BBQ Sauce
1. Heat Oil in a saucepan.  Add the fennel, seeds cumin seeds, red onion, green chillies and saute well.
2. Add all the other ingredients and let it simmer for 15-20 minutes or until it is almost reduced to half it’s original quantity.

Finally, combine around 15-20 of the baked turkey meatballs into the Berry Bqq sauce and simmer for 5 mins on low heat. Turn off the heat. Garnish with chopped coriander or Mint leaves.

Note: You may have to double the recipe for the bbq sauce for coating the whole batch of baked meatballs.

** Mixed Berry Compote:
Add 1 cup frozen mixed berries, 3-4 Tblsp  Sugar and 1 TBlsp Lemon Juice in a pan and cook until the sugar melts and the compote thickens. Use 2-3 tsp cornstarch to thicken the compote if needed. Let it cool completely and use as needed.


-Manju