Showing posts with label chocolate cake. Show all posts

Jun 19, 2020

Chocolate Fraisier | Portrait Cake

Manish's cousin Saurav came to US in January this year to complete his BTech final year project. In March we planned for him to come visit us during his college spring break which was from first week of March and a week later Manish's parents and sis were also supposed to come over. A week after Saurav came to Charlotte, the Covid pandemic hit high and cities slowly went into lockdown mode. Manish's parents and sister decided not to travel from LA and slowly everyone had to cancel a lot of plans, including Manish's birthday party which we later celebrated at home. Saurav's college also shut down and then Charlotte went into lockdown so he was pretty much stuck with us. Lol!


So anyways...coming back to Saurav Chetta (as the kids used to call him),  although technically he should be called Saurav Chittappa ;-) It was all a learning game for all of us on how do we survive during a lockdown, online grocery purchases, cooking everything at home, no outings at all and just the art of living at home day n night for weeks together. Over time Saurav Chetta became the new playmate for Appu and Mihi. Although he mostly spent his time in his room studying for upcoming courses and tests, in the evenings everyone would come down and spend time with each other. Once the weather got warm he would go out on bike rides or to play cricket or water fights with them. I got a lot of help in the kitchen with him washing and clearing the dishes, sometimes even assisting me as sou chef when I'm cooking something. Manish got his share of help with grocery clean ups, house clean up and an extra hand for outdoor stuff or just watching the kids. We had a good time inspite of it being lockdown and all.

Saurav chetta and the kids loved making chocolate cakes now and then. All of them are chocoholics. Whenever we had overripe bananas in the house it was mandatory to make Chocolate Banana cake. I would guide them but they used to make the whole cake themselves and even clear up the dirty dishes. Once baked and cooled I would top it with a thin coating of chocolate ganache and they would all enjoy the cake over a couple of days as a snack. Saurav's 1 week vacation with us turned up into a 3½ month stay and we all really enjoyed his company. I hope he did too...Lol!


After a long wait we were finally able to book his return flight back to India on an Air India evacuation flight for Jun16th. So the last few days before his return was spent on making the best of his time here and cooking/baking and eating all kinds of stuff.  I wanted to do a fun little farewell treat for him and the kids, something that was easy and wouldn't take a lot of effort. Trust me this whole quarantine thingy is making me quite lazy in terms of doing elaborate stuff ;-)


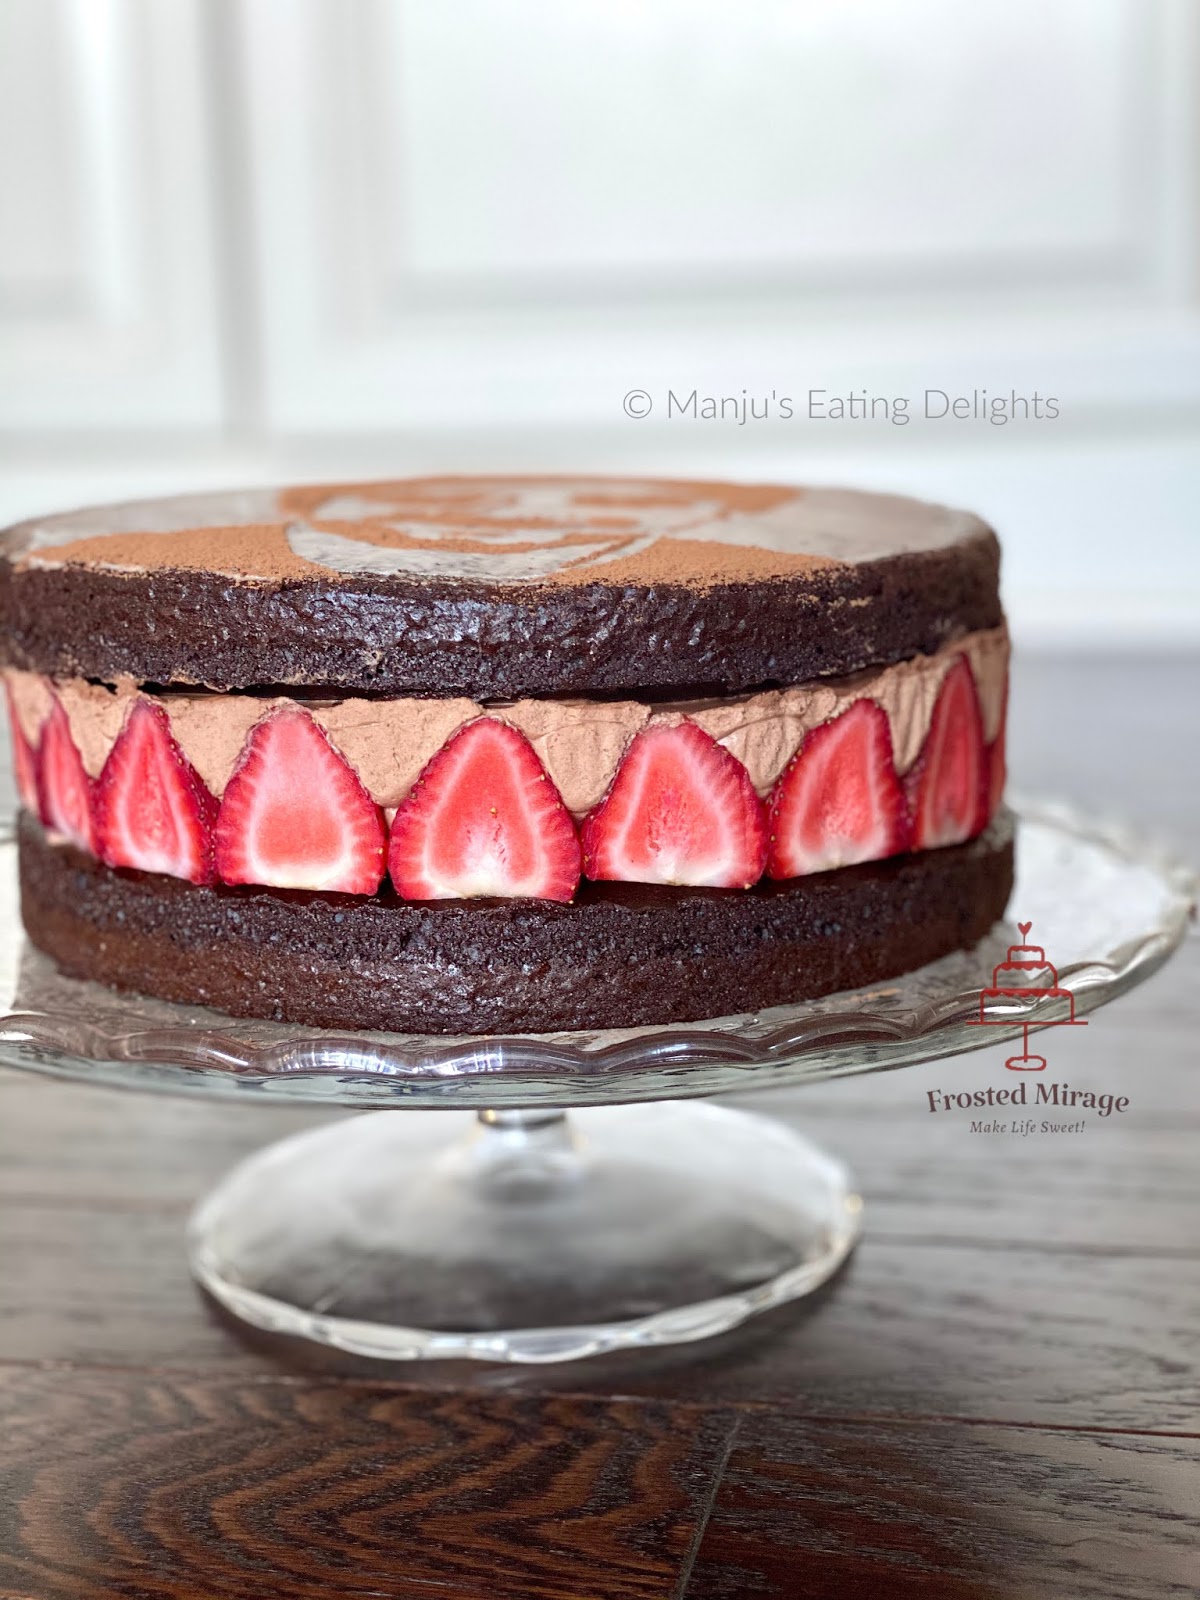
Making a Fraisier has been on my mind for a long time now. A Fraisier cake, is derived from the French word “fraise” meaning strawberry. It is a classic French cake that is traditionally comprised of a sponge cake, Génoise, cut in half, soaked with simple syrup, filled with a crème patisserie, with Strawberries arranged on the side and topped with almond paste or ganache. 

Since the kids loved my Chocolate Banana Cake, I decided to make the same Chocolate cake (without the bananas) with Chocolate Mousse filling, as I had whipping cream in hand and ofcourse decorate with strawberries.  

Chocolate Cake


You’ll Need
1¾ cups All-purpose flour
2 cups Sugar
¾ cups Cocoa powder (Used Hershey’s)
2 teaspoons Baking soda
1 teaspoon Baking powder
2 large Eggs (at room temperature)
1 cup Milk
1 cup Hot coffee / Hot water
½ cup Vegetable oil
1 teaspoon Vanilla extract
1 Tablespoon fresh Orange Zest (optional)

Directions:
1.Pre-heat the oven to 350 F degrees. Grease two 
9-inch round cake pans.  Line them with parchment paper and keep aside.
2. Sift the flour, sugar, cocoa powder, baking soda, baking powder, and salt into the bowl of an electric mixer fitted with the paddle attachment and mix until combined.
3. In another bowl, combine the milk, oil, eggs, and vanilla. With the mixer on low speed, slowly add the wet ingredients into the dry ones. 
4. With the mixer still on low, add the hot coffee (or hot water) and stir just to combine, scraping the bottom of the bowl with a rubber spatula.
5. Add the orange zest and stir to combine. (Orange zest in chocolate cake adds such a bright flavor – totally optional though)
6. Pour the batter evenly into the prepared pans and bake for 25 to 30 minutes or until a skewer inserted into the cake comes out clean.
7. Cool in the pans for 15 minutes, then turn them out onto cooling racks and cool completely.


Chocolate Mousse (Eggless)
You’ll Need
2 cups Heavy Whipping Cream
¾ cup Cocoa powder
1 ½ cups Powdered Sugar (adjust sweetness as per taste)
2 teaspoon vanilla extract
2 teaspoon Gelatin

Directions
1. Bloom Gelatin – add 2 teaspoon gelatin powder to ¼ cup cold water and let it set.
2.In the bowl of kitchen mixer, add whipping cream, sift cocoa powder and powdered sugar over it.
3. Using whisk attachment start whisking on low speed until everything is fully incorporated and then increase the speed gradually.
4. When the whipping cream starts to thicken add 2 teaspoons of vanilla extract.
5. Warm the gelatin in the microwave for 10-20 secs , just until it becomes liquid.
6. Increase the speed of the mixer to High and pour in the gelatin in a thin streak. Whip until the mousse thickens.


Assembling the Chocolate Fraisier
You’ll need
2 layers of Chocolate Cake
Chocolate Mousse
10-15 equal sized Strawberries (washed and cut in half)
Parchment paper or Acetate cake collar sheets

Directions
1.Place one layer of Chocolate Cake on a cake board/serving plate/Cake stand.
2. Carefully and snugly align the parchment paper or acetate sheet around the sides of the cake.
3. Place the halved strawberries in a neat line around the edge of the cake.
4. Fill with Chocolate Mousse until it is level with the height of the strawberries. Fill in the gaps between the strawberries also with mousse.
5. Hold the parchment paper or acetate sheet tightly so that the fillings don’t seep through the sides. (I used a ribbon to keep the parchment paper in place)
6. Place the next layer of cake on top of the mousse very carefully.
7. Refrigerate for several hours until the mousse is set.
8. Once cake is set, carefully take the parchment paper or acetate sheet out.


Now on to an interesting decor idea...making a portrait on the Chocolate Fraisier. This was a fun idea that came to my mind as a perfect little farewell for Saurav. 

A Fraisier by itself is a pretty dessert cake not requiring a lot of frosting or decoration. But I wanted the cake to be even more memorable. I love Silhouette patterns as a cake design so thought instead of a silhouette I'll make a stencil of his face and stencil that on to the cake. 

After I shared pics of the cake I have to say friends from social media hasn't stopped singing praises and I am so glad to share the technique with you. Perhaps you can give it a try for a special occassion of yours. 
This technique can be done on any dessert or cake you wish to celebrate with.


Here's how I went about doing this Portrait cake on the Chocolate Fraisier.
1. Baked two 9" Chocolate cakes (I tweaked my Chocolate Banana Cupcakes slightly).
2. Got the portrait stencil ready.
3. Prepared the Chocolate Mousse filling.
4. Assembled the Fraisier and added the portrait on the cake and refrigerated everything to set overnight. 


How to make a PORTRAIT on a CAKE

Get the image ready
  • Take a picture of the person whose Portrait you want to sketch, where the face is clearly visible. Using a photo editing tool crop out the face.
  • Using the photo editing tool make the image Black and White and increase the contrast so that the image would show only black or white areas of the face. Save this image.
  • Once the image is ready, Print it out to the size required. (here it is printed on a 8x11 sized regular paper)


Tracing the image:
  • Trace over the black portions on the image with a dark pen or pencil - these are the portions you will cut out. 
  • If any areas are not that dark but you feel will add definition to the face, then make markings to cut those areas out. For example: I traced over the nose curve and some areas of the hair and neck. 


Cut out traced portions:
  • Use a sharp exacto knife and carefully cut out all the traced areas. The paper might tear in some spots or smaller areas, just be careful and do clean cuts.
  • I wanted the stencil to be one full piece so even though some areas got separated, once I had cut them out I placed it back together and stuck the ends together with very thin strips of tape.
  • The eye pupils were difficult, so I had to separately make the black pupil and white corners and stuck it with tape. 


Your stencil sheet is now ready.


Get the assembled cake out of the refrigerator. I used parchment paper and a ribbon to keep the parchment paper secured around the cake until the cake was firmly set.

Since it was a Chocolate cake I wanted a lighter shade on top to apply the portrait on. So I applied a thin coating of very light colored chocolate buttercream over the top. Almost like a thin crumb coat, it doesn’t have to be perfect. Chill the cake again until the buttercream has hardened a bit. (I do not have any pics of these steps unfortunately)

Then place the face/portrait stencil sheet over the cake and adjust it such that the good portion of the face comes right in the center.


Use cocoa powder, coffee powder, hot cocoa powder or any dark colored fine grain powder to sift over the stencil sheet onto the cake - I used cocoa powder and a regular tea strainer to slowly sift the cocoa powder all over the cut portions on the stencil making sure it gets a decent yet even layer of the powder.
Very carefully lift the stencil without shaking much and move it aside.


Voila!


We had a fun little celebration on our patio. Saurav was really surprised and said he felt like a filmstar. It was the perfect cake for his farewell and everyone had a great time!


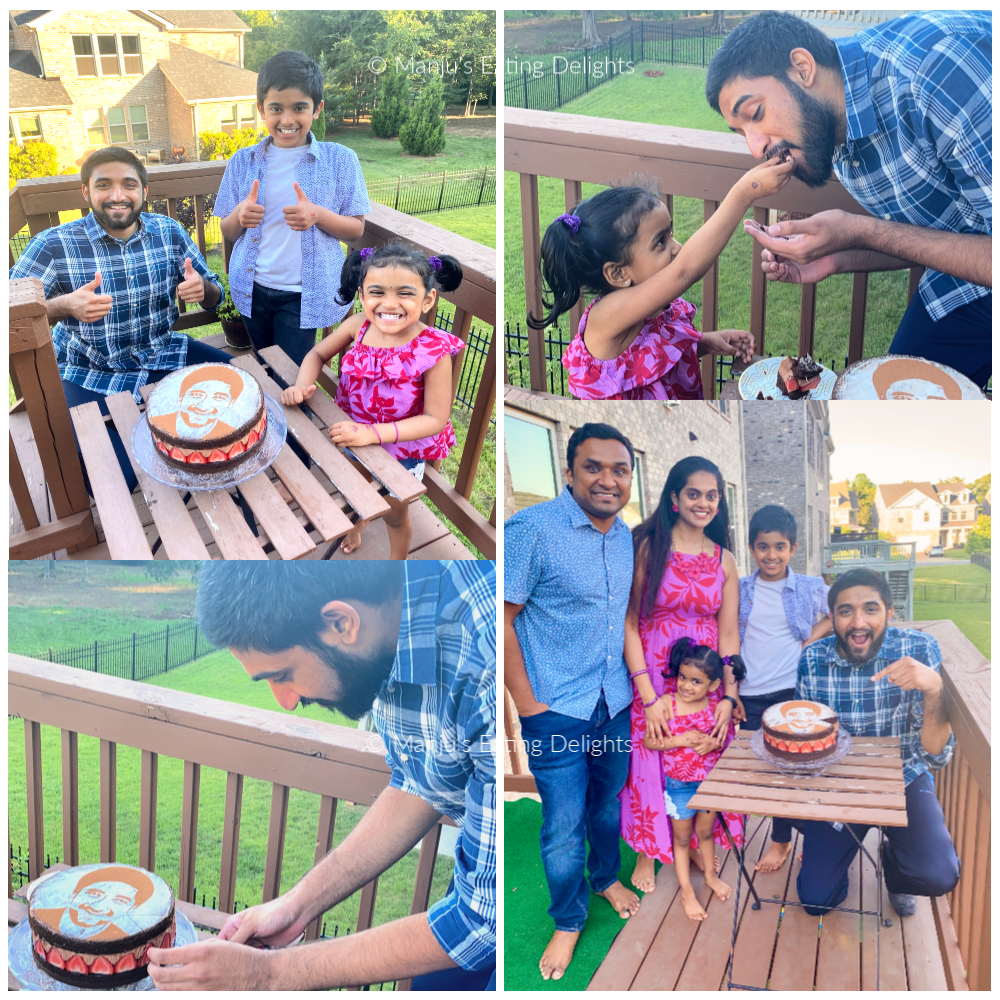
The cake was a huge hit. Saurav was all over himself seeing his portrait on a cake. The chocolate cake was moist and perfect with a small hint of orange flavor and the creamy mousse was so delicious, you couldn't stop enjoying it. We pretty much ate up half the cake and the kids were fighting for who got Saurav chetta's face ;-) 
We miss Saurav chetta so much and hope he will come back for a visit soon....

Do give this dessert and design a try for your next upcoming celebration and watch the bright smiles on your loved ones faces. This coming sunday is Father's Day...sounds like a perfect time eh!

-Manju

Sep 12, 2017

Pokémon themed birthday | Manav turns 6!


Hello dear all. The blog’s been still and inactive for a while now. I humbly apologize for the lack of activity here. Getting back to work plus, getting used to school routines and having a baby at home could be some valid reasons, but if I remember correctly I started this blog back in Oct 2011 when my firstborn was just 3 months old, mainly take some time out for myself, make new friends, express my feelings and views on the things happening around me and ofcourse to ramble on about the dishes that I tried and I wasn't very free to start with even then, but I still did blog a lot. 
I’ve had plenty of help from my in-laws and parents for over the past year after Mihi baby was born and yet I’ve just not been able to spare some time to this space, which is my virtual diary. I don’t like to make promises I can’t keep, but still I will try to atleast share 1-2 posts per month going forward and slowly get back into the rhythm of sharing my world with you all. Thank you for being so patient.

I wanted to share a fun and simple birthday party we had for my handsome first born, Manav...commonly referred to as Appu (at home) or lil’Appu (here on the blog). Not so little now I would say as he celebrated his 6th birthday on July 11th.  Am I a bit too late to even share this? :-D


He's been watching and playing a lot of Pokémon cartoons and games all summer long and so obviously wanted a Pokémon themed birthday. Although we had made separate plans to keep a bigger combined birthday party for Mihi and Appu a few weeks later, we decided to keep a small party in our backyard with just his friends from our community.

I decided to make the easiest Pokémon themed cake, which ofcourse was this Pikachu cake. It was a 5” tall delicious rich Chocolate Cake with Chocolate buttercream for my all-time chocolate loving boy. The outside was frosted with yellow colored vanilla buttercream. Pikachu’s facial features and ears were done with fondant.


To add to the theme we got some standing Pikachu and Charmander cutouts, Pokémon themed plates and blowouts from party city and some balloons in colors of red, yellow and black.
My lovely friend Swati, sent us some decorations, all the way from Minnesota which she made herself for her own son’s Pokemon themed birthday party…friends should be like her…Muah! We couldn’t use everything she sent, but I used the Pokeball shaped paper fans. There were also pokeball name tags and other decorations, which we couldn’t put up as it was too windy in the backyard.


Food was kept very simple and as per the birthday boys request of items, there were Chips, Lemonade, Fruits and Cake of course. I managed to arrange the fruits to look like a pokeball using strawberries, bananas and grapes (idea from Pinterest).


We had invited most of Appu's friends from our community to stop by for cake and snacks. The birthday boy was very happy and behaved like a good little 6 year old.  Mihi baby, just a week short of being a 1 year old was in good spirit too. Ofcourse she made good use of the opportunity to pull my hair...Lol!


Though it was a small and quick party everyone had fun. Kids enjoyed being goofy with the blowouts and smaller kids played with the balloons. Our basement is like a toy store, having a big collection of toys from all of Appu's previous birthdays..... so the kids had fun with those. Some of his friends stayed over longer and they played to their hearts content. So in all both Appu and his friends had a great time.


Mihi baby's favorite part was pulling her Appu chetta’s hair while we posed for some family pics and having grandparents here made the birthday even more special. My sister Maya sent him the Pokemon Tshirt and he was so happy to wear it.


And that, my dear all was our birthday boy's fun little Pokemon birthday. It was put together without much planning but Appu still remembers the details and that's what counts.

Our baby girl's birthday was next and it was the big 1 year old party....that's what is coming up next on the blog and I can't wait to share the details with you all.

Have a god day you all!

-Manju

Jul 29, 2014

Dinosaur Cake - a simple tutorial


I love experimenting with Appu’s b’day cakes. Because no matter how it turns up I know he’ll love it! I’m a self-taught cake decorator so I love to experiment, specially on the cakes I make for my family. It brings me both joy and also helps me explore various cake decorating skills.
Lil’Appu had a Dinosaur themed party for his 3rd b’day and the first thing he did was ask for a dinosaur birthday cake. Anybody who asked him about his b’day got the reply that ‘I’ll be getting a dinosaur b’day cake’ :-) He was so excited about it and I wanted it to look good.  

I decided to make my first ever carved 3D cake in the shape of a Stegosaurus dinosaur. 
I’m generally a little hesitant to do carved cakes for two reasons (1) what if the carving goes all wrong? (2) wastage of cake – although you could make cake pops with leftovers.  But I made up my mind this time and went ahead with my plans.

Here’s a simple tutorial with whatever pics I could manage to click while building my dino cake.


Step 1: Get the Stegosaurus spikes ready

Start with making the spikes for the Stegosaurus atleast a week in advance. I mixed some tylose powder in my marshmallow fondant but you can also use gumpaste for this as the spikes need to be hardened and stand straight on the cake. 

I used tear drop shaped cutters in three different sizes and then cut out the end from both sides to get a pointed tip at the bottom -> this will help to insert it into the cake. 
The cut out pieces can be either re-shaped or used just as is for the smaller spikes.
Make marks all over the spikes in straight lines to give it a rugged appearance and some texture.  Make several extras incase they break.
Plcae them on a baking sheet with wax paper to dry for atleast 4 days at room temperature.


I do not own an air-brush for spray coloring the cake, so this time I decided to give a try at using the Color Mist Spray colors by wilton and it worked like a charm :-) I spray misted the spikes on both sides with yellow and allowed them to dry. Then I painted the orange color in the middle using Orange luster dust mixed in vodka. Do this atleast 3 days before.


Step 2 : Bake, shape , fill and frost the cake

Ideally the body should be more oval-dome shaped than round-domed but I did not have an oval shaped pan so I used my regular round cake pans. 
For the body of the dino, I baked two 8” round cakes and one domed round cake in my small glass pyrex bowl.  Made Vanilla Buttercream and stacked them all together like this.

The flavor was a rich Chocolate-Espresso cake with lots of chocolate chips. 


To get an overall dome shape I gently carved out some cake from the top 8” cake (below the round domed cake) in a downward slant until it blended with the rest of the cake and it finally looked like this.


Frost the entire cake with vanilla buttercream. I just did a rough frosting as I was going to be covering the cake in fondant anyways, but make sure all gaps are filled in and the edges are quite smooth.


Step 3: Model the head, legs and tail (Can use Fondant, Cake or Rice Krispie treats)

I was planning to make cake-pop mix using the cake scraps after the carving to use for making the head,  legs and tail of the dino.  But I didn’t have to carve out a lot and had no extra cake on hand, so I used some leftover fondant that I had from doing a previous cake. So the Head, Tail and Legs of the dino were made with Fondant.   
(You could also use Rice-Krispie treats if you want)

The Stegosaurus head is small when compared to body and is sort of tapered with a beak like mouth.
The two front legs are smaller than the two back legs.
The tail is thick (specially where it joins the body) and its long and tapered at the end.


Step 4: Covering with Fondant 

Finally drape the whole cake including the head, legs and tail in fondant (I kneaded my fondant light green while making it) and trim away excess fondant.

Using a ball tool make holes for the eyes, small nostrils and make a shape for the mouth.
Again make vertical markings all over the body of the cake, the tail, head everywhere, to give it some texture and a scaly bodily appearance. Take care to not tear the fondant though.


I then Spray Misted the cake with Green :-) Let the cake dry out at room temp for 1-2 hrs.


Step 5: Place the spikes and give finishing touches

Now add the spikes on the cake body.  Starting with smaller spikes on the head, then bigger spikes in the center and smaller spikes again towards the tail, ending with pointed spikes at the end of the tail. I had to make small cuts with a knife to help insert the spikes into the body without breaking the spikes.
I made two small white balls for the eye-balls and used an edible marker to add the black pupil for the eyes.

Finally the finishing touches:
-- The cake board was coated with Chocolate buttercream for a muddy appearance.
-- Green grass  (vanilla buttercream colored with green) was piped all around the dino-cake to make it look as if the dino is resting in the grass. Used Wilton grass tip 233 for this.
-- Crushed graham cracker biscuits resembled sand and I added that all around the dino near the grass.


Just before the party I used some royal-icing to write ‘Happy Birthday Manav’ on the cake board. And this is how it looked.


The whole inspiration behind this dino cake was a tutorial I saw of a Stegosaurus cake by Montreal Confections and I just couldn't get it off my head :) so even though I was planning a T-Rex cake I finally decided to do a Stegosaurus with the pretty spikes on its body. 


Hope you liked the tutorial and I must confess this has been the easiest cake I have done so far. Even the detailing was pretty simple. If you ever make a dino cake please do share it with me. Would love to see your creations.

-Manju