Apr 16, 2020

No Knead Bread | Artisan Yeast Bread | Dutch Oven baked Bread


This is probably one of the easiest Bread recipes there ever is. This no Knead yeasty bread is every bit as true to it's title...really quick and easy to make. Just mix all the ingredients together and leave it to rise for about 3-4 hours and bake in a dutch oven closed with it's lid. We loved its beautiful crust and soft spongy texture that's perfect to dunk in some soup or sauce. It tasted somewhat like a sour dough bread.


After baking it reminded us of the crusty bread that is offered at one of our favorite Italian restaurants here. At the restaurant the crusty loaf is served with Balsamic Vinegar and Olive Oil and we love to season with some salt-pepper or parmesan cheese and enjoy the bread by dunking it into this mix. So my son did not waste any time in gathering up some of those and we ate half the loaf just as is....sooo good!

The rest of the loaf we dunked in some Chicken Noodle soup that I had made for dinner that night and my baby girl loved to munch on the slices with some Butter on it and the loaf didn't see another day as we polished it right off...lol!


Since I had a Dutch oven it was easy to bake this bread. If you do not have a Dutch oven here are some alternatives :
1. Using an Oven safe (upto 500F) Casserole dish with an Oven safe lid or cover with Aluminium Foil.
2. Using a baking pan to place the dough and place another oven safe pan under the baking pan filled with water. This steaming effect is required to get that lovely crust for the bread.
3. Using Oven safe heavy Metal pot with a lid.

I have followed the recipe from RecipeTinsEats. Fresh homemade bread tastes so good, you have to eat one to really know what that means. Do give this a try and you will be making it several times for sure.


Easy no knead Yeast Bread

You’ll Need
3 cups All-purpose Flour (bread flour or plain)
2 tsp instant or active dry yeast
2 tsp salt
1.5 cups very warm water (ie up to 55°C/130°F)
1.5 Tablespoon flour, for dusting and shaping dough

Directions
Make the dough:
1. Mix flour, yeast and salt in a large bowl. Add water (atleast 130F warm water), then use the handle of a wooden spoon to mix until all the flour is incorporated. Dough will be wet and sloppy.
2. Cover the bowl with cling wrap or plate, leave it on counter (or inside the oven with lights on) for 2-3 hours or until it doubles in volume.
3. Once dough has risen well, Preheat oven to 450F and place a dutch oven in oven with lid on while it is preheating (I used my Le Creuset Oval shaped dutch oven).

Shape the dough:
1. Sprinkle counter top with 1 Tablespoon flour. Scrape dough onto the counter top and sprinkle top of the dough with ½ Tablespoon flour.
2. Fold the sides of the dough inwards to roughly form a roundish shape.

Transfer to parchment paper:
Transfer the dough to the center of the parchment paper. Shape it again if needed to form a round or oval shaped dough. Dough may be sticky.

Baking the bread in Dutch Oven:
1. Remove the hot dutch oven from oven. Place the dough in parchment paper into the dutch oven and place lid on.
2. Bake for 30 minutes covered with lid, then remove lid and bake for 12 minutes or until outer crust looks deep golden and crispy.
3. Cool on rack for 10 minutes before slicing.

Notes:
1. Make sure the water used to make the dough is NOT boiling or super-hot. 120F-130F is recommended. This temp is good for proofing the yeast.
2. Dough can be prepared in morning and baked in evening , similarly it can be made at night, left to rise, refrigerated and baked in morning. When taking out of fridge, let it sit out until it loses its chill and then bake.


You can find other bread recipes on the blog in the 'My Recipes' section but here are 2 of my favorite:
Focaccia with Herbed oil


Herbs and Cheese Garlic Pull Apart Bread


-Manju

Apr 13, 2020

Mutton Biriyani | Pressure Cooker method


We are Biriyani lovers in the house and it is a must have item for any special occasion. My go to recipe is usually my mom's chicken biriyani but every now and then we love to try new kinds as well. Manish wanted Mutton Biriyani for his special birthday and so that's what we had.


My brother-in-law once shared a FB recipe post from HomeCooking for this Pressure cooker Mutton biriyani and it looked very easy, so I gave it a try and I have to say, it came out great. I have made this recipe about 3-4 times now and it always turns out great. I love to make it spicy and the kids don't seem to mind. They love any Biriyani that I make. 

Just see how beautiful each grain of rice looks and those beautiful mutton pieces, that just melts in the mouth. Cooking in the pressure cooker is a breeze and the rice is mixed in with the gravy so it gets beautifully flavored and plumped up with all that masala.


I should try Shrimp Biriyani next...any excuse is a good excuse to have some biriyani...Lol!

Serve Mutton Biriyani with Raita, Pappad and some tangy pickle. I made my raita with plain Yogurt mixed together with chopped onions, green chilies, carrots, cucumber, corriander leaves, salt and pepper. 
This pressure cooker recipe always turns out perfect for me so do give it a try. 


Mutton Biriyani in Pressure Cooker
Serves 4

You’ll Need
To marinate
3 lbs Mutton
1 teaspoon Turmeric powder
2 teaspoons Red Chilli powder
Salt to taste

For Masala paste
1 large Onion
6 Garlic cloves
2” piece Ginger
3 Green Chillies
6 pieces dry Red chilli
1 Tablespoon Grated Coconut
½ cup Mint Leaves
½ cup Coriander leaves
1 teaspoon Coriander powder
Little water

For Pressure Cooking
5 Litre Pressure Cooker
2 Tablespoons Ghee or Butter
1 Tablespoon Oil
Whole Spices : 2 Cinnamon sticks, 3 Cardamom pods, 5 Cloves, 5 whole Black pepper, 1 Star Anise, 2 Bay Leaves
4 Onions (thinly sliced)
3 Tomatoes (chopped)
3 cups Diluted Coconut Milk
3 cups Basmati Rice (soaked in water for 30mins)
1 cup Coriander Leaves (chopped)
1 cup Mint Leaves (chopped)

Directions:
Marinate the Mutton pieces
In a bowl add the mutton pieces and the spices and marinate it for 30minutes.

Soak the rice
Measure and wash 3 cups of Basmati Rice in a bowl . Allow it to soak for atleast 30 minutes before cooking.

Make Masala paste
Add all the ingredients under Masala paste in a grinder and grind it to a fine paste using little water if needed.

Pressure cooking the Biriyani
1. Heat 2 Tablespoons of Ghee/Butter and 1 Tablespoon of Oil in the Pressure cooker.
2. Add all the whole spices and give it a sauté.
3. Add the sliced onions and sauté until the onions caramelize and turn golden brown.
4. Add the chopped tomatoes and the ground masala paste and sauté everything until the tomatoes soften.
5. Add the marinated Mutton pieces and mix it with the Onion masala.
6. Add 3 cups of Diluted Coconut Milk, 1 cup each of chopped Coriander and Mint Leaves and stir everything.
7. Season with enough salt, cover with lid, place the whistle and pressure cook for 6-7 whistles or until the mutton is cooked.
8. Once the cooker cools down, open the pressure cooker, make sure mutton pieces are cooked, season again if needed and then add the soaked Basmati rice and mix gently.
9. Cover with pressure cooker lid and wait for steam to come out (water starts coming off the whistle spout) and then place the whistle and cook for 7 mins. (no need for the whistle to blow)
10. Turn off the heat and let the cooker rest for about 5 mins before opening it.

Notes:
1. For Diluted Coconut Milk: I used 1 14oz can of coconut milk, which is about 2 ½ cups coconut milk, so I added 2 ½ cups Coconut milk + ½ cup water for the liquid. 
2. Wait for pressure cooker to cool down always before trying to open it after cooking. Or run cold water over the cooker with the whistle on it until the pressure comes down and then attempt opening the lid. Else it can be very dangerous!
3. The recipe can be easily modified based on your need. Just make sure the cups of rice = cups of diluted coconut milk and adjust the mutton quantity and spices accordingly. (I have made with 4 cups of rice and 4 cups of diluted coconut milk)
4. If you do not want to use Coconut Milk, feel free to use Water. 


Recipe Source: HomeCooking


Here are some other Biriyani recipes that I have on the blog which are just as good, click on the recipe title to get to the recipe:

Chicken Biriyani


Fish Biriyani


Lauki Biriyani (veg option)


Other recipe with Mutton:
Kerala style Mutton Roast


-Manju

Apr 8, 2020

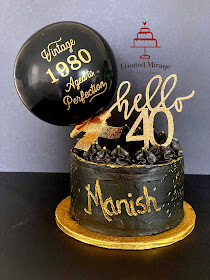
Apple Toffee Crunch Cake with Cinnamon Buttercream | Manish's special Birthday!


End of March is always a fun time for us...It's the start of spring and we always get to celebrate it every year due to Manish's birthday. We are all still staying at home, not going out anywhere or gathering with friends due to the Coronavirus Pandemic, but still it was a very special day for us and we celebrated it the best way we could. Manish, my beloved hus and best friend celebrated a milestone 40th birthday! Woohoo!!

I had planned something grand and a had group of good friends ready to help execute it, but it all came crashing down few weeks before due to the coronavirus pandemic and stay at home orders and we had to cancel all the plans. I still did want him to have a lovely day with some fun memories. So with the help of his sister and some friends we came up with a fun video of all his childhood to recent pictures and Birthday wishes from relatives to friends. He was truly surprised and had a big wide smile when he saw the video and wishes.

We put up a fun little photo backdrop to take pics during the cake cutting and few of his friends and our family called in via Zoom video call, which was also a surprise. I kind of tried to keep the theme Black and Gold, however my Appu did not have a suitable black top so he settled for a dark navy blue shirt and the rest of us did our best to wear shades of Black and Gold ;-)
We had a virtual party during cake cutting, spent time catching up with friends and had lots of laughs. He wanted Biryani for lunch, so after all the fun I made him a nice and spicy Mutton Biryani. Will share the recipe soon. Appu and Mihi made him some hand drawn b'day cards and in all it was a nice day.


He wanted an elegant looking cake in some new fancy flavors. What he really wanted was one of those 'Rocky Mountain Chocolate Factory' style gourmet Chocolate caramel Apples, but we couldn't go out now to buy those...so we decided to come up with a cake that somewhat mimics that flavor along with a crunchy bite. So he got an elegant Black and Gold themed Birthday cake in an Apple Toffee crunch flavor with a Cinnamon Buttercream filling inside and a Chocolate Cinnamon Buttercream frosting outside. Yumm!

Here are some pics of the cake in the making:
Freshly baked Apple cakes...cooling 


Walnut Crumble and Toffee Sauce


Fresh Apple cake , Toffee Sauce, Walnut Crumble, simple syrup and Cinnamon Buttercream


On the first cake layer: Create a buttercream dam and spread 1 Tblsp Toffee sauce


Spread Cinnamon Buttercream over the toffee sauce and add the Walnut crumble


Repeat above steps with all the layers of cake


Crumb coat with Cinnamon buttercream and allow cake to chill in refrigerator for 20mins


Apply final coating of Buttercream and decorate
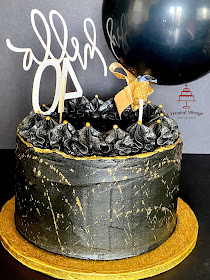
I decorated the cake in black colored Chocolate Cinnamon buttercream. I did not create a very smooth finish on purpose and gave the cake a rustic, rugged finish with a lip of buttercream coming over the top of the cake.


For the front of the cake I tried doing the cake stamp technique on buttercream but hand drawn and wrote his name and painted inside it with edible gold. Gold was painted on to the cake trim.


For the top, back and sides of the cake I sprayed on edible Gold with a paint brush. The added some buttercream swirls all around the top and placed a sugar Gold pearl on each swirl.
A black Balloon with some fun wordings and a golden 'Hello Forty' cake topper added the final touches.

This truly is a celebration worthy cake for it has a bunch of little components to prep first before it all comes together. The cake is pretty sweet due to the apple in the batter, the toffee sauce and the sweet buttercream, but it's so worth it!
First I started with baking the cake layers and then I made the Toffee crumble and Toffee sauce. All these components needs to be cooled entirely. Finally the Cinnamon Buttercream and then we are ready to start with assembling the cake.


I followed Tessa Huff's recipe from The Cake Blog and substituted walnuts for pecans as that's what I had at hand. It turned out perfect! The Cinnamon Buttercream recipe below is my own.


Apple Toffee Crunch Cake
Fresh Apple cake with Walnut crumble, Toffee sauce and Cinnamon buttercream

You’ll Need
For the Apple Cake:
3 cups All-purpose flour, divided
2 teaspoon Baking Powder
1 teaspoon Cinnamon
Pinch of Salt
1 cup unsalted Butter, softened
2 cups granulated Sugar
2 teaspoons Vanilla extract
4 large Eggs
1 cup Whole Milk
3 cups peeled and diced Apples ( I used 2 Gala Apples)
½ cup chopped Walnuts

For the Walnut Crumble:
½ cup quick cooking Oats
¼ cup chopped Walnuts
¼ cup Brown Sugar
¼ cup All-purpose flour
3 tablespoons unsalted Butter, softened
2 tablespoons Honey
Small pinch of Salt

For the Toffee Sauce:
5 Tablespoons unsalted Butter
¾ cup Brown Sugar
1 Tablespoon light/dark Corn syrup
⅓ cup Heavy Cream/Whole Milk
1 teaspoon Vanilla
small pinch Salt

For Cinnamon Buttercream
1 ½ cups Butter (3 sticks)
6 cups Confectioners Sugar
1 teaspoon Cinnamon powder
½ teaspoon Vanilla extract
2 or 3  Tablespoon Milk/Water

Directions:
Make the Apple Cake: 
1. Pre-heat oven to 350 F. Grease the bottoms of two 8-inch pans. Line the bottoms with parchment, then grease and flour the parchment and sides of the pans. Set aside.
2. Remove 1/3 cup flour and set aside.
3. Sift together the remaining flour, baking powder, cinnamon, and salt. Set aside.
4. Using an electric mixer, beat the butter until smooth, then add the sugar and mix on medium speed together until light and fluffy. Add the vanilla extract.
5. Mix in the eggs, one at a time. Stop the mixer and scrape down the sides of the bowl.
6. Add half the dry ingredients followed by milk and then add in the second half of the dry ingredients and mix until just combined.
7. Toss the diced apples and walnuts with the reserved flour. Fold in the apples and walnuts into the cake batter until evenly distributed.
8. Divide the batter between the two pans. Bake for 32-35 minutes until golden on top and a skewer inserted into the center of the cakes comes out clean. (Mine actually baked for about 50-55 mins, so keep watching until center is fully baked)
9. Cool on a wire rack for 15 minutes before removing the cakes from their pans and cool completely.

Make the Walnut Crunch:
1. Raise the oven temperature to 375 F. Line a baking sheet with parchment or silicone baking mat and set aside.
2. Combine all of the ingredients together in a medium bowl. Stir together with a wooden spoon.
3. Spread the mixture out on the prepared pan. Bake for 8 to 10 minutes, stirring halfway, until the crumbles are golden brown. Let cool and break into small pieces before use. (I baked for about 20 mins turning the crumble every 2 mins until it was nice and golden brown)
Note: I pulsed the crumble slightly in the food processor for smaller chunks.

Make the Toffee Sauce:
1. Melt the butter in a saucepan over medium heat. Once melted, stir in the brown sugar and corn syrup. 
2. Turn the heat up to high. While stirring with a wooden spoon, bring the mixture up a boil and cook for about 5 minutes or until the sugar dissolves.
3. Remove from the heat and carefully whisk in the cream. Reduce the heat to low. Place the saucepan back on the stove and whisk, slowly but constantly. Simmer for about 8 minutes.
4. Remove from the heat and add in vanilla extract and a pinch of salt. Place in a heat-safe container and allow to cool and thicken.

Make the Cinnamon Buttercream:
1. Beat the Butter until smooth and creamy.
2. Add the powdered sugar in batches until it is fully incorporated with the butter.
3. Add Cinnamon powder, Vanilla extract and milk as needed to combine the buttercream and make it smooth and creamy.

Assemble the Cake:
1. After the cakes have completely cooled, carefully slice them in half horizontally with a long serrated knife.  This will give 4 beautiful layers of cake.
2. Place one of the bottom layers on a cake board.
3. Spread on about 1 tablespoon of the Toffee sauce on the cake and then spread the buttercream in ½" or ¼” thickness and sprinkle with ½ cup of the crumble.
4. Top with the next layer of cake and repeat.
5. Crumb coat the stacked cake with the cinnamon buttercream and set in the refrigerator to chill for 15 to 20 minutes. Then add the final coat of Buttercream and decorate as you prefer. Chill one last time until everything is set.

Notes:
1. If the Toffee sauce is too thick, slightly warm it in the microwave.
2. Pulse the Walnut crunch slightly in the food processor for smaller crumbles, else it will be difficult to slice the cake.
3. If the top of the cake starts browning while baking, cover it with a greased aluminium foil until it gets fully baked.
4. After filling in all the cake layers, I added some cocoa powder and black color to the remaining cinnamon buttercream to frost the outside of my cake to give it that black look.
5. You can divide the cake batter into three 8” pans and make  3x 8” cakes instead, baking time will vary.
6. If you prefer to not add the Toffee sauce in between cake layers, it would go very well on top of the cake as a drip or can be spooned over the cake slice when being eaten, maybe with a scoop of vanilla ice cream...yumm!


Here are some more cakes I've blogged with recipes for Manish's earlier bday celebrations, just click on the title to go to the recipe:

Tres Leches Cake with Lychee mousse filling and Chocolate Collar


Vanilla Sponge Cake with Raspberry Mousse
 

Lemon Cake with Mango Curd Filling and Lemon Buttercream


-Manju