Showing posts with label Buttercream frosting. Show all posts

Apr 1, 2015

A Spring B'day for my buddy!


It's a beautiful day today. Yes, a lovely 78F as I write this, no not fooling ya (as it's April Fool's day too today) and I'm just so blogging happy about that :-) We went for a lovely walk in the evening and Appu happily exclaimed "Mummy, you are not wearing jacket!!" I just love days like this and can't wait for more jacketless days.
I just took an unexpected break from blogging the entire past month for no particular reason, but I have to say the extra 'me' time felt very good....March flew by in a blink and trust me so will April.

As always March 29th turned out be a a very special and beautiful day, hubby darling turned a year older and it's been 3 glorious years in our lovely home. I baked and decorated a spring themed cake for hubby dear and planned for a fun potluck with our closest friends.
Climate-wise it was a bit cold so couldn't plan any outdoor activities, so we enjoyed indoors with the warm company of our friends, awesome food, wine and a fruity colorful cake.


Spring is round the corner and I'm jolly excited about it. I have always wanted to try making a Spring themed cake with some new buttercream decorating techniques and also try my hand at baking a citrusy Lemon cake for so long and Manish's b'day seemed a perfect occasion to try that out. Another thing I've wanted to try was fruit curd.....so ta-da, all in one....Lemon Cake with a tangy-sweet Mango curd filling and Yellow ombre buttercream sides with sunflowers and roses to symbolize the beginning of colorful Spring.
As the cake turned out too flowery for a guy I promised Manish a 'man-ish' cake next year...like a burger cake or beer cake or something non-flowery :-P :-P

I'll share an entire detailed post of the cake explaining how to make a layer cake, crumb-coating and of-course the recipe in my next blog post.....for today I'm just sharing these snaps.

The kids were having a blast in our basement and did not bother to come up for cake cutting! Appu sent his spiderman toy with a friend who went to call the kids saying spider-man represented him...oh well! :-) But we managed a quick pic after cake cutting while he came up to check what we were upto and ofcourse, for his share of cake...hehe!


The response for the cake flavor was mixed, some of our friends really enjoyed the refreshing citrus flavored cake, while others weren't a fan of it though they agreed that the cake was really good and they all loved the roses and sunflowers. Manish and I personally loved the cake flavor and even my colleagues enjoyed it when I took some to office but in all it was certainly a new flavor from the usual chocolate or vanilla flavors.

So more in my next blog post, which will be more fun with more cake pictures and detailed tutorial on how I made this cake with recipe et all....

-Manju 

May 7, 2014

The making of a Full Sheet Cake at home


What a month April had been...phew! Crazy busy and my oven had been baking cakes and goodies non-stop :-) Thankfully all my projects turned out fine and now its time to share them here one-by-one...so there'll be back-to-back cakes and treats being posted here. Not a bad thing is it?

A cake as big as a full sheet deserves a full length coverage right? ;-) So here goes...

Earlier last month the regional community that Manish and I are part of conducted a fun competition event just for kids of various age groups. While deciding upon the food, snacks and drinks options I was asked if I could make a Sheet cake for the kids. I have to be honest when I say I just jumped at the opportunity ;-) And another honest fact, I have never even seen how big a full sheet cake is in real life! 
The event named 'Varnolsavam' had a logo competition for the kids for which several kids submitted their entries and one was finally selected as the winning logo and since I couldn't come up with any other interesting ideas I decided to draw the winning logo on top of the cake to symbolize the event. It was a tough call considering how poor an artist I am, but I went ahead with it. 
So today I'll share how I went ahead making a whole sheet cake at home and my fun experience at drawing on a cake. Ready?? :-)

Let's start with some measurement knowledge on sheet cake sizes. I'm talking about the sheet cakes that are atleast 2" high in thickness (not the thin jelly roll sheet cakes)
Quarter sheet cake - 9" x 13" x 2"
One-third sheet cake - 11" x 15"x 2"
Half sheet Cake - 12" x 18" x 2"
Full Sheet Cake - 18" x 24" x 2"

Our regular home ovens are big enough to support upto a half sheet cake pan. So I had to make two half sheets to get my full sheet cake. 

I baked the cakes a day in advance and made around 4 batches of my favorite rich & moist Chocolate cake batter for 1 Half sheet cake, so in total made 8 batches of cake batter for both the half sheet cakes :-) Once baked and cooled, I placed them on their cooling racks itself , wrapped them in foil and refrigerated them. 

Then I made a sturdy Cake base: Used a 2ft x 2ft plywood board and covered it in aluminium foil. Over that I taped together two half sheet cake boards and stuck it on top of the foil-covered plywood board.
The cakes were then carefully placed on the cake board and tightly pressed together (I din't use any buttercream to stick them together)


Then I made my favorite American Vanilla Buttercream. For a cake this huge I needed lots of buttercream. I just did a blind math and decided to make 5 batches of this recipe (Thankfully I decided not to torte and fill the cake....imagine the amount of buttercream I would had to make then!!) 


Buttercream and Cake was ready, now its time to frost this baby....


The below pic is just to show you how big this cake was to frost! It took me a good 1 hr or more to get it quite smooth and straight. I used my offset spatula and later a bench scraper along with hot water for this.


Later piped a neat border with a hot orange shade (mixed orange and lemon yellow gel colors into my vanilla buttercream until I got desired color)


Everything good so far....Next was the daunting task in front of me, paint the logo on this vast cake canvas! 

First let's hear a short-story on my art-skills ;-P
I remember in my 8th grade, we had a very strict arts teacher who was also our PT teacher. It was sure that we would all get negative grades in his arts class as he was never happy with anything we drew. 
But when the final scores came, he gave me the highest marks...ME!! of all the artistic kids in class!  Obviously the kids in my class went scrambling over my arts book to see what extraordinary pictures I had drawn to bag such high grades, and there was nothing even close to extraordinary.....just some colors and some shapes that remotely looked like human beings or cars or trees :-P 
When the kids in my class asked him why I was given the highest grade (now pls imagine me sitting in my seat, looking very very pink, firstly 'coz I was the happiest girl in class and secondly due to a slight shame as some of my classmates din't think I deserved it), he gave the reason that I was the only girl in class who was always punctual with my arts assignments and always neat & tidy with my work. Hmmmmm....nothing to do with my art work I know, but well, that was his reason for giving me the highest grades. My classmates went off mumbling under their breath, totally wanting to disagree with him...but hey, here I am today sharing my only proud 'art' moment...hehe. Otherwise I'm no artist at all and cannot even draw a bird properly! Anyways...

The original logo was beautifully drawn by a talented 12 year old girl, Namitha. The event being a kid's competition event on various activities like dancing, singing, essay writing, painting, coloring, malayalam and english speech etc for kids of ages 3-16 yrs. Namitha beautifully captured the entire essence of the event on her logo and I knew I had to do justice to this gorgeous visualization of hers.

Varnolsavam Logo - drawn by Namitha
I kept pondering a bit as to the best option to draw on a butercream cake , then it struck me...Glitter Gel colors! I din't have all the needed colors so off I sent Manish to get me all the colors on the logo...and he did just as told...hehe!
I used a toothpick to make very mild markings on the cake where each part of the picture went and colored inside it with the gel colors. This was how it looked in the end. Phew! This took me about 2 hrs, considering my drawing skills and the fact that I couldn't risk much ;-)


And just when we thought everything was good we realised that the large box Manish got from Costco to fit the cake wasn't sturdy enough and was too big to fit in our car trunk! Then came our friends to the rescue, they sat down with Manish and re-sized the box and gave it enough padding, converting it to a sturdy cake box, that could bear the weight of the cake and also fit in our car trunk ;-) Thanks to all who helped!!

All things were finally sorted out. Other than a hairline crack in the buttercream that happened while placing the cake into the cake box and finally into the car, there were no other issues and it landed safely at the venue.


The kids were super excited as they crowded around the cake waiting for the cake cutting and ofcourse their slice....Namitha insisted that I also join in the cake cutting and we cut the cake together. Some wanted the slice with orange cream, some wanted a slice with the gel colors , while other's just wanted a big slice ;-) It was a lot of fun and both kids and adults enjoyed the cake, me too! And there was enough cake for more than one serving. And my lil'Appu couldn't have given a bigger smile while enjoying his slice :-)
(below pics are courtesy of my friend Anjana, who graciously took most of the pics at the event)

In all it was super fun event and this experience of making such a large cake and then sharing it with the kids is what's going to stay in my heart forever!

Hopefully you enjoyed reading this post and now you know its not too hard to make a full-sheet cake at home!!

More gorgeous treats to follow, so keep watching out this space or my Facebook Page for updates.

-Manju

Jul 25, 2013

Blue ombre White Cake, Gelatin bubbles and Buttercream Shells...


A birthday to me is never complete without a Cake. Maybe because that’s how I grew up celebrating my birthdays and there was always cake.  Last year for my lil’Appu’s b’day I made my first two tier cake with Fondant decorations. As the party was a Rainbow theme I wanted to make the popular seven colored rainbow Cake. But I refused to bake a cake filled with so much artificial color for a baby’s birthday! So finally baked up my most  favorite Chocolate Banana cake with Chocolate buttercream and it was a huge hit!!

But I have always wanted to try a colorful layer cake…so this time with the help and tips from few blogger friends, I decided to go for an Ombre cake – shades from dark tone to lighter tone of the same color. And I convinced myself that it was only a little bit of artificial color in each layer :-) 
Also I decided against doing a Tiered/ Fondant cake this time…Single tier cakes can look just as pretty and elegant and did you know, Buttercream is the new Fondant! :-P


Appu’s Second birthday was a Bubble theme, so I went  for a Blue-White Ombre effect. For the cake flavor I decided to try a White Cake recipe I found at Epicurious. I had initially planned to make Three 10” layers. But I felt for a 10” inch cake, the batter was less to be divided into three, so I double the cake batter recipe and divided them equally into four cake pans - to obtain three shades of blue and one white layer .


The blue colors were obtained by using Wilton’s Royal Blue icing gel mixed with the cake batter in different quantities. The White layer is the actual White cake itself and trust me it definitely does look White…

Now coming to the decoration, this is where I get all excited and a zillion ideas float through my head. A bubble themed party needed a bubble effect on the cake, right!! I had anyway decided to go for buttercream decoration and was still making up my mind on the pattern when I thought it would be nice to make Gelatin bubbles as toppers.

My initial plan was to make few Blue, White and Golden shaded balls in different sizes and keep them all around and on top of the cake (like floating bubbles) , but did I tell you I had cooked the entire dinner for the party myself (with parents to help ofcourse). So after a whole day of cooking, I was terribly exhausted and had almost dropped my plans of making these. But not willing to quit, after everyone went to bed (almost midnight), I decided to try to make a few gelatin balls atleast in one color and made these Blue ones in different sizes - I added a tiny bit of ‘Blue Luster Dust’ to the gelatin-water mix to get the blue balls.

The technique calls for blowing up small balloons (water balloons are best) in different sizes. The balloons are greased and then dipped in slightly bloomed, melted and colored gelatin until it coats the balloon nicely and left overnight to dry. Once hardened, just burst the balloon slowly from the end and you get nice colored gelatin bubbles. Sounds easy? But it was a hell of a task (mayb coz my brain was so dead tired) and I would say I somehow managed to hold my patience together :-)
The original technique called for propping up the gelatin coated balloons on lollipop sticks to dry, but I had cake pops planned for my lollipop sticks ;-), so I just waited for the gelatin to dry up a bit and tied up the balloon end on a string loop and hung them down my kitchen cupboard knobs overnight to harden ;-) !

Here’s a link to theoriginal technique if you ever wanna try. (These almost feel like plastic once hardened and it’s not edible, just so you know)

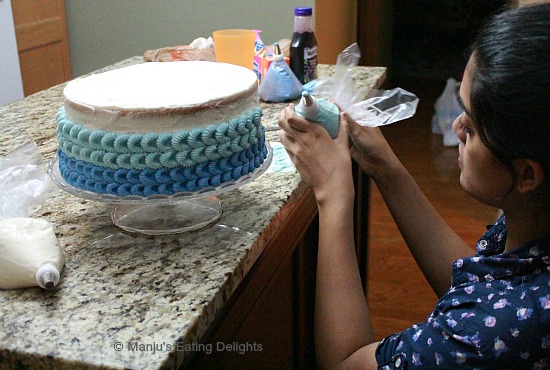
Next came the buttercream decoration.  I wasn’t sure what to do for a bubble effect and also to impart the ombre effect. I have loved the petal or fish scale like design that you’ll find all over the internet on many cakes. But I wanted it be different. So instead of buying a round tip, I bought a start tip (Wilton Tip# 199) to make the pattern around the cake, and it almost resembled Shells, so I’m calling it Shell pattern!


Getting the Shell Pattern is really so easy. I have explained it here in the easiest way that I can think of. ( I took random pics while frosting late at night, so the pics may not be the best but understandable nevertheless )


How to obtain Shell Pattern with Buttercream using Wilton Tip # 199

The first and foremost step is to make a good pipeable consistency Buttercream Frosting (neither too thick nor too thin)
I've used my Vanilla Buttercream recipe and made 3 batches of it  (1 batch for filling and crumb coating the cake, next 2 batches for final shell decoration)

Next important step after filling the layers with frosting and crumb coating the cake is to Refrigerate for 30mins

Then decorate as follows -

Step 1 : Add Frosting/Icing of desired color to piping bag(s) and attach the star tip securely. 
Step 2 : Take the piping bag with Icing of desired color and apply gentle pressure to release a drop (of required size) of the icing on the side of the cake.


Step 3 : Using a thin metal spatula or butter knife, gently wipe the frosting horizontally creating a depression in the centre and a tail of buttercream to the right. Clean the butterknife on a papertowel after each shell is made.

Step 4 : Again add a drop of the icing on the tail portion but close to the center depression(as shown in pic at Step 2)  and continue by wiping it horizontally until you finish the entire cake.
(Remember to Clean the butterknife/spatula on a papertowel after each shell is made)

 If using different shades of icing, change the Icing colors as desired for your decoration.

If you feel the buttercream frosting is getting thinner due to heat from our hands, refrigerate for 10 mins and continue.


Yes, it’s a bit time taking, but the end result is fabulous and I guess this cake almost has more than a 100 shells around it, don’t you think? ;-)

Here’s me doing the shell pattern :-) Pic taken by daddy and no matter how tired I am, I always have the patience and presence of mind to decorate a cake…It’s my absolute favorite part of any cake making!!

Before I stop rambling let me tell you, this White Cake recipe is a stunner. The flavor is huge and the texture is just perfect and color is very much WHITE. And I’m glad I decided to give it a try. 
The only things that bothered me was it uses only egg whites, 6 of them (what am I supposed to do with the leftover 6 egg yolks? ) and as I had doubled the cake recipe, I was left with 12 egg yolks *SIGH* !! We finally made scrambled egg yolks the next day to finish them off…Lol!

I was very adamant that everyone should get all the four ombre layers, so instead of cutting into wedges I cut the cake into thin slices so that it wasn’t too big to fill one’s tummy, but enough to enjoy a full slice with all 4 layers ;-)


‘White Cake’ 

Recipe source: Epicurious (taken from Cook’s Illutsrated)

You’ll need
Cake Flour- 2 ¼ cups
Milk (at room temperature) - 1 cup
Egg whites (at room temperature) - 6
Almond extract - 2 tsp  
Vanilla extract - 1 tsp
Granulated Sugar - 1 ¾  cups
Baking powder -  4 tsp
Unsalted Butter (softened but still cool) - 1½  sticks
Salt - 1 tsp  

Directions
1.  Pre-heat oven to 350F. Grease with butter and dust with flour two 9-inch cake pans.
2.  Make sure milk and eggs are room temperature.
3.  Pour milk, egg whites, and extracts into medium bowl and mix with fork until blended.
4.  Mix cake flour, sugar, baking powder, and salt in bowl of electric mixer at slow speed.
5.  Cut butter into small cubes and add. Continue beating on low for about 1-2 minutes.
6.  Add all but 1/2 cup of milk mixture to flour mixture and beat at medium speed for 1 1/2 minutes. Add remaining 1/2 cup of milk mixture and beat for another 1 minute.
7.  Pour batter evenly between the two prepared cake pans.
8.  Bake until toothpick inserted in the center comes out clean, 23 to 25 minutes.
9.  Allow cake to cool to room temperature and invert to a cooling rack until it reaches room tempertaure.
10.  Frost and decorate as desired

Modifications I made:
1. I used 10-inch cakes pans. I had doubled the cake recipe, and distributed the batter evenly into 4 cake pans.
2. My baking time for each cake layer was reduced to 21-23 minutes.
3. I used 2 tsp vanilla extract + 1 tsp milk (to replace the 2tsp almond extract + 1tsp vanilla extract) - too much vanilla extract will reduce the White color for the cake, so use less or use colorless Vanilla extract.
4. I always add only a pinch of salt in all my cakes – I hate salty cakes, even the slightest hint!


Lil’Appu now thinks any cake in front of him is meant to be cut by singing ‘Happy U uuuuu’ and as you see here, he again cuts his cake slice the next day and ate the whole thing too ;-)

I try to keep my posts short but I have so much to share…Lol!  And I don't know if I've missed out on anything, so if you have any questions feel free to Contact Me or come over to my Facebook page.

Up next on MED will be the gorgeous Cake Pops I made. So come back soon…


-Manju