Showing posts with label White Cake. Show all posts

Feb 25, 2015

Let it Go....a Frozen themed Queen Elsa Doll Cake


I’m super excited about the cake I’m sharing with you all today. I have always wanted to do a doll cake. When my friend’s friend asked me if I can help her with the cake for her daughter’s birthday, the only details she told me was it was going to be a Frozen Princess themed party. I heard ‘princess’ and ‘frozen theme’ and instantly suggested that it would be great to do a queen Elsa doll cake and even her daughter loved the idea.  

The day I bought the Queen Elsa doll,  I was super excited and trust me was tempted to play with it ;-) No wonder kids love barbie dolls and all such pretty dolls. They are just gorgeous!

When I think of the movie Frozen the scene that comes to my mind is when Queen Elsa sings ‘Let it Go’ and builds her beautiful snow castle. I wanted my Queen Elsa to be standing in that pose. 


It was love at first sight when I saw Ipoh Bakery's fashionista doll cakes. I was awed at the beauty of William’s creations and knew that if I ever got a chance at making  a doll cake then this would be it.  William himself was so kind and helped me with few questions I had before I started making the cake.

What makes this cake stand out from the usual doll cakes is that instead of the doll standing wearing her pretty princess gown which is like an inverted dome (this forms the cake), here the doll appears as if its walking forward pulling her beautiful skirt or cape forward. One of her legs are exposed giving it a stylish yet elegant touch and there’s movement and grace and looks so fashionable. The skirt/cape forming the cake.

The only challenge for me was carving the cake to form a smooth skirt that’s following Queen Elsa as she conjures up her Snow castle.  I’m not a fan of carving and wasting precious cake slices. So I made sure each and every carved cake piece was added to the skirt in the best way possible attached with buttercream, giving an overall smooth finish.


The doll is an actual Queen Elsa Doll, which is the only non-edible portion of the cake. The top of the skirt from where the edible portion of the cake starts was 5.5" tall and it extends to be almost 15" long.  


I baked my favorite White Velvet Cake and frosted and filled the cake with creamy Nutella Buttercream…yumm! Covered in homemade marshmallow fondant that I shaded Teal.  

After making the pleats of the skirt I added some final touches in the form of snowflakes and added some shine to the dress and snowflakes using luster dust. 

I left the cake board silver itself as I felt the color combo of Teal-White-Silver looked good for a Frozen theme. Eileen's name and age were placed on snowflakes shimmered with luster dust. I also placed snowflakes in Queen Elsa's palms to imitate the scene in the movie where she conjures snowflakes with her bare hands.


Little Eileen had a wonderful Frozen Princess themed party and my friend said that everyone was just mesmerized with the cake!  ;-) 

So what do you all think?....please do share you feedback. The pics were all taken at night as the party was during the day....waiting to see some pics from the party as well :-)

-Manju

Jan 15, 2015

Jungle Animals themed Cake


I'm so excited to share my first cake this New Year....a super fun, extremely cute and bright Jungle Animals themed tiered cake. Ridhaan's mom is my very good friend and she had asked me to do his birthday cake many months before. Although I wasn't sure if I would be able to make it (due to some other matters) I finally decided to go ahead. Her only request was for a Mango Mousse filling and some animals to go on the cake to match with the Animal themed birthday party she had in mine. Rest all was left to me and sky was the limit....

I'm proud of this cake for several reasons.
(a) This is my first non-fondant tiered cake with a smooth fondant-like finish. It took a lot of time to get the sides smooth and edges straight but it was worth it. There were some imperfections but let's say I decorated over them...hehe :-P These are very important factors in the word of beautiful cakes so it mattered a lot to me as well and I'm glad it worked well.
(b) This was my first tiered cake with a creamy Mousse filling. Mousse fillings are generally very soft and people don't recommend them for tiered cakes or even for cakes that need to sit out for a long time. But I tried it and it worked fine. Maybe I should thank the freezing temperatures here in Minnesota for that!
(c) My first cake with actual sugar figurines that you can eat! :-D

The Cakes were Vanilla White Cake with creamy Mango Mousse Filling covered with color tinted Vanilla Buttercream with marshmallow fondant accents for decoration and figurines. 

Until now I've never really tried making edible figurines, except for the Clowns I made for Lil'Appu's 1st Birthday Cake. Usually I just keep a plastic toy topper or a themed candle topper and just decorate the rest of the cake. But this time I felt with the animal theme it would be great to have some cute looking animals on the cake, so I went ahead with making them.
I made a Giraffe, Zebra, Elephant and Lion. I wish I had made the giraffe neck longer, but other than that I was happy with the rest of the animal figurines. These were made almost a week in advance and they hardened perfectly. 


My son used to come back daily from daycare and go stare at the animals...he just loved them. He is so used to me making cakes for friends that he doesn't touch or disturb my 'cake stuff' and for some reason he thinks he can go for the party anyways and eat the cake and decorations there (which is usually true)...so after the cake is cut its a whole different story, he wants everything first ;-D 
He kept requesting that I make a Monkey as well and I told him we'll make one directly on the cake. I don't know if he understood, but he kept waiting for the monkey every single day :)

The Tree toppers were a last minute addition. After I placed the animals on the cake with the Lion on top I just felt it needed something more...I thought about placing a Sun, but then the colors of the Lion and sun would be almost same (yellow-orange) , so finally decided to place the same trees that I had placed around the cake. Well, you can call them Coconut trees although the leaves should have been longer ;-) It's all in the imagination....hehe! If you notice I even gave small scale like texture to the stem of the tree to give it a proper 3D tree look. I decorated the cake board with chocolate buttercream to give it a muddy ground like appearance and it looked pretty good.

Then there were vines, some grass, more leaves, coconut trees and flowers to complete the overall look of the cake. I wanted the Monkey to be hanging from the tail on a vine and that's how I did it.


My fun animals :)


My friend had already bought the candle that would go on the cake so we placed that at the venue. Here are some pics of the beautiful Cake Table and cake cutting :)


Here's how the cake slice looked like! It really was yumm if I may say so.....ahem!


I'm still waiting for some more pics that the photographer at the party had taken....I'm sure my friend is waiting for those more than me :-P 
The party was super fun, the decorations were perfect and colorful and the food was awesome and not to mention how lovely the cake was...hehe! 
Lil'Ridhaan happily ate up the sugar Elephant and lil'Appu went for the Lion, but I don't have pics of any of that...hopefully the photographer took some :)

Will share more fun cake stories in upcoming posts...until then take care and bye bye!

-Manju


Jun 16, 2014

Red, Gold and White Wedding Cake


After having made an Engagement cake a while ago I was yearning to do a Wedding cake someday. I did not have to wait long as our close friends announced they were getting married this year and that too in Minneapolis and yaaayyy, I just jumped at the occasion of making a pretty cake for them that matched with their wedding and theme. 


I'm so happy to say I was able to make a Three Tiered Wedding cake for them who got married this year in April and it was a beautiful ceremony and the first time I attended a North Indian Wedding. They decided to bring their immediate family over to MN to attend and bless them on this auspicious occasion. 

A lot of things had to be taken care of like food, photographer, venue, poojari, sangeeth and Mehendi night preps, decorating the venue etc etc . Trust me I never did nor think of anything of this sort for my own wedding other than getting dressed up, wearing makeup and sitting at the mandap ;-)

The bride and groom along with help from a bunch of us friends did all the preparations and organizing for the big day and it was a gorgeous event and one to remember and in the end a job well done ;-) 


They chose 'Love Marriage' as the theme for the wedding with decorations in colors of Red, White and Gold! So the colors for the cake was set. She also wanted some cookies to add to the favor bag for the guests as a Thank you for attending their auspicious event, so we decided to bake them at home itself and do some decorations with royal icing.


We first started with the cookies. My friend and her sis-in-law (who came from India) helped me with the cookie baking-decorating marathon ;-) 

We baked 85 Shortbread cookies in an aromatic Espresso flavor using fluted Heart shaped cookie cutters. We planned to incorporate the Love theme into the cookies so decided on doing a marbled heart effect using royal icing. I made two batches of red and white royal icing and we all had so much fun doing the icing decoration.  The whole cookie making marathon literally took us the whole day and here's how it looked :-)


The wedding was held at an elegant Indian restaurant here in Minneapolis and the entire decor was done such that it had everything to do with 'Love'. There were heart shaped red balloons, red and golden drapes all over the hall, beautiful fresh flower arrangements and elegant tea light candles floating in crystal vases filled with red rose petals at each table, golden chandeliers hanging from the ceiling and romantic indian music playing in the background....in all it was a glittery night and a beautiful wedding!


For the wedding cake after brainstorming quite a bit I decided on bottom and top tiers being Red and middle tier being White with the couple's Initials on it.
Thankfully the wedding was on a Monday, so I had the entire weekend to bake, frost and decorate the cake. We decided on these Cake flavors: 
Bottom Tier (10"d x 4"h) - Rich Chocolate Cake with Vanilla Buttercream
Middle Tier (8"d x 6"h) - Red Velvet Cake with Vanilla Buttercream
Top Tier (6"d x 6"h) - White Cake with Mango Buttercream

Everything from Cake to frosting to fondant was all made at home from scratch with the freshest of ingredients and the decorations took me almost 14hrs flat on all three tiers. Here's a look at how these beauties looked before getting draped with fondant.


I wanted to do a Mehendi design on the bottom tier, but as I'm personally not very good with doing free hand mehendi, I decided to use a stencil. I used the left-over Red Royal Icing (that we made for the cookies) and used the stencil for the pattern on the cake and I painted over the stenciled royal icing with Antique gold edible dust. This was so time-consuming and I had no room for mistakes with even a bristle going out of line, so it was very intricate work. This was done three times all around the bottom tier.


For the middle tier, I decided on a pleated look. I had recently bought an embosser rolling pin on sale and wanted to use that to create an embossed look on the fondant pleats. It was very faint but hey! you can see it if you look closely. The pleats took me quite some time with measuring each individual pleat to be of same thickness and attaching them one by one. I did a free-hand heart cut-out on fondant and wrote the couple's initials and piped a beaded border with white Royal icing and painted over both with Antique Gold Edible dust. 


For the top tier I had initially planned on making several sugar roses and placing them on top, as my friend loved Red Roses, but that din't work out, so finally I used my silicon mold to  make a giant rose and painted it with Antique Gold Edible dust. 

To give the cake more height I included a divider in between the middle and top tier using a styrofoam block that was 4" in diameter and 3" in height, that I wrapped fully in cling wrap and added fondant beads accents which again was painted fully with Antique Gold Edible dust.  


The cake was supported with wooden dowels for stability and placed on a pretty silver cake stand surrounded by rose petals and pretty candles in wine glasses. The florist suggested keeping some fresh roses on top of the cake and she promised that the flowers were organic and pesticide free, so we placed few roses on the top. So finally I was able to keep few roses on top of the cake as planned before and there you go!!!


Here are some more precious moments :-)


Photography credits for the Cake: Kristin McCarthy Photography
Cake cutting and decoration pics : Kushal Paudyal Photography

Please do share all your valuable feedback on the cake which was my first three tiered cake as well. It still has plenty of room for improvement but I'm hoping to learn as I go. 
I want to thank the bride and groom who are our close friends from the bottom of my heart for letting me make the cake for their special day and I wish them a very happy married life.

Next on the blog, I will be sharing the recipe for the gorgeous Espresso Shortbread cookies and will also show how we did the marbled heart effect with Royal icing, so don't go anywhere ;-) 

-Manju

Jul 25, 2013

Blue ombre White Cake, Gelatin bubbles and Buttercream Shells...


A birthday to me is never complete without a Cake. Maybe because that’s how I grew up celebrating my birthdays and there was always cake.  Last year for my lil’Appu’s b’day I made my first two tier cake with Fondant decorations. As the party was a Rainbow theme I wanted to make the popular seven colored rainbow Cake. But I refused to bake a cake filled with so much artificial color for a baby’s birthday! So finally baked up my most  favorite Chocolate Banana cake with Chocolate buttercream and it was a huge hit!!

But I have always wanted to try a colorful layer cake…so this time with the help and tips from few blogger friends, I decided to go for an Ombre cake – shades from dark tone to lighter tone of the same color. And I convinced myself that it was only a little bit of artificial color in each layer :-) 
Also I decided against doing a Tiered/ Fondant cake this time…Single tier cakes can look just as pretty and elegant and did you know, Buttercream is the new Fondant! :-P


Appu’s Second birthday was a Bubble theme, so I went  for a Blue-White Ombre effect. For the cake flavor I decided to try a White Cake recipe I found at Epicurious. I had initially planned to make Three 10” layers. But I felt for a 10” inch cake, the batter was less to be divided into three, so I double the cake batter recipe and divided them equally into four cake pans - to obtain three shades of blue and one white layer .


The blue colors were obtained by using Wilton’s Royal Blue icing gel mixed with the cake batter in different quantities. The White layer is the actual White cake itself and trust me it definitely does look White…

Now coming to the decoration, this is where I get all excited and a zillion ideas float through my head. A bubble themed party needed a bubble effect on the cake, right!! I had anyway decided to go for buttercream decoration and was still making up my mind on the pattern when I thought it would be nice to make Gelatin bubbles as toppers.

My initial plan was to make few Blue, White and Golden shaded balls in different sizes and keep them all around and on top of the cake (like floating bubbles) , but did I tell you I had cooked the entire dinner for the party myself (with parents to help ofcourse). So after a whole day of cooking, I was terribly exhausted and had almost dropped my plans of making these. But not willing to quit, after everyone went to bed (almost midnight), I decided to try to make a few gelatin balls atleast in one color and made these Blue ones in different sizes - I added a tiny bit of ‘Blue Luster Dust’ to the gelatin-water mix to get the blue balls.

The technique calls for blowing up small balloons (water balloons are best) in different sizes. The balloons are greased and then dipped in slightly bloomed, melted and colored gelatin until it coats the balloon nicely and left overnight to dry. Once hardened, just burst the balloon slowly from the end and you get nice colored gelatin bubbles. Sounds easy? But it was a hell of a task (mayb coz my brain was so dead tired) and I would say I somehow managed to hold my patience together :-)
The original technique called for propping up the gelatin coated balloons on lollipop sticks to dry, but I had cake pops planned for my lollipop sticks ;-), so I just waited for the gelatin to dry up a bit and tied up the balloon end on a string loop and hung them down my kitchen cupboard knobs overnight to harden ;-) !

Here’s a link to theoriginal technique if you ever wanna try. (These almost feel like plastic once hardened and it’s not edible, just so you know)

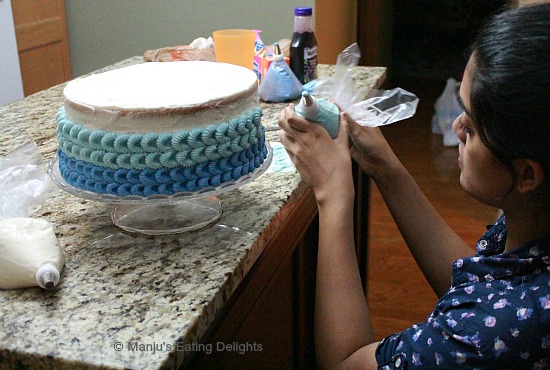
Next came the buttercream decoration.  I wasn’t sure what to do for a bubble effect and also to impart the ombre effect. I have loved the petal or fish scale like design that you’ll find all over the internet on many cakes. But I wanted it be different. So instead of buying a round tip, I bought a start tip (Wilton Tip# 199) to make the pattern around the cake, and it almost resembled Shells, so I’m calling it Shell pattern!


Getting the Shell Pattern is really so easy. I have explained it here in the easiest way that I can think of. ( I took random pics while frosting late at night, so the pics may not be the best but understandable nevertheless )


How to obtain Shell Pattern with Buttercream using Wilton Tip # 199

The first and foremost step is to make a good pipeable consistency Buttercream Frosting (neither too thick nor too thin)
I've used my Vanilla Buttercream recipe and made 3 batches of it  (1 batch for filling and crumb coating the cake, next 2 batches for final shell decoration)

Next important step after filling the layers with frosting and crumb coating the cake is to Refrigerate for 30mins

Then decorate as follows -

Step 1 : Add Frosting/Icing of desired color to piping bag(s) and attach the star tip securely. 
Step 2 : Take the piping bag with Icing of desired color and apply gentle pressure to release a drop (of required size) of the icing on the side of the cake.


Step 3 : Using a thin metal spatula or butter knife, gently wipe the frosting horizontally creating a depression in the centre and a tail of buttercream to the right. Clean the butterknife on a papertowel after each shell is made.

Step 4 : Again add a drop of the icing on the tail portion but close to the center depression(as shown in pic at Step 2)  and continue by wiping it horizontally until you finish the entire cake.
(Remember to Clean the butterknife/spatula on a papertowel after each shell is made)

 If using different shades of icing, change the Icing colors as desired for your decoration.

If you feel the buttercream frosting is getting thinner due to heat from our hands, refrigerate for 10 mins and continue.


Yes, it’s a bit time taking, but the end result is fabulous and I guess this cake almost has more than a 100 shells around it, don’t you think? ;-)

Here’s me doing the shell pattern :-) Pic taken by daddy and no matter how tired I am, I always have the patience and presence of mind to decorate a cake…It’s my absolute favorite part of any cake making!!

Before I stop rambling let me tell you, this White Cake recipe is a stunner. The flavor is huge and the texture is just perfect and color is very much WHITE. And I’m glad I decided to give it a try. 
The only things that bothered me was it uses only egg whites, 6 of them (what am I supposed to do with the leftover 6 egg yolks? ) and as I had doubled the cake recipe, I was left with 12 egg yolks *SIGH* !! We finally made scrambled egg yolks the next day to finish them off…Lol!

I was very adamant that everyone should get all the four ombre layers, so instead of cutting into wedges I cut the cake into thin slices so that it wasn’t too big to fill one’s tummy, but enough to enjoy a full slice with all 4 layers ;-)


‘White Cake’ 

Recipe source: Epicurious (taken from Cook’s Illutsrated)

You’ll need
Cake Flour- 2 ¼ cups
Milk (at room temperature) - 1 cup
Egg whites (at room temperature) - 6
Almond extract - 2 tsp  
Vanilla extract - 1 tsp
Granulated Sugar - 1 ¾  cups
Baking powder -  4 tsp
Unsalted Butter (softened but still cool) - 1½  sticks
Salt - 1 tsp  

Directions
1.  Pre-heat oven to 350F. Grease with butter and dust with flour two 9-inch cake pans.
2.  Make sure milk and eggs are room temperature.
3.  Pour milk, egg whites, and extracts into medium bowl and mix with fork until blended.
4.  Mix cake flour, sugar, baking powder, and salt in bowl of electric mixer at slow speed.
5.  Cut butter into small cubes and add. Continue beating on low for about 1-2 minutes.
6.  Add all but 1/2 cup of milk mixture to flour mixture and beat at medium speed for 1 1/2 minutes. Add remaining 1/2 cup of milk mixture and beat for another 1 minute.
7.  Pour batter evenly between the two prepared cake pans.
8.  Bake until toothpick inserted in the center comes out clean, 23 to 25 minutes.
9.  Allow cake to cool to room temperature and invert to a cooling rack until it reaches room tempertaure.
10.  Frost and decorate as desired

Modifications I made:
1. I used 10-inch cakes pans. I had doubled the cake recipe, and distributed the batter evenly into 4 cake pans.
2. My baking time for each cake layer was reduced to 21-23 minutes.
3. I used 2 tsp vanilla extract + 1 tsp milk (to replace the 2tsp almond extract + 1tsp vanilla extract) - too much vanilla extract will reduce the White color for the cake, so use less or use colorless Vanilla extract.
4. I always add only a pinch of salt in all my cakes – I hate salty cakes, even the slightest hint!


Lil’Appu now thinks any cake in front of him is meant to be cut by singing ‘Happy U uuuuu’ and as you see here, he again cuts his cake slice the next day and ate the whole thing too ;-)

I try to keep my posts short but I have so much to share…Lol!  And I don't know if I've missed out on anything, so if you have any questions feel free to Contact Me or come over to my Facebook page.

Up next on MED will be the gorgeous Cake Pops I made. So come back soon…


-Manju