Oct 16, 2017

3 Ingredient Mango IceCream | Manju's Eating Delights Turns 6!


Hello one and all! I have been writing and updating a blog post to share our baby girls big 1st birthday party that was in July, but it's taking longer than expected to get all the details in :-) I'll share that shortly , but meanwhile I realized that my little space here turned 6 years old yesterday on Oct 15th...yaay! That surely called for a quick thank you post and ofcourse a yumm recipe...

Happy Birthday to my little blog and thank you to all who still visit this space, though I have been very poorly with updating it in the past year. I still get lots of messages and updates from friends and family who tried a recipe from here and came out well. I also get thank you notes from families who got inspired from the various birthday themes posted here and how it worked great for them. So Thank you all, my virtual family for always being there to inspire and motivate. 
Wow! thats 6 years of blogging and though I've had several hobbies that I started and left, this is probably my only one that's lasted this long. Pat on the back for me and big group hug to all of you for being there by my side.

These days I love watching all these quick FB cooking videos. An entire dish is shown done in 5 minutes and they make it look so damn easy. I tried doing a very simple Mango Lassi video beginning of this year and I have to say it was no easy job at all. I was nervous, felt weird and hated how I sounded although the recipe was good and I enjoyed drinking it all up after the shoot :-) Probably it's easier if you don't have to show yourself too much in front of the camera, mayb I should try that next.


Anyways, there was some more mango pulp left from after making the lassi and I had this sudden idea to try making an instant Mango icecream. The recipe is so easy, specially since I'm using canned and sweetened mango pulp. And not to mention how I love anything with Mango  ;-)

Mango IceCream

You’ll Need
1 cup Sweetened Mango Pulp
1 cup Heavy whipping cream
1  cup Condensed Milk
1 teaspoon Cardamom powder (optional)
Fresh/canned diced Mango (optional)

 Directions:
1. Add the mango pulp and condensed milk to a bowl and mix it up - easy if you use a whisk.
2. Whip the heavy whipping cream until they form smooth yet stiff peaks.
2. Slowly incorporate the whipped cream to the mango pulp-condensed milk mixture until its smooth and well incorporated.
3. For additional flavor and to overcome the sweetness I added some cardamom(elaichi) powder to the mango ice cream.
You can also add nuts or tutti-fruitti chunks or diced mango/peach or any fruit of liking to the icecream.
4. Transfer to a rectangular freezer safe dish and allow it to freeze for atleast 12hrs.
5. Scoop and enjoy in a bowl or over a cone.

Suggestion:
Above recipe makes a small quantity, as I used the remaining Mango pulp which was leftover after making a mango lassi.
If you prefer to make a larger quantity I would suggest using the entire can of Mango pulp + entire can of condensed milk  and atleast 2 cups of whipping cream or double the recipe.
The Mango pulp can I used is 30 oz 
Condensed Milk is 14oz 
Flavor/Garnish as preferred. Pistachios pair really well with Mangos ;-)


It's always Icecream season somewhere and specially if you can make a super quick and easy one like this without the need of any fancy icecream maker machine/gadgets. Make this for any party or at occasions when you've invited guests over and they'll be asking you for the recipe for sure.

Recently at an India Fest here we tasted a Paan (beetle leaf) flavored icecream, mildy green colored and so full of beetle leaf and gulkhand (rose jam) flavor....it was so good. I am definitely gonna try that sometimes soon. 


Ciao my dears...See you soon!

-Manju


Sep 12, 2017

Pokémon themed birthday | Manav turns 6!


Hello dear all. The blog’s been still and inactive for a while now. I humbly apologize for the lack of activity here. Getting back to work plus, getting used to school routines and having a baby at home could be some valid reasons, but if I remember correctly I started this blog back in Oct 2011 when my firstborn was just 3 months old, mainly take some time out for myself, make new friends, express my feelings and views on the things happening around me and ofcourse to ramble on about the dishes that I tried and I wasn't very free to start with even then, but I still did blog a lot. 
I’ve had plenty of help from my in-laws and parents for over the past year after Mihi baby was born and yet I’ve just not been able to spare some time to this space, which is my virtual diary. I don’t like to make promises I can’t keep, but still I will try to atleast share 1-2 posts per month going forward and slowly get back into the rhythm of sharing my world with you all. Thank you for being so patient.

I wanted to share a fun and simple birthday party we had for my handsome first born, Manav...commonly referred to as Appu (at home) or lil’Appu (here on the blog). Not so little now I would say as he celebrated his 6th birthday on July 11th.  Am I a bit too late to even share this? :-D


He's been watching and playing a lot of Pokémon cartoons and games all summer long and so obviously wanted a Pokémon themed birthday. Although we had made separate plans to keep a bigger combined birthday party for Mihi and Appu a few weeks later, we decided to keep a small party in our backyard with just his friends from our community.

I decided to make the easiest Pokémon themed cake, which ofcourse was this Pikachu cake. It was a 5” tall delicious rich Chocolate Cake with Chocolate buttercream for my all-time chocolate loving boy. The outside was frosted with yellow colored vanilla buttercream. Pikachu’s facial features and ears were done with fondant.


To add to the theme we got some standing Pikachu and Charmander cutouts, Pokémon themed plates and blowouts from party city and some balloons in colors of red, yellow and black.
My lovely friend Swati, sent us some decorations, all the way from Minnesota which she made herself for her own son’s Pokemon themed birthday party…friends should be like her…Muah! We couldn’t use everything she sent, but I used the Pokeball shaped paper fans. There were also pokeball name tags and other decorations, which we couldn’t put up as it was too windy in the backyard.


Food was kept very simple and as per the birthday boys request of items, there were Chips, Lemonade, Fruits and Cake of course. I managed to arrange the fruits to look like a pokeball using strawberries, bananas and grapes (idea from Pinterest).


We had invited most of Appu's friends from our community to stop by for cake and snacks. The birthday boy was very happy and behaved like a good little 6 year old.  Mihi baby, just a week short of being a 1 year old was in good spirit too. Ofcourse she made good use of the opportunity to pull my hair...Lol!


Though it was a small and quick party everyone had fun. Kids enjoyed being goofy with the blowouts and smaller kids played with the balloons. Our basement is like a toy store, having a big collection of toys from all of Appu's previous birthdays..... so the kids had fun with those. Some of his friends stayed over longer and they played to their hearts content. So in all both Appu and his friends had a great time.


Mihi baby's favorite part was pulling her Appu chetta’s hair while we posed for some family pics and having grandparents here made the birthday even more special. My sister Maya sent him the Pokemon Tshirt and he was so happy to wear it.


And that, my dear all was our birthday boy's fun little Pokemon birthday. It was put together without much planning but Appu still remembers the details and that's what counts.

Our baby girl's birthday was next and it was the big 1 year old party....that's what is coming up next on the blog and I can't wait to share the details with you all.

Have a god day you all!

-Manju

Apr 24, 2017

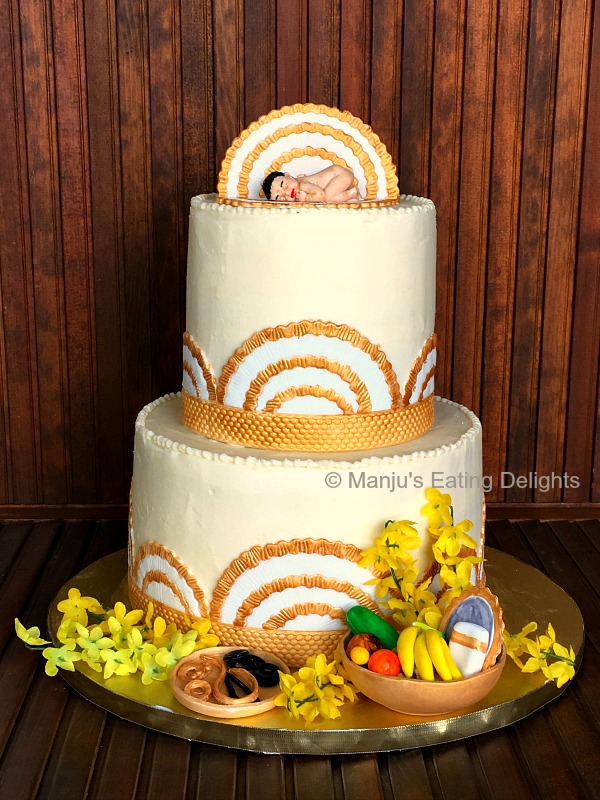
Vishu themed Cake | Baby's naming ceremony | Traditional Kerala style design

The last themed cake I make was back in August 2015. Yes! It's true...I don't think I have shared that cake here yet either...meh! The whole time I excused myself from any fancy cake stuff in the excuse of being pregnant, then due to our move to Charlotte,  all of my 'cake stuff' were packed away into dozens of boxes and then our newborn came along etc etc

Anyways not going to dwell in the past, so here I'm sharing my latest cake , thanks to some awesome friends who trusted me to the core on everything from flavor to design. Our friends S and S had had their third baby boy in March and they planned to have a fun get-together with close friends and family on April 14th to celebrate the baby's naming ceremony which happens when the baby is 28 days old. April 14th also happened to be the day of Vishu festival, which is a popular harvest festival for folks from the state of God's Own Country, Kerala .


As it was Vishu festival and also the naming ceremony (aka, Iruvathiettukettu in malayalam) I decided to go for a traditional look which will depict both the festival as well as signify the baby's special occasion.

One of the most popular arrangements done for Vishu, other than a scrumptious vegetarian feast (sadhya), is the VishuKani. The Malayalam word kani means 'that which is seen first', so Vishukkani means 'that which is seen first on Vishu'. The Vishu kani arrangements usually consists of a tray or golden bowl, Uruli filled with various vegetables and fruits, a mirror, ornaments, new dress and most popularly, yellow Konna flowers along with a Lamp and the photo of a Hindu god.
I used a random image of a Vishukani from google  and re-created the look using gumpaste and this is what it looked like. I was lucky enough to find the yellow flowers at a local art&craft store that perfectly resembled the yellow Konna flowers. Except for the flowers all other VishuKani items are made from gumpaste and edible.


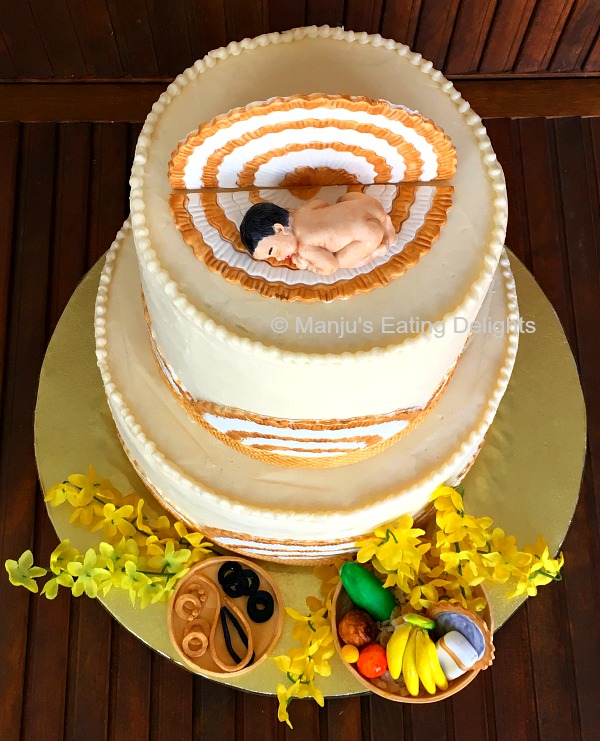
To signify the baby's naming ceremony function, I decided to make a cute little sleeping baby figurine and a tray filled with the various ornaments that we would adorn the baby for the first time after he/she is born which generally includes a Gold waist chain, Gold baby bangles and anklets, Black thread worn around the waist and black bangles (karivala).  Again all items are made from gumpaste and edible.


Here's another look at the Tray of ornaments and Vishu kani arrangement.


For the overall deisgn on the cake I went for the Kerala Set Sari/Mundu design which is ideally a cream/ivory colored cloth with gold border.


When I took it my friend's home, they wanted to display it along with some traditional Lamps, statue of baby Krishna and also their Vishu kani tray. Here are some pics taken by my friend himself. 


That's me with my little Mihika baby. It was her very first Vishu and we are wearing traditional Kerala style Set sari and pattupavada respectively and coincidentally our colors matched - Orange. Anyways, I'm digressing from the actual topic... the Cake ;-)


The cake flavor was White Cake with a filling of Mango mousse, pieces of mango and peach with vanilla Buttercream frosting on the outside.  I didn't get a picture of the sliced cake but it'll look exactly like the cake slice from this cake.

Everyone was thrilled to see the cake and had never seen a traditional Kerala theme depicted on a cake. I was thrilled to be able to successfully deliver the design I had in mind and anyone from Kerala could relate to it without even explaining the theme.

Although not entirely perfect I was very happy with how the cake came out. Buttercream frosting is not my favorite when trying to get smooth and clean sides but I did not have the time to do a fondant cake. Maybe next time... ;-)
Hope you enjoyed this cake as much as I did from making to blogging about it. So until next time all I have to say is do what you love doing and see you all soon!

-Manju
Mar 16, 2017

Chilli Fish or Fish Manchurian | Indo-Chinese fusion dish


Hello and welcome to my first post for this year :-) How is everyone?  I’m doing very well and having fun with my two beautiful little ones at home. I’ve been back to working full time since last October, so that keeps me additionally busy as well. Any free moment after the kids sleep is spent with me trying to catch up on my sleep…Lol! Baby girl is a good little girl, she eats and sleeps well, but she still has her random night time wakings and wants some mommy cuddle time.

Mihi baby is 8 months old as of today  and goodness time is  flying. Appu is having more fun with her now as she is getting more responsive and playful with him and as for Mihi, she adores her big bro and is always waiting for a moment to catch his attention. She starts making noises and saying baba and tata whenever she sees Appu. I love this little world that I am in now and trying to absorb all of it!


Ever since Appu started Kindergarten, our weekday mornings are a cat and mouse chase against the clock trying to get Appu to wake-up, brush and get dressed for school and eat some quick breakfast before his bus arrives. Sometimes baby girl wakes up and wants to be part of all the morning fun. His bus comes at 7am and after the morning rush Mihi baby looks forward to some cuddle time with her dada. She is most active and does a lot of baby talk at this time and we love this little morning routine of ours.

It snowed here on Saturday…yes!  Charlotte was covered in a white blanket. It was also the Indian festival of Holi, so I joked with my friends saying we played with white color. It was Mihi baby’s first snow , so we bundled her up and took some pics outside.
Big bro Appu had lots of fun with kids in the neighborhood playing with their sledges.  The snow started quickly melting by afternoon, so it didn’t last long! But the climate is still a bit cold, so we are  eagerly looking forward to some time in the sun soon.


I haven't been doing my usual cooking and baking like before but whenever time permits I still try a dish or two now and then. Anything that is quick, easy, less prep time and tastes great are dishes that's on my agenda these days. One pot meals are usually preferred , else 'chop-dump in pressure cooker-done' type meals...Lol!
Now and then I bother taking a pic or two and sharing it on my Instagram profile or on facebook and I was blown over by the response my Fish Manchurian got me :-) 
I have to say, it woke up the blogger in me... :-P I got several 'recipe please' requests so I promised I'll blog about it coz it definitely is blog worthy and let me say really really easy to prepare. And trust me, mom-of-two talking here...


I skipped the big process of frying the fish in flour coated batter and all that. That will definitely make the dish more richer, but that's the most time taking process so I skipped it.  
Also I didn't marinate the fish either, you could do that for more flavor. But it still came out good. Having fish that's cleaned and cut into cubes ready in the freezer is a plus :-)
I took the pics in a hurry just before sunset so they just came out looking blah....but the recipe is more important, so here's how I made it.


Chilli Fish or Fish Manchurian

You’ll Need
For Fish marination:
Boneless Fish fillets – Used 3 big Tilapia filets (cut the fillet in half and then cut into bite sized pieces)
½  teaspoon  Black Pepper powder
½  teaspoon Red chilli powder
¼ teaspoon Turmeric powder
Salt, to taste

For sauce:
1 Tablespoon Canola Oil
½ Red Onion , chopped finely
3 Green Chilies , cut diagonally
3 Garlic  cloves, chopped finely
1” length Ginger, chopped into sticks
3 Tablespoon Ketchup
2 Tablespoon Red Chili Sauce  (I used Chilli Garlic Sauce)
4 teaspoon Soy Sauce
2 teaspoon White Vinegar
1 Tablespoon Corn Starch  
1 cup Water
Green Onions – 3 stalks, cut diagonally for garnishing

Directions:

Pan fry the Fish
1. Marinate the Fish with the spice powders and salt for atleast 30 minutes. (I skipped this)
2. In a non-stick frying pan, spray some oil and once hot, place the fish without crowding the pan.
3. Once one side is browned, gently flip and cook the other side and make sure the fish is fully cooked through. Cooking on a low heat avoids burning the fish and enables even cooking.

(You can always fry the fish in more oil or dip the fish in flour-batter and fry, but I wanted to use as less oil as possible so I just sprayed some oil and cooked on a very low heat until both sides of the fish were browned and cooked through)

For the sauce:
1. Heat oil in a frying pan and add Onions, Green chillies , Ginger, Garlic and cook until onions are mildly browned.
2. Add Ketchup and Red Chilli sauce and sauté until it cooks down and the oil starts to separate.
3.  Next add soy sauce and vinegar and mix well.
4.  Mix the cornstarch with water and add it to the pan. Cook on medium-low heat until the sauce starts to thicken.
5.  Now add the pan fried fish pieces and gently coat the sauce all over the fish . 
6.  Garnish with Green onions and serve!

Suggestions:
You can follow the steps done for the fish using Chicken or Shrimp or use Veggie options like Tofu, Paneer, Eggplant, Baby Corn etc...if you have other suggestions do let me know too :-) 


I know some of you will surely be trying out this dish. Don't forget to let me know how it turned out. If you make any changes or use any specific ingredient that makes the dish even more yumm do let me know. So see you until next time...back to my busy world!
-Manju