Showing posts with label birthday cake. Show all posts

Apr 8, 2020

Apple Toffee Crunch Cake with Cinnamon Buttercream | Manish's special Birthday!


End of March is always a fun time for us...It's the start of spring and we always get to celebrate it every year due to Manish's birthday. We are all still staying at home, not going out anywhere or gathering with friends due to the Coronavirus Pandemic, but still it was a very special day for us and we celebrated it the best way we could. Manish, my beloved hus and best friend celebrated a milestone 40th birthday! Woohoo!!

I had planned something grand and a had group of good friends ready to help execute it, but it all came crashing down few weeks before due to the coronavirus pandemic and stay at home orders and we had to cancel all the plans. I still did want him to have a lovely day with some fun memories. So with the help of his sister and some friends we came up with a fun video of all his childhood to recent pictures and Birthday wishes from relatives to friends. He was truly surprised and had a big wide smile when he saw the video and wishes.

We put up a fun little photo backdrop to take pics during the cake cutting and few of his friends and our family called in via Zoom video call, which was also a surprise. I kind of tried to keep the theme Black and Gold, however my Appu did not have a suitable black top so he settled for a dark navy blue shirt and the rest of us did our best to wear shades of Black and Gold ;-)
We had a virtual party during cake cutting, spent time catching up with friends and had lots of laughs. He wanted Biryani for lunch, so after all the fun I made him a nice and spicy Mutton Biryani. Will share the recipe soon. Appu and Mihi made him some hand drawn b'day cards and in all it was a nice day.


He wanted an elegant looking cake in some new fancy flavors. What he really wanted was one of those 'Rocky Mountain Chocolate Factory' style gourmet Chocolate caramel Apples, but we couldn't go out now to buy those...so we decided to come up with a cake that somewhat mimics that flavor along with a crunchy bite. So he got an elegant Black and Gold themed Birthday cake in an Apple Toffee crunch flavor with a Cinnamon Buttercream filling inside and a Chocolate Cinnamon Buttercream frosting outside. Yumm!

Here are some pics of the cake in the making:
Freshly baked Apple cakes...cooling 


Walnut Crumble and Toffee Sauce


Fresh Apple cake , Toffee Sauce, Walnut Crumble, simple syrup and Cinnamon Buttercream


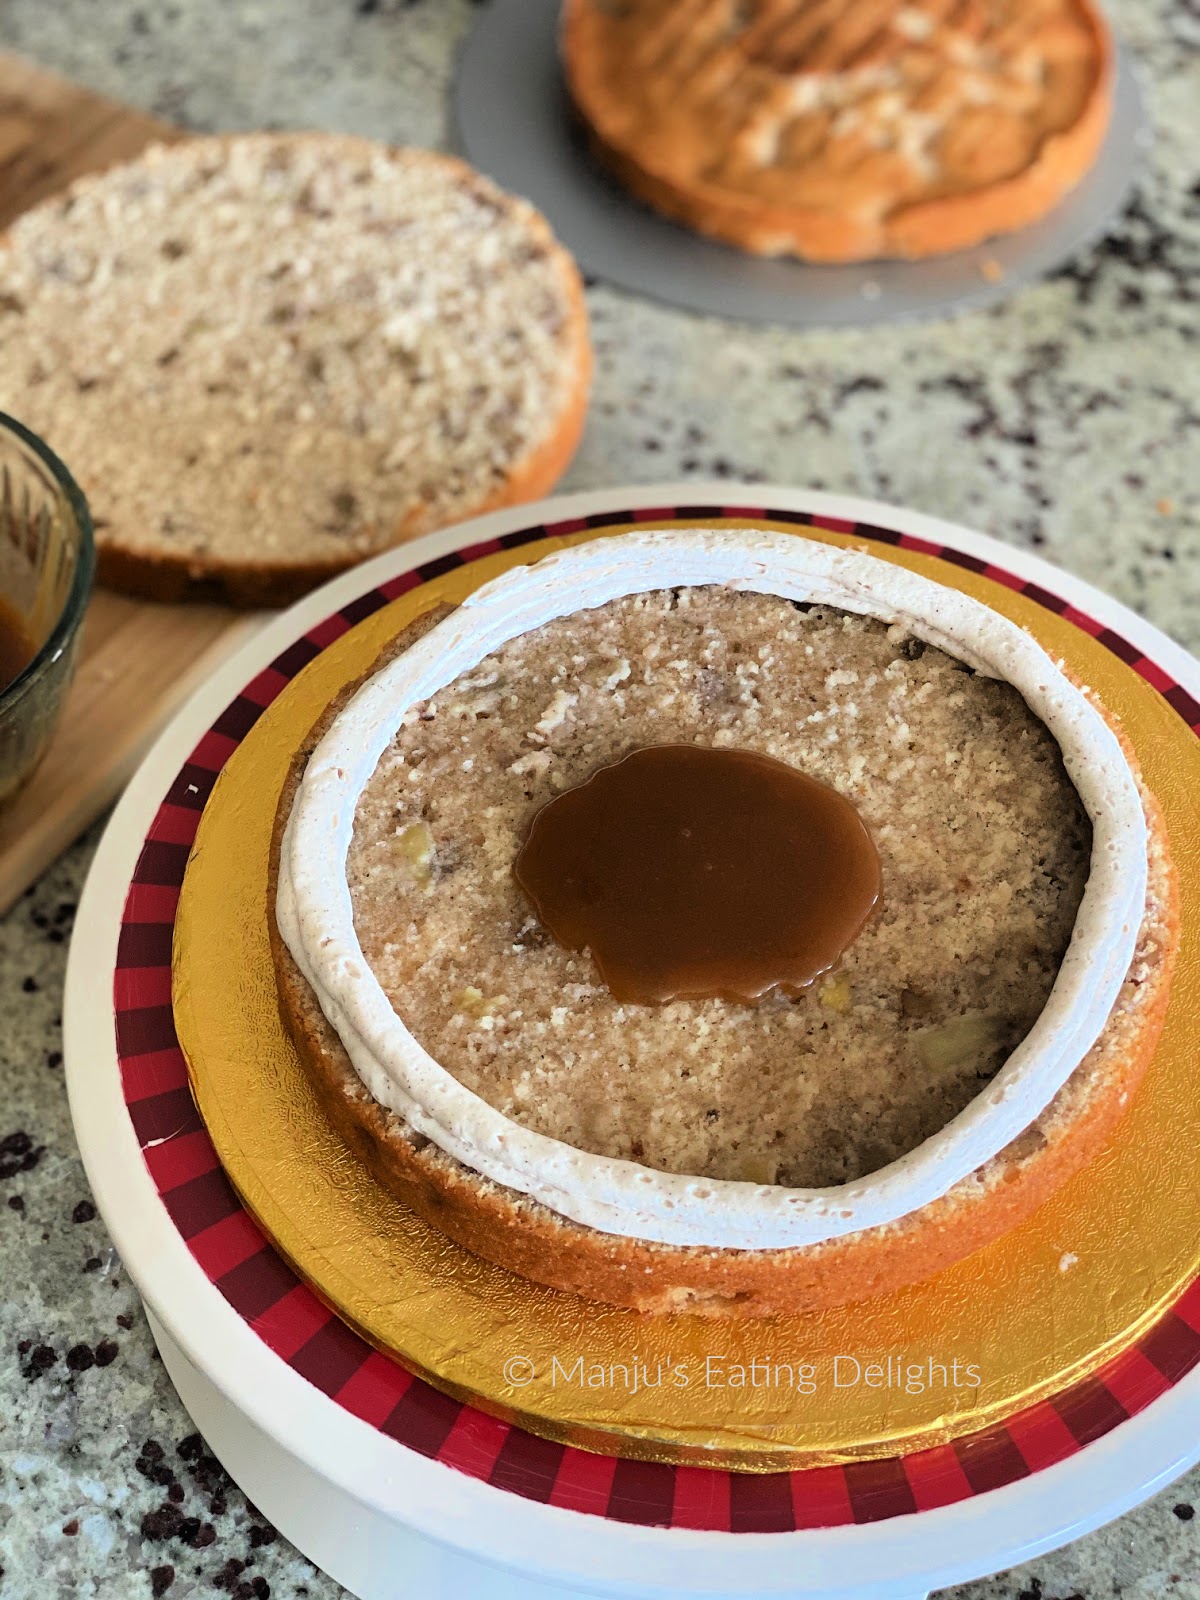
On the first cake layer: Create a buttercream dam and spread 1 Tblsp Toffee sauce


Spread Cinnamon Buttercream over the toffee sauce and add the Walnut crumble


Repeat above steps with all the layers of cake


Crumb coat with Cinnamon buttercream and allow cake to chill in refrigerator for 20mins


Apply final coating of Buttercream and decorate
I decorated the cake in black colored Chocolate Cinnamon buttercream. I did not create a very smooth finish on purpose and gave the cake a rustic, rugged finish with a lip of buttercream coming over the top of the cake.


For the front of the cake I tried doing the cake stamp technique on buttercream but hand drawn and wrote his name and painted inside it with edible gold. Gold was painted on to the cake trim.


For the top, back and sides of the cake I sprayed on edible Gold with a paint brush. The added some buttercream swirls all around the top and placed a sugar Gold pearl on each swirl.
A black Balloon with some fun wordings and a golden 'Hello Forty' cake topper added the final touches.

This truly is a celebration worthy cake for it has a bunch of little components to prep first before it all comes together. The cake is pretty sweet due to the apple in the batter, the toffee sauce and the sweet buttercream, but it's so worth it!
First I started with baking the cake layers and then I made the Toffee crumble and Toffee sauce. All these components needs to be cooled entirely. Finally the Cinnamon Buttercream and then we are ready to start with assembling the cake.


I followed Tessa Huff's recipe from The Cake Blog and substituted walnuts for pecans as that's what I had at hand. It turned out perfect! The Cinnamon Buttercream recipe below is my own.


Apple Toffee Crunch Cake
Fresh Apple cake with Walnut crumble, Toffee sauce and Cinnamon buttercream

You’ll Need
For the Apple Cake:
3 cups All-purpose flour, divided
2 teaspoon Baking Powder
1 teaspoon Cinnamon
Pinch of Salt
1 cup unsalted Butter, softened
2 cups granulated Sugar
2 teaspoons Vanilla extract
4 large Eggs
1 cup Whole Milk
3 cups peeled and diced Apples ( I used 2 Gala Apples)
½ cup chopped Walnuts

For the Walnut Crumble:
½ cup quick cooking Oats
¼ cup chopped Walnuts
¼ cup Brown Sugar
¼ cup All-purpose flour
3 tablespoons unsalted Butter, softened
2 tablespoons Honey
Small pinch of Salt

For the Toffee Sauce:
5 Tablespoons unsalted Butter
¾ cup Brown Sugar
1 Tablespoon light/dark Corn syrup
⅓ cup Heavy Cream/Whole Milk
1 teaspoon Vanilla
small pinch Salt

For Cinnamon Buttercream
1 ½ cups Butter (3 sticks)
6 cups Confectioners Sugar
1 teaspoon Cinnamon powder
½ teaspoon Vanilla extract
2 or 3  Tablespoon Milk/Water

Directions:
Make the Apple Cake: 
1. Pre-heat oven to 350 F. Grease the bottoms of two 8-inch pans. Line the bottoms with parchment, then grease and flour the parchment and sides of the pans. Set aside.
2. Remove 1/3 cup flour and set aside.
3. Sift together the remaining flour, baking powder, cinnamon, and salt. Set aside.
4. Using an electric mixer, beat the butter until smooth, then add the sugar and mix on medium speed together until light and fluffy. Add the vanilla extract.
5. Mix in the eggs, one at a time. Stop the mixer and scrape down the sides of the bowl.
6. Add half the dry ingredients followed by milk and then add in the second half of the dry ingredients and mix until just combined.
7. Toss the diced apples and walnuts with the reserved flour. Fold in the apples and walnuts into the cake batter until evenly distributed.
8. Divide the batter between the two pans. Bake for 32-35 minutes until golden on top and a skewer inserted into the center of the cakes comes out clean. (Mine actually baked for about 50-55 mins, so keep watching until center is fully baked)
9. Cool on a wire rack for 15 minutes before removing the cakes from their pans and cool completely.

Make the Walnut Crunch:
1. Raise the oven temperature to 375 F. Line a baking sheet with parchment or silicone baking mat and set aside.
2. Combine all of the ingredients together in a medium bowl. Stir together with a wooden spoon.
3. Spread the mixture out on the prepared pan. Bake for 8 to 10 minutes, stirring halfway, until the crumbles are golden brown. Let cool and break into small pieces before use. (I baked for about 20 mins turning the crumble every 2 mins until it was nice and golden brown)
Note: I pulsed the crumble slightly in the food processor for smaller chunks.

Make the Toffee Sauce:
1. Melt the butter in a saucepan over medium heat. Once melted, stir in the brown sugar and corn syrup. 
2. Turn the heat up to high. While stirring with a wooden spoon, bring the mixture up a boil and cook for about 5 minutes or until the sugar dissolves.
3. Remove from the heat and carefully whisk in the cream. Reduce the heat to low. Place the saucepan back on the stove and whisk, slowly but constantly. Simmer for about 8 minutes.
4. Remove from the heat and add in vanilla extract and a pinch of salt. Place in a heat-safe container and allow to cool and thicken.

Make the Cinnamon Buttercream:
1. Beat the Butter until smooth and creamy.
2. Add the powdered sugar in batches until it is fully incorporated with the butter.
3. Add Cinnamon powder, Vanilla extract and milk as needed to combine the buttercream and make it smooth and creamy.

Assemble the Cake:
1. After the cakes have completely cooled, carefully slice them in half horizontally with a long serrated knife.  This will give 4 beautiful layers of cake.
2. Place one of the bottom layers on a cake board.
3. Spread on about 1 tablespoon of the Toffee sauce on the cake and then spread the buttercream in ½" or ¼” thickness and sprinkle with ½ cup of the crumble.
4. Top with the next layer of cake and repeat.
5. Crumb coat the stacked cake with the cinnamon buttercream and set in the refrigerator to chill for 15 to 20 minutes. Then add the final coat of Buttercream and decorate as you prefer. Chill one last time until everything is set.

Notes:
1. If the Toffee sauce is too thick, slightly warm it in the microwave.
2. Pulse the Walnut crunch slightly in the food processor for smaller crumbles, else it will be difficult to slice the cake.
3. If the top of the cake starts browning while baking, cover it with a greased aluminium foil until it gets fully baked.
4. After filling in all the cake layers, I added some cocoa powder and black color to the remaining cinnamon buttercream to frost the outside of my cake to give it that black look.
5. You can divide the cake batter into three 8” pans and make  3x 8” cakes instead, baking time will vary.
6. If you prefer to not add the Toffee sauce in between cake layers, it would go very well on top of the cake as a drip or can be spooned over the cake slice when being eaten, maybe with a scoop of vanilla ice cream...yumm!


Here are some more cakes I've blogged with recipes for Manish's earlier bday celebrations, just click on the title to go to the recipe:

Tres Leches Cake with Lychee mousse filling and Chocolate Collar


Vanilla Sponge Cake with Raspberry Mousse
 

Lemon Cake with Mango Curd Filling and Lemon Buttercream


-Manju

Feb 25, 2015

Let it Go....a Frozen themed Queen Elsa Doll Cake


I’m super excited about the cake I’m sharing with you all today. I have always wanted to do a doll cake. When my friend’s friend asked me if I can help her with the cake for her daughter’s birthday, the only details she told me was it was going to be a Frozen Princess themed party. I heard ‘princess’ and ‘frozen theme’ and instantly suggested that it would be great to do a queen Elsa doll cake and even her daughter loved the idea.  

The day I bought the Queen Elsa doll,  I was super excited and trust me was tempted to play with it ;-) No wonder kids love barbie dolls and all such pretty dolls. They are just gorgeous!

When I think of the movie Frozen the scene that comes to my mind is when Queen Elsa sings ‘Let it Go’ and builds her beautiful snow castle. I wanted my Queen Elsa to be standing in that pose. 


It was love at first sight when I saw Ipoh Bakery's fashionista doll cakes. I was awed at the beauty of William’s creations and knew that if I ever got a chance at making  a doll cake then this would be it.  William himself was so kind and helped me with few questions I had before I started making the cake.

What makes this cake stand out from the usual doll cakes is that instead of the doll standing wearing her pretty princess gown which is like an inverted dome (this forms the cake), here the doll appears as if its walking forward pulling her beautiful skirt or cape forward. One of her legs are exposed giving it a stylish yet elegant touch and there’s movement and grace and looks so fashionable. The skirt/cape forming the cake.

The only challenge for me was carving the cake to form a smooth skirt that’s following Queen Elsa as she conjures up her Snow castle.  I’m not a fan of carving and wasting precious cake slices. So I made sure each and every carved cake piece was added to the skirt in the best way possible attached with buttercream, giving an overall smooth finish.


The doll is an actual Queen Elsa Doll, which is the only non-edible portion of the cake. The top of the skirt from where the edible portion of the cake starts was 5.5" tall and it extends to be almost 15" long.  


I baked my favorite White Velvet Cake and frosted and filled the cake with creamy Nutella Buttercream…yumm! Covered in homemade marshmallow fondant that I shaded Teal.  

After making the pleats of the skirt I added some final touches in the form of snowflakes and added some shine to the dress and snowflakes using luster dust. 

I left the cake board silver itself as I felt the color combo of Teal-White-Silver looked good for a Frozen theme. Eileen's name and age were placed on snowflakes shimmered with luster dust. I also placed snowflakes in Queen Elsa's palms to imitate the scene in the movie where she conjures snowflakes with her bare hands.


Little Eileen had a wonderful Frozen Princess themed party and my friend said that everyone was just mesmerized with the cake!  ;-) 

So what do you all think?....please do share you feedback. The pics were all taken at night as the party was during the day....waiting to see some pics from the party as well :-)

-Manju

Dec 10, 2014

Bollywood theme cake with Paisley decorations and Gold beads!


I’m delighted to share this Bollywood Themed Cake with Paisley decorations and Gold beads that I made for a friend’s surprise party that she was throwing for her husband’s 40th birthday. The party theme was Bollywood....how fun! 
Her only requirement was a colorful and grand looking tiered cake with a disco ball as topper.
As it was for her husband, I wanted the cake colors to be more neutral, yet full of color with all the bollywood bling and decided to go with an Orange and Blue color combo, with accents of Gold ;-)


The top tier is a rich and buttery Vanilla Cake with Chocolate Buttercream filling, coated in Dark chocolate Ganache and covered in Royal Blue colored Marshmallow Fondant.

The bottom tier is a luscious Chocolate Cake with Chocolate Buttercream filling, coated in Dark chocolate Ganache and covered in Orange colored Marshmallow Fondant.

Each paisley is hand cutout, sprayed mildly with edible gold spray for a shine and decorated with edible gold beads. The smaller paisley cutouts were painted with edible gold and orange luster dust alternatively. The decoration took a lot of time, imagine sticking each gold bead one by one around the entire cutouts and around the border of the cake! But the end result was worth it.


For the top-tier I went with a quilted design decorated with edible gold beads with a bead impression lace mat border shaded gold. 


The inspiration for the name plaque was this Bollywood banner (pic from google images)


I made star shaped impressions to give the idea that the husband, ‘Rajeev’, is the star of the party! :-)


The Disco Ball topper is non-edible. I used a Styrofoam ball which was sprayed in gold color and stuck gold colored sequins all around. I placed it on top of a smaller round Styrofoam block which I wrapped around with a pretty Red ribbon with golden bead piping. 


When I went to the party hall to setup the cake, I was spell bound with the decorations. The Bollywood theme just screamed out with the colorful decorations ! It was just spectacular and a sight to behold....


I love the way light bounced off the gold sequins giving it a sparkly effect.


Look at the beautiful table decoration with the hidden lights and all....Loved it!


Making this cake was such a pleasure...although there were a few hiccups while decorating the cake, it was all resolved quickly and perfectly and I was very satisfied with the end result. It looked elegant and neat and the colors were perfect for the birthday ;-) 

I cannot end this post with thanking my friends for giving me this opportunity and trusting me with the cake for their beautiful surprise party and also to my husband who stayed up with me all the time while making this cake. Without him this cake wouldn't have been possible!

Your comments and feedback are my inspiration, so please don't forget to share your thoughts on this cake :-) Muah!

-Manju

Jul 29, 2014

Dinosaur Cake - a simple tutorial


I love experimenting with Appu’s b’day cakes. Because no matter how it turns up I know he’ll love it! I’m a self-taught cake decorator so I love to experiment, specially on the cakes I make for my family. It brings me both joy and also helps me explore various cake decorating skills.
Lil’Appu had a Dinosaur themed party for his 3rd b’day and the first thing he did was ask for a dinosaur birthday cake. Anybody who asked him about his b’day got the reply that ‘I’ll be getting a dinosaur b’day cake’ :-) He was so excited about it and I wanted it to look good.  

I decided to make my first ever carved 3D cake in the shape of a Stegosaurus dinosaur. 
I’m generally a little hesitant to do carved cakes for two reasons (1) what if the carving goes all wrong? (2) wastage of cake – although you could make cake pops with leftovers.  But I made up my mind this time and went ahead with my plans.

Here’s a simple tutorial with whatever pics I could manage to click while building my dino cake.


Step 1: Get the Stegosaurus spikes ready

Start with making the spikes for the Stegosaurus atleast a week in advance. I mixed some tylose powder in my marshmallow fondant but you can also use gumpaste for this as the spikes need to be hardened and stand straight on the cake. 

I used tear drop shaped cutters in three different sizes and then cut out the end from both sides to get a pointed tip at the bottom -> this will help to insert it into the cake. 
The cut out pieces can be either re-shaped or used just as is for the smaller spikes.
Make marks all over the spikes in straight lines to give it a rugged appearance and some texture.  Make several extras incase they break.
Plcae them on a baking sheet with wax paper to dry for atleast 4 days at room temperature.


I do not own an air-brush for spray coloring the cake, so this time I decided to give a try at using the Color Mist Spray colors by wilton and it worked like a charm :-) I spray misted the spikes on both sides with yellow and allowed them to dry. Then I painted the orange color in the middle using Orange luster dust mixed in vodka. Do this atleast 3 days before.


Step 2 : Bake, shape , fill and frost the cake

Ideally the body should be more oval-dome shaped than round-domed but I did not have an oval shaped pan so I used my regular round cake pans. 
For the body of the dino, I baked two 8” round cakes and one domed round cake in my small glass pyrex bowl.  Made Vanilla Buttercream and stacked them all together like this.

The flavor was a rich Chocolate-Espresso cake with lots of chocolate chips. 


To get an overall dome shape I gently carved out some cake from the top 8” cake (below the round domed cake) in a downward slant until it blended with the rest of the cake and it finally looked like this.


Frost the entire cake with vanilla buttercream. I just did a rough frosting as I was going to be covering the cake in fondant anyways, but make sure all gaps are filled in and the edges are quite smooth.


Step 3: Model the head, legs and tail (Can use Fondant, Cake or Rice Krispie treats)

I was planning to make cake-pop mix using the cake scraps after the carving to use for making the head,  legs and tail of the dino.  But I didn’t have to carve out a lot and had no extra cake on hand, so I used some leftover fondant that I had from doing a previous cake. So the Head, Tail and Legs of the dino were made with Fondant.   
(You could also use Rice-Krispie treats if you want)

The Stegosaurus head is small when compared to body and is sort of tapered with a beak like mouth.
The two front legs are smaller than the two back legs.
The tail is thick (specially where it joins the body) and its long and tapered at the end.


Step 4: Covering with Fondant 

Finally drape the whole cake including the head, legs and tail in fondant (I kneaded my fondant light green while making it) and trim away excess fondant.

Using a ball tool make holes for the eyes, small nostrils and make a shape for the mouth.
Again make vertical markings all over the body of the cake, the tail, head everywhere, to give it some texture and a scaly bodily appearance. Take care to not tear the fondant though.


I then Spray Misted the cake with Green :-) Let the cake dry out at room temp for 1-2 hrs.


Step 5: Place the spikes and give finishing touches

Now add the spikes on the cake body.  Starting with smaller spikes on the head, then bigger spikes in the center and smaller spikes again towards the tail, ending with pointed spikes at the end of the tail. I had to make small cuts with a knife to help insert the spikes into the body without breaking the spikes.
I made two small white balls for the eye-balls and used an edible marker to add the black pupil for the eyes.

Finally the finishing touches:
-- The cake board was coated with Chocolate buttercream for a muddy appearance.
-- Green grass  (vanilla buttercream colored with green) was piped all around the dino-cake to make it look as if the dino is resting in the grass. Used Wilton grass tip 233 for this.
-- Crushed graham cracker biscuits resembled sand and I added that all around the dino near the grass.


Just before the party I used some royal-icing to write ‘Happy Birthday Manav’ on the cake board. And this is how it looked.


The whole inspiration behind this dino cake was a tutorial I saw of a Stegosaurus cake by Montreal Confections and I just couldn't get it off my head :) so even though I was planning a T-Rex cake I finally decided to do a Stegosaurus with the pretty spikes on its body. 


Hope you liked the tutorial and I must confess this has been the easiest cake I have done so far. Even the detailing was pretty simple. If you ever make a dino cake please do share it with me. Would love to see your creations.

-Manju