Oct 13, 2015

Rotating carousel cake - a little video !


I know we are deep in Fall right now but I love to remember the warm n sunny summer we had this year. My sister and her hus came over to visit us for a whole week 1st week of July and then Manish’s parents stayed over with us for 2 whole months and later his sister and family with their 2 month-old baby boy, Dhyan came over and stayed for a month. So we had a lovely family time throughout this summer and my lil’Appu couldn’t have been more pleased with so many people to pamper and play with him. He loves his lil’nephew and always tells everyone he meets that he has a brother…Awww!

Manav, my lil'Appu's birthday falls on July 11th and this year his grandparents were here with us on his birthday and we wanted to make it a special one.


Having a summer b’day is so much fun 
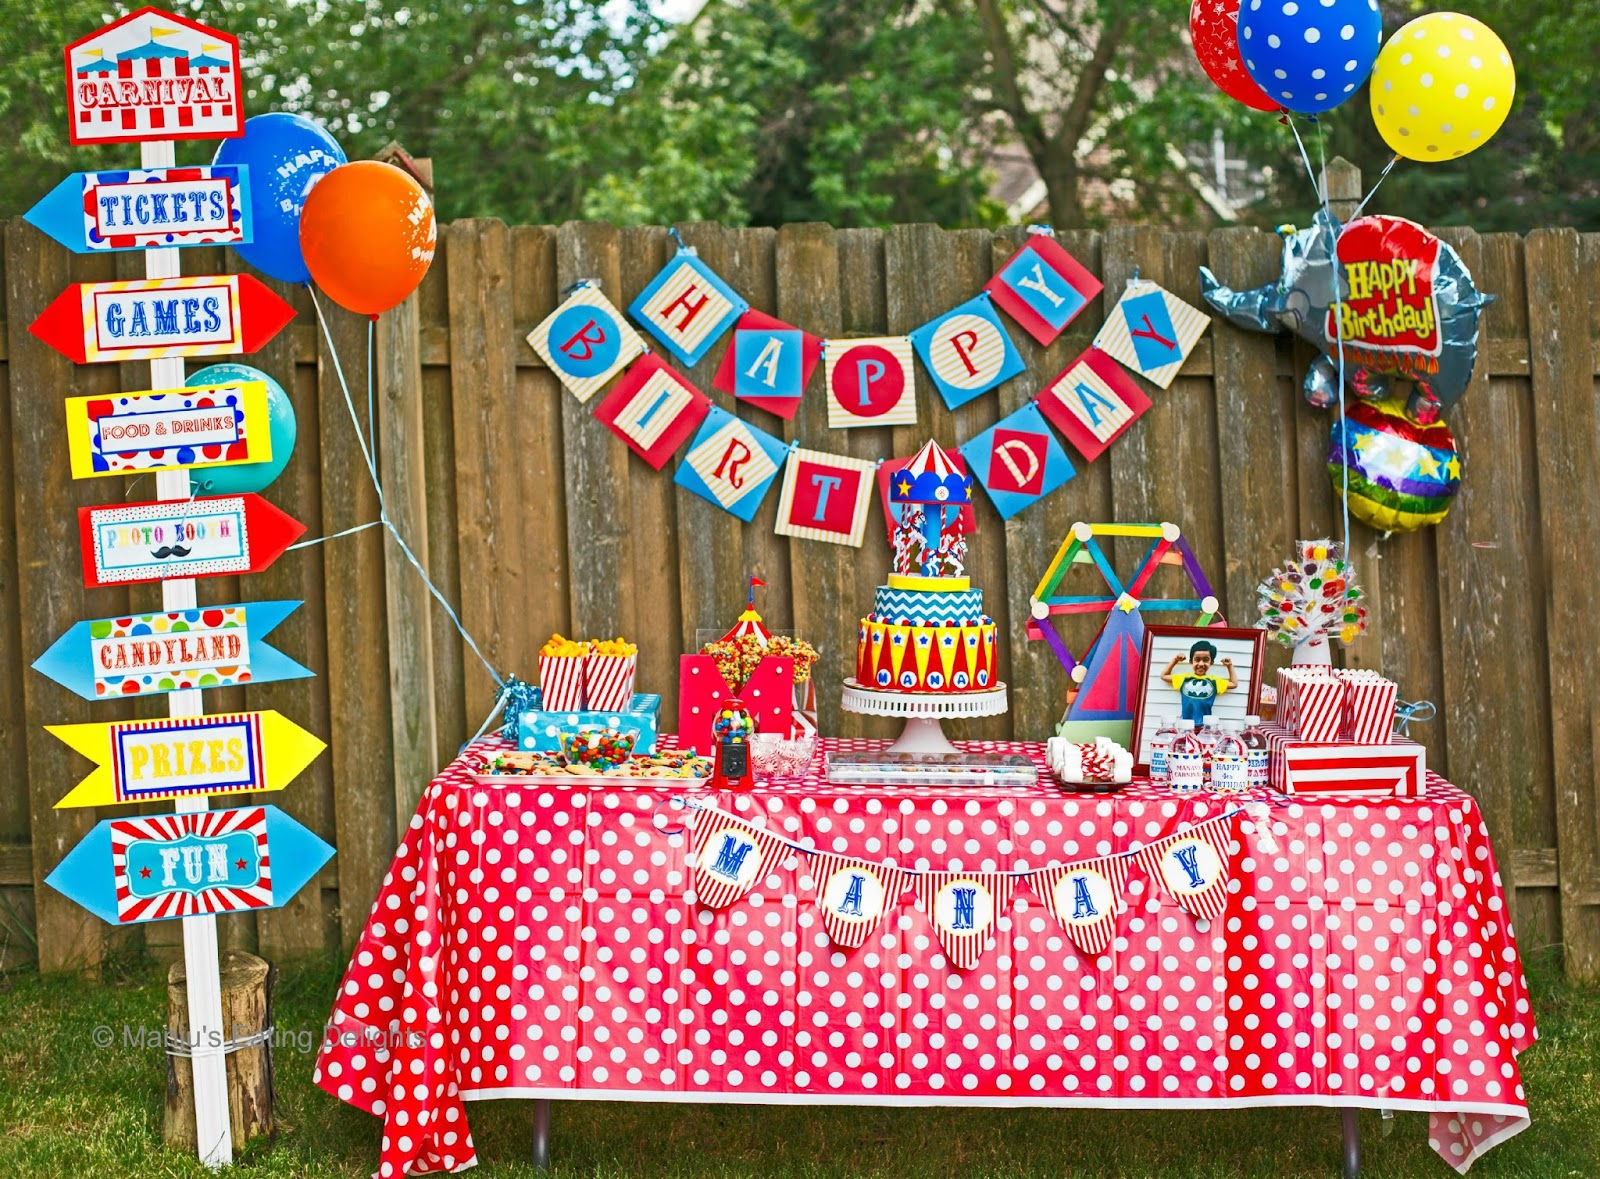
and we love keeping outdoor parties. We decided to do a colorful Carnival themed birthday for him this year with a whole bunch of games which the kids actually had to play to win their Prizes ;-) I’ve shared a full detailed post on the fun birthday party here.


Let me mention in advance that this is not a recipe post. It's just a post where I'm bragging about how we managed to make a rotating carousel cake and me trying some Ganache techniques...Lol! If still interested read away....

The first things that come to my mind when I think of a Carnival are Carousels and Ferris wheel rides. After going back n forth with what sort of cake to make, I decided to do a Carousel cake. I have earlier once made a Carousel cake for a girly birhday but my boy loves carousels too, so I decided to go with the same plan. My friends agreed to help make a Ferris Wheel to add to the cake table décor, so I was just thrilled.


Now if you have been following my blog for a while you know only too well how I love to go a bit crazy with my cakes :-) I had bought a rotating turntable a while ago to try an experiment on making a moving cake…u know a 4D kind of cake.

I did not make a tiered cake, nor did I want to spend a lot of time making the carousel edible. So I converted the rotating turntable to act like a second tier and completely constructed the carousel on top using Styrofoam blocks and printed paper. Each horse on the carousel is hand cut out…I must say all that cutting made my fingers quite numb!


I spent quite a lot many days getting the right designs designed up on my laptop and then printed out for the carousel and cutting them up and sticking it all together.  As he was turning 4 that was printed out on the top portion of the carousel.
We wanted to place a flag on top of the carousel tent, but that did not work out well.

The picture shown below shows how exactly the carousel parts came together. The first pic is the initial portion of the carousel and this was stuck onto the rotaing turntable which was covered with a Teal chevron patterned photo paper...I loved using photopaper, it was shiny and glossy and kept its shape. The conical carousel tent, horses and the bunting around the cone are all done using photpaper with deigns I made and printed out.


Appu was sitting beside me all the time while I worked on the carousel and he was quite thrilled. He was more overjoyed when I started the rotating turntable….he kept saying, “look mummy, the horses are jumping!” ;-) Yaaay! we had a rotating home-built carousel!

Now the only thing left was to bake the cake and ofcourse decorate it. Since the theme was about being colorful and fun and we already had the carnival element(the carousel) to go on top of the cake, I decided to make a colorful Polka Dot inside surprise cake.


The Polka dots were actually colorful cake balls which I was able to quickly make thanks to my electric cake ball maker. This gadget was a time saver I should say and was a cheap Thanksgiving purchase.
I went for fun, bright and boyish colors (if you can say so) – Red, Green, Yellow, Blue & Orange.

Once the cake was baked and cooled, I filled it with Vanilla Buttercream and frosted using yellow colored White Chocolate Ganache. 

Colored ganache is a big rage these days and a really nice option for those who do not enjoy the taste of Fondant but still want a really neat and smooth finish for their cakes. So I’ve always wanted to try this technique and it was a breeze I should say and I loved the end result and besides it tastes like white chocolate, what’s not to like about that! I used a premium quality White Chocolate and it set up beautifully.
Oh! And I tried a method called the Upside-down technique to get straight edges around the cake. Have to say I did not like the idea of having to flip my heavy cake up and down, so I’m not a fan of this technique and will have to try something else to get those neat sharp edges.  (Only a cake fanatic would understand all the things I just said in this paragraph…Lol!)

The decoration was so simple, all I had to do were cut out triangular red colored Fondant strips that was the same height as the cake and align then around the cake.
I cut out Manav’s name and placed them in round fondant circles.
Finally I placed the carousel (with the rotating turntable) on another cake board which was then placed on the cake and decorated around the cake board with colorful fondant balls. 

The pic below makes the cake look lopsided as the the table itself was sitting on a downhill portion of our backyard :-P


And thus my Roating Carousel Cake just rotated away the entire time it sat out at the party and I have to say it was quite the center of attraction!
Here's a fun little video I made showing the rotating cake and the cake table decoration and the games we put together! Hope you enjoy watching it. It's my first attempt at making a video, so your feedback is highly valuable :-)


-Manju

Sep 28, 2015

CARNIVAL themed Birthday - Manav turns 4!


Our little apple is not so little anymore as he turned a fantastic four years old on July 11th.  Manav, our lil'Appu, is a proud, cheerful and full of smiles four year old with tons of mischief up his sleeves and lot of good wit and charm.
He is tall, intelligent, a bit shy in front of strangers but smart, loves to walk, run and ride his bike all day long. He cannot get enough of swimming and staying in the water. He loves writing his name over and over again on his white board and has learnt to color within the lines and recognize all the alphabets and numbers and counts until 30! 
He is a music lover and absolutely loves Bollywood songs and listening to the Malayalam rockband Thaikudam Bridge. Hrithik Roshan is his favorite dancing actor and Appu even tries to imitate his steps. 
He loves helping his dad with all kinds of housework and backyard chores and thinks he has a lot of muscles :-D 

He sticks to me like a bee to a flower and literally keeps me on my toes. There is never a dull moment with my bumble bee and like I always say, I can never have enough of writing about him. Manish, myself, our family and close friends wishes him all success in life and we'll be there to support him in whatever his heart desires to do. This year's birthday was a lot more special with Appu's paternal grandparents being here and they helped a lot with all the decoration and party planning.

I was initially quite clueless as to what theme to keep for his 4th birthday. Oh! btw...I love doing themed parties...it's just so much fun to keep a theme and watch it materialize and the internet has all kinds of fun ideas. After looking around for ideas I saw this super fun theme - A CARNIVAL party or a CIRCUS theme that can be easily done in any outdoor or indoor space and it's a perfect theme for boys/girls of any age group or even for adults. Infact I even saw some weddings in a carnival theme, how fun would that wedding have been? :) 
Long post ahead with all the tiny details we included for this fun birthday party, so keep reading!

After discussing with Manish about the theme, he too loved it and we decided to do a Carnival birthday party in our backyard! I wanted to keep a bunch of fun games for the kids with a proper Carnival approach where each kids got tickets to play the games.  We invited only very close friends and neighbors whom Appu was familiar with so that he would have fun playing with everyone and not be shy.


CARNIVAL GAMES


The games were all set out all over our backyard with a proper sign board for each game which we printed out and made ourselves. The games we planned were:

Carnival Can Toss : 6 cans stacked together to be knocked down with a ball. Me and my friend Winnie, saved all used cans (fruit, tomato paste, coconut milk cans etc) cleaned and wrapped them in printed paper for the game.


Ping Pong Fishing : Aim pin pong balls into the fish bowls (plastic cups with blue cellophane to resemble water and a plastic goldfish) and if they win they get to keep the fish!


Starfish Ring Toss : Starfish shaped inflatable with 5 rings & poles, kids had to aim all the rings on the poles.

Bowling Pins : Roll the bowling ball to knock down the pin spread out on his alphabet mat. This game was Appu's special request and his birthday present from us, he loves playing it all the time.
Basketball Throw: Aim the ball into the basket. (You can see the basketball hoop behind the bowling pins)

Duck Pond Fishing: Fish the ducks out of the pond using the fish pole -- this game was a huge hit!

Ping Pong Toss: Aim 6 ping pong balls into 6 red cups. 

Each kid got a wristband and name tags as they walked up to the games area...yup wristbands, just like an actual Carnival, just that these said 'Manav's Carnival' on them :-)


Each kid were given 7 'Admit-One' tickets , 1 for each game. They had to stand in line and wait for their turn to play a game and were given few rounds to play each game and if they won, a different set of blue colored 'Keep this Coupon' Tickets were handed over. The kids actually played to win the blue tickets and were well behaved. They had a blast and apparently the duck pond fishing game was the biggest hit among all the kids. 
 

Even though it turned out to be a super hot and sunny day, all the kids including my little guy and all my volunteer friends (who manned the games) were sporty and played very nicely and had a good time.


CARNIVAL THEMED DECORATIONS & CAKE TABLE

We decorated our entire backyard and patio deck with fun carnival themed party hangings and lots of colorful balloons. It looked very colorful and festive.


For the Cake table I wanted a colorful station that depicted a fun carnival-like-candyland including a full fledged Directional sign board and colorful balloons. We stationed the cake table against our backyard fence which was a good spot.
There was a Circus Tent, Carousel and Ferris wheel on the Cake table to go with the Carnival theme. We also kept some colorful (homemeade) Trix treats, M&M chocolates and cookies, yummy Truffle balls, popcorn and cheesepuffs and a colorful Lolipop tree. 


I wanted a marquee with the letter 'M' on the cake table and decided to make it ourselves. So we bought a 3D alphabet block M from Michaels and covered it with Red scrapbook paper. Manish and his dad drilled holes to place the blinking LED balloon lights and actually made the marquee come to life, just like how I wanted and it blinked away all throughout the party :-) The mini gumball machine filled with peanut M&M's was actually lil'Appu's favorite thing on the cake table. 
For the Circus Tent , we borrowed a styrofoam lolipop stand from our nearby Dollar Store and wrapped it up with fun carnival red and white striped wrapping paper and printed out a Carnival tent that fit perfectly as the backdrop.
We made some colorful Trix Treats (instead of Rice Krispie treats) on a stick and though some of them standing meting due to the heat and started dropping down on the stick, it still looked quite good.


The colorful Ferris wheel was made my my talented couple friends Swati and Navaneet and it actually rotates...how awesome!
There was also a fun photograph of Appu which he posed for saying he had strong muscles and that was perfect to keep near the marshmallow dumbbells (which I called Strongman dumbells). And not to forget the waterbottles with customized wraps.


I decided to make a Carousel Cake this time for Appu's birthday and one that actually rotates...yes the Carousel on top of the cake actually rotates. As usual I love to experiment with my family's b'day cakes, so a fun fact about the cake is that the yellow portion of the cake is not fondant but yellow colored White Chocolate Ganache...so I made my first Colored Ganache cake! And another fun part...the cake was filled with colorful polka dots...so a Polka Dot surprise inside cake it was....yaay! More about that in a separate post.


The Directional Board was our next big project. We actually went to Menards to get a decent sized white colored wooden board to form the stem of the directional board. I had plenty of colorful chart paper which my brother-in-law helped cut into different sided arrows and I printed out the names and stuck them on the chart. Later my father-in-law helped stick each sign on the board. It was amazing to see how it all came up finally! The sign directions did not quite match with where the actual stuff was but it did not matter...hehe.


CARNIVAL PRIZES


For the Carnival prizes, our plan was to actually hang all the prizes on the wrapped board with pushpins and place the board near the Games area for all the kids to see, but they wouldn't stay and kept falling down with the weight, so we just placed them flat on the board and kept a sign that said Carnival Prizes.


Each set of prizes were kept within ziploc bags and we printed out an image that said 'Manav's Carnival' and 'Happy 4th Birthday' on either side and placed them on top of the ziploc and stapled it up. It looked just like how a party favor bag bought from party city would look like but customized :-D The fun carnival prizes included variety of toys, pencils, chocolates and fun star shaped sunglasses. Each kid could select any bag they wanted. Apart from the color of the toys/glasses and chocolates everything in each bag was same.


CAKE CUTTING


Cake cutting went really well...all the kids gathered around the cake table...they all got so excited that they started screaming on top of their lungs, which was quite noisy if i may say so, but they were all happy and that's what mattered.


Appu wanted to hold the knife and cut the cake all by himself which I had to reluctantly agree to unless I wanted a tantrum at that moment. 
The rotating carousel peeked everyone's curiosity and the kids wanted to touch it and try stopping the rotation...oh well! chaos with a big C :-D N to top it off, my cake was almost on the verge of melting due to all the heat so I just wanted to be done with it ...Lol! 


Everyone sang Happy Birthday while Appu decently cut a pretty slice all by himself and literally gulped the entire piece. He happily ate a slice from whoever gave him one and was the first to take another big slice to go n eat it all by himself...either he was damn hungry or he really loved the cake...hehe! 


It was a fun Polka dot inside White Chocolate cake with White Chocolate Ganache and everyone said the cake tasted amazing. More on the cake in a detail post...coming soon :)


PHOTOBOOTH

We kept a fun Photobooth with lots of cheeky carnival props for everyone to strike a pose! It was huge hit and everyone enjoyed taking a snap with the fun props. We forgot to take a pic of the props but you get it right? ;-)

Appu's favorite was the gumball machine and he used that as his prop and ate up all the candy in it too...Love the pics where the kids are posing with the props!


FOOD & DRINKS

When I asked Appu what he wanted to eat on his b'day he said without evening thinking - Pizza! So well, we went the easy route with the food, although I had a huge plan of a carnival themed food spread, but I'm so glad I didn't go crazy on that and ordered some simple food. The only hard work we did on the food was making the food labels...Lol!!
We decided to not keep any carbonated drinks as it was a kids party so instead there was plenty of refreshing and chilled homemade Mango lemonade and Strawberry lemonade and Water for drinks with Potato chips, colorful fryums and popcorn for snacking. 


Appetizers: Chicken Wings and Cheesy Garlic Bread 
Pizza: Variety of Veg and chicken options
Pasta : Veg and chicken Pasta from our favorite Italian restaurant - Bucca Di Beppo. 
Dessert: Chilled Mango custard with mixed fruits and nuts.
My mother-in-law and I made the delicious Mango Fruit custard for dessert which we forgot to bring out from the fridge until the last moment - oops! so a few friends missed that treat before they left. Sorry about that folks...we enjoyed the remaining dessert over the next few days...hehe!

In all it was a superb birthday party , the games and decor were a big hit and although it was a super hot day everyone seemed to have had fun. My parents-in-law, Manish (hus) and some close friends were so helpful in getting everything setup for the party. 
The night before the party my mother-in-law (mummy) and father-in-law (pappa) stayed up late at night to stick the personalized labels for the water bottles and the carnival prizes and pappa helped with all the balloon blowing and getting the directional board ready.  Love them!

Phew! Finally I'm done with writing down this b'day post. I feel like I've been writing this forever as I did not want to miss any detail, a lot of which I had to purposely omit to not make it too boring. It's also taken me sooooooo long to just get all the pics sorted out, for which I need to thank my friend and photographer Bishal for capturing such awesome moments of the birthday party.

If you've kept up with my rambling until here, then I'll be back soon with some more details on the cake soon in my next blog post, so stay put...until then, lets all have fun, be goofy and have a carnival time ;-)


-Manju


Jul 17, 2015

Meen Pathiri - steamed Rice Pancakes with a Fish Masala stuffing | a Malabari delight


I love trying varieties of food when cooking for friends or if I have guests over. I know it’s not a good practice to experiment with food for the very first time when you have guests over. But if I’m calling over close friends who share the same passion as me when it comes to trying new food I don’t mind. I know they’ll forgive me if it fails and still eat the dish or else applaud it and want me to immediately share it on the blog ;-) I’m thankful for having such friends.


I wanted to share this post the same week I made this dish but that got delayed by a couple of months now :-D Anyways, few months ago, I had a set of close pals over for lunch and decided we’ll have a Malabari themed lunch. Malabar is the northern region of kerala and their cuisine is quite different from Kottayam (where I’m from) and let me say the food options are really yumm!
Initially I had thought of making the whole lunch myself but then we later decided on a potluck…Don’t blame me if you start drooling all over :-D , but the lunch menu we decided on was:
Chicken Chatti pathiri, Meen Pathiri, Kappa with Fish Curry, Varutharacha Chicken Curry, Spicy Fish fry, Nei Chor, Mixed Veg raita, Rasmalai (for dessert)


Wanting to try something new and different I decided to try my hand at making Chicken Chatti Pathiri and Meen Pathiri. My friends decided to bring the other stuff and for dessert I just bought some Rasmalai from the Indian store, which turned out really good btw.

All the dishes came out so good and we couldn’t stop complimenting each other for our cooking skills…Lol! The Meen Pathiri was a big hit, everyone went for second and third helpings. 
Meen Pathiri is a Malabar treat which is commonly served during special occasions like Weddings, Ramadan feast etc. They are steamed rice pancakes with a Fish Masala filling. The pancakes itself tastes great on their own. The preparation can be a bit time consuming but they were really worth it and if you shallow fry the fish instead of deep frying and use less oil when preparing the masala, these Fish pancakes turn out to be a very healthy snack/appetizer option too. It’s a must try dish!

The Chicken Pathiri came out pretty good for a first try, it held its shape and came out perfectly from the pan but I personally felt the chicken filling needed some more spice or flavor, so I’m not sharing the recipe for that now. I want to give it another try and see if it works next time and then will share my experience in detail. 


But for now let’s enjoy and try this awesome Meen Pathiri recipe. The fish masala filling  is simply awesome and even the Rice Pathiri tastes great on its own. My friends also agreed this was a good recipe to share on the blog, so here it is…


I followed the recipe instructions as given by my favorite Malabari cuisine blogger Shabs from her blog Shab's cuisine and have almost copied the instructions exactly as written by her as it was so well explained. The only changes I made was using Idli rice for the pathiri and using boneless fish whereas she has used fish with bones and de-boned the fish after frying. 


MEEN PATHIRI (Fish masala stuffed Rice Pancakes)
Recipe Source: Shab's Cuisine

You'll Need
For Rice Pathiri
2 cups Parboiled rice (I used IDLI Rice)
1 ½ Tablespoons fennel seeds (Perumjeerakam)
1 ¾ cups grated coconut
1 ½ cups water
1 cup Rice flour
Salt – As required

For Fish fry
3-4 Fillets of boneless Tilapia
2 Tablespoons Red Chilli powder
1 teaspoon Black pepper powder
1 teaspoon Coriander powder
½ teaspoon Turmeric powder
Salt as needed
Water as needed to make a thick paste

For Fish Masala
3 Large onions (approx 4cups chopped)
5 large cloves of garlic (1 heaped Tblsp, grated)
2 medium Tomatoes (approx 1 cup chopped)
2 teaspoon Kashmiri Chilli Powder
3 teaspoon Coriander powder
½ teaspoon Turmeric powder
1-1 ½ Tablespoon Lime/lemon juice
2 twigs curry leaves, chopped
6-8 Mint leaves, chopped
Tablespoons Coriander leaves
Tablespoons water
½ teaspoon Garam masala
1 teaspoon salt

For Coconut paste:
½ cup grated coconut
½ teaspoon fennel seeds (perumjeerakam)
2 shallots
4 Tablespoons (1/4 cup) water

Directions
For making the Ari (rice) Pathiri :
1. Soak the rice in water for 3-4 hours or overnight.
2. Grind it with minimal water until you get a coarse yet grainy mixture.
3. Add coconut, fennel seeds, roughly chopped onions and salt to this and grind for few seconds until everything is just crushed and NOT smooth.
4. Tip the whole mixture in to a large bowl, add the rice powder and mix well using hands until you get dough that can be shaped into balls.


For Fish masala
1. Rub the fish with salt and lemon juice to get rid of the raw smell. Wash it thoroughly.
2. Make a thick paste of all the powders with water and marinate fish for about ½ hour -1 hour.
3. Make a smooth coconut paste by grinding the coconut, fennel, 2 shallots and water.
4. Heat a large frying pan and add oil. Fry the fish well. Remove from flame and break each piece into 4-6 portions. Keep them aside.
5. In the same pan, add onions and salt and sauté until it becomes soft and translucent. Add ginger, garlic and sauté for few minutes until the onion is cooked very well. Add chilli powder, coriander powder and turmeric powder and sauté for few seconds.
6. Add in the chopped tomatoes, cover and cook till the tomatoes are soft and cooked. Add the coconut paste and ¼ cup water (less or more as required to get a very thick, neither dry nor watery gravy/masala). 
7. Cover and cook for 3-4 minutes until the raw smell of the coconut goes away. Add the chopped coriander-mint leaves, lime/lemon juice and garam masala and stir well, cook for a minute or two. Add the fish pieces, cover and cook on very low flame until all the flavour is infused well for about 8-10 minutes.


For assembling the Meen Pathiri:
1. Take a small portion from the rice dough, make a ball and flatten it on a non-stick sheet (I used my Silpat mat, can also use square cutouts of wax paper or a banana leaf) using the heel of your palm. Add some masala in the centre along with the fish pieces. Leave some space at the ends.
2. Make another pathiri in another sheet the same way, a bit bigger than the previous one and cover the masala filled pathiri, covering the masala completely. Slowly press the edges using the fingers to seal all the fish masala in.

3. For steaming the pathiri, you can either place the pathiri with the wax paper/banana leaf itself into the steamer, or else just place each pathiri into a greased steamer by itself and steam for 10-12 minutes until its fully cooked through and becomes firm to touch.

4. Repeat the same process until all the fish masala and the rice dough are used up. Serve hot!


The entire lunch was a hit with these Meen (fish) Pathiri turning out the best! I'm urging you all to give it a try sometime.


-Manju

Jul 15, 2015

Pizza Margherita


The first time I read the name Pizza Margherita on a menu card at a restaurant I was quite puzzled...I wondered, do they actually add Margarita in a pizza? Sounds quite dumb but trust me I was quite amused to find that I wasn't the only one who had thought so. Apparently Margarita (the drink) and Margherita (the pizza) are world's apart from each other and even the spellings are different although they are pronounced the same. 

Pizza Margherita or Margherita Pizza is a really simple Pizza yet it's huge on flavor. You just need three main ingredients for this pizza, Mozerella (fresh is best), a flavorful Tomato pizza sauce and fresh Basil leaves. 

Here's what I found when I searched on trusted Google.com for why this pizza is named as such:
  1. An often recounted story holds that on 11 June 1889, to honour the Queen consort of Italy, Margherita of Savoy, the Neapolitan pizzamaker Raffaele Esposito created the "Pizza Margherita", a pizza garnished with tomatoes, mozzarella, and basil, to represent the national colours of Italy as on the Italian flag.

I love baking fresh homemade pizza and trying new toppings each time and this was a flavor I tried when we kept a simple backyard bbq gettogether with friends. These were ideally meant as an appetizer and got over so fast that I only managed to take some quick snaps on my Iphone camera, thank goodness for such smart phone cams. Even my lil'Appu loved this pizza and ate several slices.

The pizza crust recipe makes about 2 medium sized pizzas, I made 4 small pizzas. I just used some store bought Marinara sauce and Grated mozerella cheese for the toppings and used fresh Basil leaves from our garden.  Fresh Basil leaves is quite a must to bring out the flavor in this pizza...

PIZZA MARGHERITA

You'll Need
For Pizza Dough
½ cup Warm Water
2 ¼ teaspoon Instant  Yeast
4 cups Bread flour / All-purpose Flour plus more for dusting
1 ½ teaspoon Salt
1 ¼ cup water, at room temperature
2 Tablespoons Extra Virgin Olive Oil

For Margherita Pizza topping
Preferred Pizza sauce (Marinara sauce)
Grated Mozerella as needed or use fresh Mozerella
Fresh Basil leaves, as needed
Salt as needed
Red chilli flakes / Seasoned Pizza flavoring herbs etc for garnish

Directions:
To make Pizza Dough
1.Take warm water in a small bowl and add the instant yeast and set it aside. (sometimes I add a pinch of sugar to help activate the yeast faster)
2. In the bowl of a stand mixer with paddle attachment add the flour and salt and mix well.
3. Add the measured water at room temperature into the yeast mixture.
4. On a slow speed add the yeast-water mixture with olive oil into the flour and combine until a dough starts to form.
5. Switch to the dough hook and knead on low speed until the dough is smooth and elastic for about 5 minutes and transfer the dough onto a greased/oiled bowl covered with plastic wrap and let it rest and double in size for about 1 – 1 ½ hours.

Once doubled in size, deflate the dough gently and divide into equal parts (I divided the dough into 4 parts) and rolled the dough into balls and cover each ball with a damp cloth and let them rest again for 10minutes. (if not using all the dough balls, you can freeze them by individually wrapping in plastic wrap)

To make Pizza Margherita

1. Make the pizza rounds by dusting the work surface with some flour and rolling out with a rolling pin or dusted hands to desired size keeping the crust a little thick and brushed with some olive oil.  Place the pizza on a baking tray that is lightly sprinkled with some cornmeal or Sooji(rava) to prevent the dough from sticking.

2. Spoon the top of the pizza base with desired pizza sauce, I used marinara sauce bought from our local Kowalski store (it was perfectly seasoned and had a lovely flavor)
3. Tear some fresh Basil leaves and add them over the top of the marinara sauce.
4. Top with generous amounts of grated Mozzarella cheese. Sprinkle a pinch of salt over the top.
5. Pre-heat the oven at 500F and then place the baking tray with the pizza on it and bake for about 10-12 mins or until the cheese is melted and bubbly. You may need to reduce or increase baking times depending on the size of your pizza.
6. If desired garnish the pizza with red chilli flakes or dried pizza seasoning for extra flavor. Cut into slices and serve hot!

Recipe Source:
Pizza Dough: Annies Eats
Pizza Toppings: My own

-Manju