

On this happy occasion I present to you a "CCC"....read on to know more :-)
Well first I wanted to share with you how MED came into being and its journey until now...Long 'short story' ahead, are you ready?? :-)


I used to take photographs of the food I cooked/ate ever since I went to college , mainly to share with my parents, who lived in Dubai at the time and I was in studying-living-working in India. So any dish I prepared or ate at some restaurant would be proudly presented with pictures to my parents. Who doesn't like to show off ? :-)
I still remember this time of the year last year, when I had just decided to quit my job (in the middle of my maternity leave) as I couldn't bring myself to leave my then 3 month old at someone else's care and I honestly wanted a longer break :-) But I wanted some hobby to keep me connected and talking with other people. A few months earlier I had started posting some recipes at a common food forum called CookEatShare , but I wanted something that had 'my name' on it ;-) At that time I had created a photo album named Manju's Eating Delights on my personal facebook page to lure my friends into my new-found hobby and food photography and I just decided to keep the same name if I ever started a blog!
I was horrible at figuring out the template setup and page creation blah blah on Blogger (or just plain lazy you can say :-) ), and I took the easy route, let Manish do all that stuff :-) I had prepared PaalAppam with Potato Stew for breakfast that morning, for which I had taken few snaps (to send to my parents) and posted the same on the blog , evening of Oct 15th, 2011. Thus MED was born... drumrolls please!! :-P
Now I love to photograph food in different ways and get more and more creative , and though I have lots more to learn, I'm really enjoying with each of my post :-)

My Blog and I have grown so much in this past 1 year. I am back at my old job, I feel so full of energy and blogging has brought out a creative side in me that I never knew I had. I have learnt how to balance my life with my sweet baby and hubby, office work, homely chores and blogging!
The blog has close to 37500+ views, 119 followers and 150+ Facebook Likes and gets close to 200+ views daily (not bad for a beginner blogger), not to mention the lovely messages I get from friends, family, colleagues and other readers on various occasions.
And the reason for all this is you all...YOU are my inspiration and energy!! THANK YOU again!

I used a Vanilla Cake box mix ( well it was just taking up some of my pantry space :-) ). I divided the batter equally in half before adding the water and substituted the 1 cup water with 1/2 cup Orange juice and 1/2 cup lemon juice respectively. The whole house smelled so citrus-ey while it baked :-).
The first time I ever saw a chekerboard cake was at Raspberri Cupcakes blog and I loved it. And recently I've been totally hooked on to Amanda's blog and loved the tutorial she gave for her Rose cake and finally I just used both these ideas and since I had plenty of Oranges and Lemons at home, I used them for my cake flavor. Sometimes you need a change from chocolate and vanilla flavors right? :-)
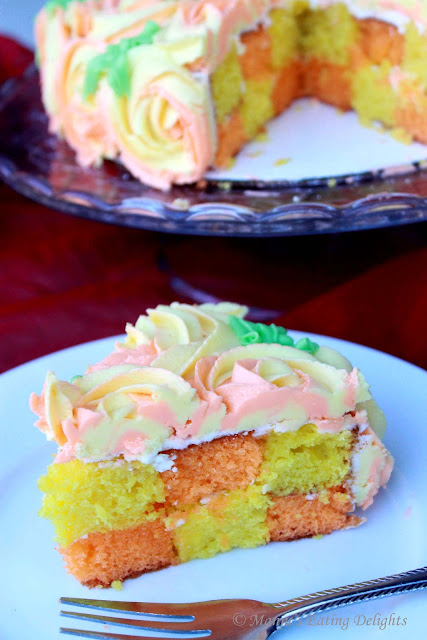
Orange and Lemon Checkerboard cake with Roses
You'll need
For cake
Vanilla Cake box mix - 1 (I used Betty Crocker)
Eggs - 3
Vegetable oil - 1/2 cup
Freshly squeezed Orange juice - 1/2 cup
Orange zest - 1 tblsp
Freshly squeezed Lemon juice - 1/2 cup
Lemon zest - 1tblsp
Sugar - 1tblsp
Wiltons Orange colored food gel - as required
Wiltons Yellow colored food gel - as required
For Vanilla buttercream
Butter (Softened at Room temperature )- 2 sticks (16tblsp)
Confectioners sugar (powdered sugar) - 3-4 cups
Pure Vanilla extract - 1 tsp
Salt - a tiny pinch
Milk or heavy cream - 3-4 tblsp
Wiltons Orange colored food gel - as required
Wiltons Yellow colored food gel - as required
Wiltons Green colored food gel - as required (optional)
Directions
For Cake
1. Preheat oven to 350F and grease two 8" round cake pans and keep aside.
2. Squeeze Orange juice and Lemon juice such that you get half cup of each and zest the Oranges and Lemons and keep aside. ( I had to use 2 oranges and 2 lemons).
 3. As per the box cake instructions beat together the eggs and vegetable oil with the cake mix (without adding any water.)
4. Divide the batter equally into two separate bowls. (The batter should divide equally with 1cup+1.5tblsp each in each bowl)
5. Add the orange juice + orange zest into one bowl and beat it well using a hand mixer/electric mixer. Add some Orange colored food gel until the desired color is obtained.
6. Sweeten the lemon juice with 1 tblsp sugar. Add the juice and lemon zest to the other bowl with cake batter and beat well again. Add some Yellow colored food gel until the desired color is obtained.
7. Pour the Orange cake batter into the cake tin and bake for 22-25 mins until a toothick inserted in the cake come out clean.
8. Similarly bake the Lemon cake batter for 22-25 mins.
9. Once the cakes have cooled slightly, transfer to a wire rack and refrigerate until assembling.
For Vanilla buttercream
1. In a large mixing bowl, cream the softened butter for few minutes on low speed. ( Its highly important that the butter is softened at room temperature, it should not be melted)
2. Add the vanilla extract and salt and beat again.
3. Now add the confectioners sugar 1 cup at a time and mix well using a spatula or a paddle attachment (if you are using a kitchen aid mixer).
4. After adding about 3 cups of powdered sugar, add milk if necessary, depending on the consistency of the buttercream you are looking for and smoothen the buttercream by folding it gently yet firmly using the spatula. (To pipe the roses , I made the buttercream at a stiff consistency and added about 2-3 tblsp of milk to smoothen it out)
5. Add desired color to the buttercream using a toothpick (Any Gel food coloring is the best, as it does not add more fluid to the buttercream)
[ I made 2 batches of this buttercream frosting , reserved 1 cup aside , and divided the rest of the buttercream and colored it orange and yellow separately]
To assemble the Checkerboard Cake
1. Once the Orange and Lemon cakes are completely chilled, level them such that both cakes are of same height or thickness.
2. We need to cut the cakes into individual concentric circles vertically. As I've used an 8" inch cake, I used 2 glass bowls of 4" and 6" diameters (If you have a cookie cutter with appropriate size measurements that's the best choice)
As shown in the pic, I have cut out the 4 inch size, and then using the other 6" glass bowl I cut out another layer around this 4" circle.
 3. Keep the Orange cake outer layer on your cake stand/board, apply a light coating of buttercream (which was reserved) around the inner edges of the cake , then carefully place the Lemon cake into the inside. Again apply some buttercream and place the Orange cake (4" part) inside and complete the cake (as shown)

To pipe the Roses
1. Attach the 1M piping tip to the tip of your piping bag or Ziploc bag.
2. Add the Orange colored buttercream to one half of the bag and the Yellow colored buttercream to the other half.
3. Squeeze out some buttercream until you see both the colors blended together.
4. Start from the sides of the cake, Keep your tip in the center and carefully and swiftly do a Swirl starting from inside to out, until a Rose shape swirl is obtained. Continue the same all around the edge and over the cake.
5. There will be gaps in between the rose swirls, which you may fill with same buttercream by simply piping small stars or dots using the 1M tip, else like I did, color some remaining white buttercream with Green gel and using a Leaf tip, pipe leaves in the gaps :-)
 Few useful suggestions and tips:
1. The Lemon cake is really lemony and if you prefer a milder lemon taste, reduce the quantity of fresh lemon juice to 1/4 cup and add 1/4 cup water to obtain 1/2 cup of fluid. Sweeten with 1 tblsp sugar.
2. The cake is pretty moist and crumbly, so be careful while arranging the concentric patterns. A denser cake is preferable for such patterns (just my opinion)
3. DO NOT beat your buttercream with a whisk attachment , trust me, I learnt it the hard way. Use a spatula or wodden spoon to mix together the confectioners sugar with the butter. It results in a creamier buttrecream with less air bubbles in it.
 The cake tasted very fruity and had a beautiful citrus flavor. I felt the lemon cake was too lemony for us, so next time I may reduce the amount of Lemon juice, but it went very well with the sweet buttercream. I took almost the entire cake to my office and shared with all my colleagues. They loved it and my boss gave me a double thumbs up!!! Yippeeee!!
P.S : for those who are wondering, I've NEVER taken a Cake Baking or Cake decoration class ever! I just don't have the time for that right now.
Also, I do all of the design and setup on the blog now, and still learning! :-)
And a special thanks to my hubby dear and beautiful baby boy for bearing with all my craziness while preparing for a post, starting from making the dish, styling, photographing , blogging etc etc :-)
And to my family , friends and colleagues for their constant support!
And so as MED crosses a year, let's all wait for what all is coming up next right??? What about a Giveaway? :-) Sounds interesting?....all in my next post! Stay tuned Amigos!!!
(Oct 21st, 2012) Update: Please check here for the Giveaway information. Hope you win! :-)
-Manju
The first time I ever saw a chekerboard cake was at Raspberri Cupcakes blog and I loved it. And recently I've been totally hooked on to Amanda's blog and loved the tutorial she gave for her Rose cake and finally I just used both these ideas and since I had plenty of Oranges and Lemons at home, I used them for my cake flavor. Sometimes you need a change from chocolate and vanilla flavors right? :-)

Orange and Lemon Checkerboard cake with Roses
You'll need
For cake
Vanilla Cake box mix - 1 (I used Betty Crocker)
Eggs - 3
Vegetable oil - 1/2 cup
Freshly squeezed Orange juice - 1/2 cup
Orange zest - 1 tblsp
Freshly squeezed Lemon juice - 1/2 cup
Lemon zest - 1tblsp
Sugar - 1tblsp
Wiltons Orange colored food gel - as required
Wiltons Yellow colored food gel - as required
For Vanilla buttercream
Butter (Softened at Room temperature )- 2 sticks (16tblsp)
Confectioners sugar (powdered sugar) - 3-4 cups
Pure Vanilla extract - 1 tsp
Salt - a tiny pinch
Milk or heavy cream - 3-4 tblsp
Wiltons Orange colored food gel - as required
Wiltons Yellow colored food gel - as required
Wiltons Green colored food gel - as required (optional)
Directions
For Cake
1. Preheat oven to 350F and grease two 8" round cake pans and keep aside.
2. Squeeze Orange juice and Lemon juice such that you get half cup of each and zest the Oranges and Lemons and keep aside. ( I had to use 2 oranges and 2 lemons).

4. Divide the batter equally into two separate bowls. (The batter should divide equally with 1cup+1.5tblsp each in each bowl)
5. Add the orange juice + orange zest into one bowl and beat it well using a hand mixer/electric mixer. Add some Orange colored food gel until the desired color is obtained.
6. Sweeten the lemon juice with 1 tblsp sugar. Add the juice and lemon zest to the other bowl with cake batter and beat well again. Add some Yellow colored food gel until the desired color is obtained.
7. Pour the Orange cake batter into the cake tin and bake for 22-25 mins until a toothick inserted in the cake come out clean.
8. Similarly bake the Lemon cake batter for 22-25 mins.
9. Once the cakes have cooled slightly, transfer to a wire rack and refrigerate until assembling.
For Vanilla buttercream
1. In a large mixing bowl, cream the softened butter for few minutes on low speed. ( Its highly important that the butter is softened at room temperature, it should not be melted)
2. Add the vanilla extract and salt and beat again.
3. Now add the confectioners sugar 1 cup at a time and mix well using a spatula or a paddle attachment (if you are using a kitchen aid mixer).
4. After adding about 3 cups of powdered sugar, add milk if necessary, depending on the consistency of the buttercream you are looking for and smoothen the buttercream by folding it gently yet firmly using the spatula. (To pipe the roses , I made the buttercream at a stiff consistency and added about 2-3 tblsp of milk to smoothen it out)
5. Add desired color to the buttercream using a toothpick (Any Gel food coloring is the best, as it does not add more fluid to the buttercream)
[ I made 2 batches of this buttercream frosting , reserved 1 cup aside , and divided the rest of the buttercream and colored it orange and yellow separately]
To assemble the Checkerboard Cake
1. Once the Orange and Lemon cakes are completely chilled, level them such that both cakes are of same height or thickness.
2. We need to cut the cakes into individual concentric circles vertically. As I've used an 8" inch cake, I used 2 glass bowls of 4" and 6" diameters (If you have a cookie cutter with appropriate size measurements that's the best choice)
As shown in the pic, I have cut out the 4 inch size, and then using the other 6" glass bowl I cut out another layer around this 4" circle.


4. Repeat the same for the Other cake with Lemon, Orange and Lemon and apply a light coating of buttercream over the first layer of cake and carefully place this second layer on top. (Or you can directly do the second layer over the first layer , which is how I did)
5. Apply a crumb coating with slightly loosened (with milk) buttercream over the whole cake.To pipe the Roses
1. Attach the 1M piping tip to the tip of your piping bag or Ziploc bag.
2. Add the Orange colored buttercream to one half of the bag and the Yellow colored buttercream to the other half.
3. Squeeze out some buttercream until you see both the colors blended together.
4. Start from the sides of the cake, Keep your tip in the center and carefully and swiftly do a Swirl starting from inside to out, until a Rose shape swirl is obtained. Continue the same all around the edge and over the cake.
5. There will be gaps in between the rose swirls, which you may fill with same buttercream by simply piping small stars or dots using the 1M tip, else like I did, color some remaining white buttercream with Green gel and using a Leaf tip, pipe leaves in the gaps :-)

1. The Lemon cake is really lemony and if you prefer a milder lemon taste, reduce the quantity of fresh lemon juice to 1/4 cup and add 1/4 cup water to obtain 1/2 cup of fluid. Sweeten with 1 tblsp sugar.
2. The cake is pretty moist and crumbly, so be careful while arranging the concentric patterns. A denser cake is preferable for such patterns (just my opinion)
3. DO NOT beat your buttercream with a whisk attachment , trust me, I learnt it the hard way. Use a spatula or wodden spoon to mix together the confectioners sugar with the butter. It results in a creamier buttrecream with less air bubbles in it.

P.S : for those who are wondering, I've NEVER taken a Cake Baking or Cake decoration class ever! I just don't have the time for that right now.
Also, I do all of the design and setup on the blog now, and still learning! :-)
And a special thanks to my hubby dear and beautiful baby boy for bearing with all my craziness while preparing for a post, starting from making the dish, styling, photographing , blogging etc etc :-)
And to my family , friends and colleagues for their constant support!
 |
| Cake anyone??? :-) |
(Oct 21st, 2012) Update: Please check here for the Giveaway information. Hope you win! :-)
-Manju
Happy anniversary dear..
ReplyDeleteSuch a gorgeous cake to celebrate the occasion..
Thanks Divya :)
DeleteThe first is always so special & omg with the wonderful cake.. this double checker has been on my mind for so long..hope to see many more yrs of bloggin!
ReplyDeleteRasi,
Deletethanks a lot for your compliments...Its really easy to make this checkerboard cake.
I wish I had one more layer, would have looked prettier...Try it out, Hope my instructions are easy and clear.
Absolutely gorgeous cake to celebrate the occasion...Congrats and best of everything to you Manju.
ReplyDeleteAbsolutely gorgeous cake to celebrate the occasion...Congrats and best of everything to you Manju.
ReplyDeletehappy bloggoversary!
ReplyDeleteand lovely story abut how your blog came to be :)
i am a fan of amanda's blog and her rose technique too. your cake has turned out beautiful!
Thank you Abeer...I'm a huge fan of your cakes too :-)
DeleteCongrats Manju .. Cake looks lovely.. Wish to see more such recipes from you.. I am still wondering how you managed to pull this off so neatly.. :)
ReplyDeleteThanks a lot Nupur..
DeleteTo be honest , when I started piping those roses, my buttercream was so stiff that it started breaking, then I had to soften it again with some milk and make sure its of a pipeable consistency...and I literally held my breath and went for it, without stopping and did all the roses all at once.
I never thought it would look so neat! :-) (I was almost thinking its not gonna work, but it did...yaaay!)
happy blog anniversary manju.. nice post and enjoyed while reading it :)
ReplyDeletecongrats ...the cake looks awesome,u made it beautifully
ReplyDeleteSuper Yummy Recipes
What a beautiful cake and a wonderful post Manju, its a lovely write up and great to know your story. I wish that life is beautiful like you and delicious like your recipes /;0 wishing you more happiness through your blog and life... congrats and take care
ReplyDeletePriya :)
WOW!!! Congrats on your first year completion. Wondering how do u manage all those chores in a balanced way. Great!!!! The cake looks delicious with wonderful icing and nice fall colors. Happy blogging.
ReplyDeleteTempting and delicious.. Love the clicks.Happy anniversary..
ReplyDeleteHeartfelt Congrats gal,keep rocking with more interesting recipes,you have a great way to go..The cake looks gorgeous & perfect with the checkerb board pattern..Admire ur dedication to blogging along with work,Keep it up:)
ReplyDeleteJoin my ongoing EP events-Rosemary OR Sesame @ Now Serving
The cake looks lovely! Congrats on your one year blogging anniversary!
ReplyDeleteManju, what an amazing job!! This cake looks beautiful from the inside and out!! You are a fantastic cake decorator and you should show it off. I quit my job after my 2nd child was born and have not looked back. I love that we all have met in this virtual food world and get to share such amazing culinary delights with each other. This cake gets an A++++ in my book!! Take a bow my friend. :)
ReplyDeletePS.. Happy Blogiversary too!! You have done a spectacular job with your blog. :) Wishing you many more years of happy blogging. :)
ReplyDeleteHappy birthday to your blog baby, am speechless and couldnt take my eyes from ur mindblowing work, absolutely fabulous.
ReplyDeleteCongrats manju,loved the deco...cute.
ReplyDeleteHappy blog anniversary Manju!!..Wish you more success and fame..The cake looks really good...feel like grabbing it out of the screen...love the colors you have used...
ReplyDeleteThat is a pretty checkerboard cake. I didn't know that you could make checker board cake even without that 'Wilton checkerboard' baking mold. Nice job!!!
ReplyDeleteHow fantastic this looks, colorful and moist. The perfect cake to celebrate a year of blogging. Here's to many more!
ReplyDeletelooks great.. and congratulations..
ReplyDeleteCake looks truly gorgeous!!! You've decorated it so perfectly Manju!! Congrats on your 1st Blogoversary too :)
ReplyDeletesimple awesome!!! hats off to your patience...
ReplyDeletehttp://from-a-girls-mind.blogspot.com/
wow...what a gorgeous & marvellous looking cake!!!Congrats Manju..!! Wish you all the best for many more such wonderful years of blogging..
ReplyDeletePrathima Rao
Prats Corner
i like those roses on the cake...very neat and the cake looks absolutely yummy
ReplyDeleteWow.. love the rose cake.. I have try the checkerboard cake for sure.. roses look a lil' tough :D
ReplyDeleteYou are really talented!! It looks beautiful ! :-) Best wishes to you!
ReplyDeleteIts wonderful!!
ReplyDeleteJust wanted to know, will the roses stay in shape in Kerala's atmosphere? How long will they stay in shape outside the fridge?
Wonderful blog! Best wishes :)