Apr 29, 2013

We Knead to Bake #4 : Torcettini di Saint Vincent - sugar crusted yeasted cookies from Valle d'Aosta


I’m part of a lovely baker’s group started by Aparna Balasubramaniam called 'We Knead to Bake'. Our aim is to bake one bread every month for the whole of 2013 as suggested by Aparna and post it on our blogs by 24th of each month (ya I know I’m late).  I missed the March event due to all my busy packing and home shifting, but dint want to miss the April one…not when it has such a classy name…Lol!

Torcettini di Saint Vincent - doesn't the name just sound classy.  Torcettini are yeasted cookies/biscuits, yes yeasted cookies and not bread. They are almost bread like in texture, but with a crunchy exterior and rather soft flaky interior. They are usually shaped into twisted loops or tear drops and rolled in sugar before baking.
{ These cookies are synonymous with the town of Saint Vincent in Valle d'Aosta, a small mountainous region in North-Western Italy. Torcetti/ Torcettini are believed to have descended from Grissini (breadsticks) which were made from the leftover scraps of bread dough. According to one story, a Grissini baker had some leftover butter which he needed to use up. Inspiration struck and he decided to add the butter to the last batch of his Grissini dough for the day. To be able to differentiate this lot of “breadsticks” from his Grissini, he rolled them in sugar and shaped them into loops, and the Torcetti was born. Torcetti/ Torchettini are usually flavored with lime/ lemon zest or anise } – taken from Aparna’s blog

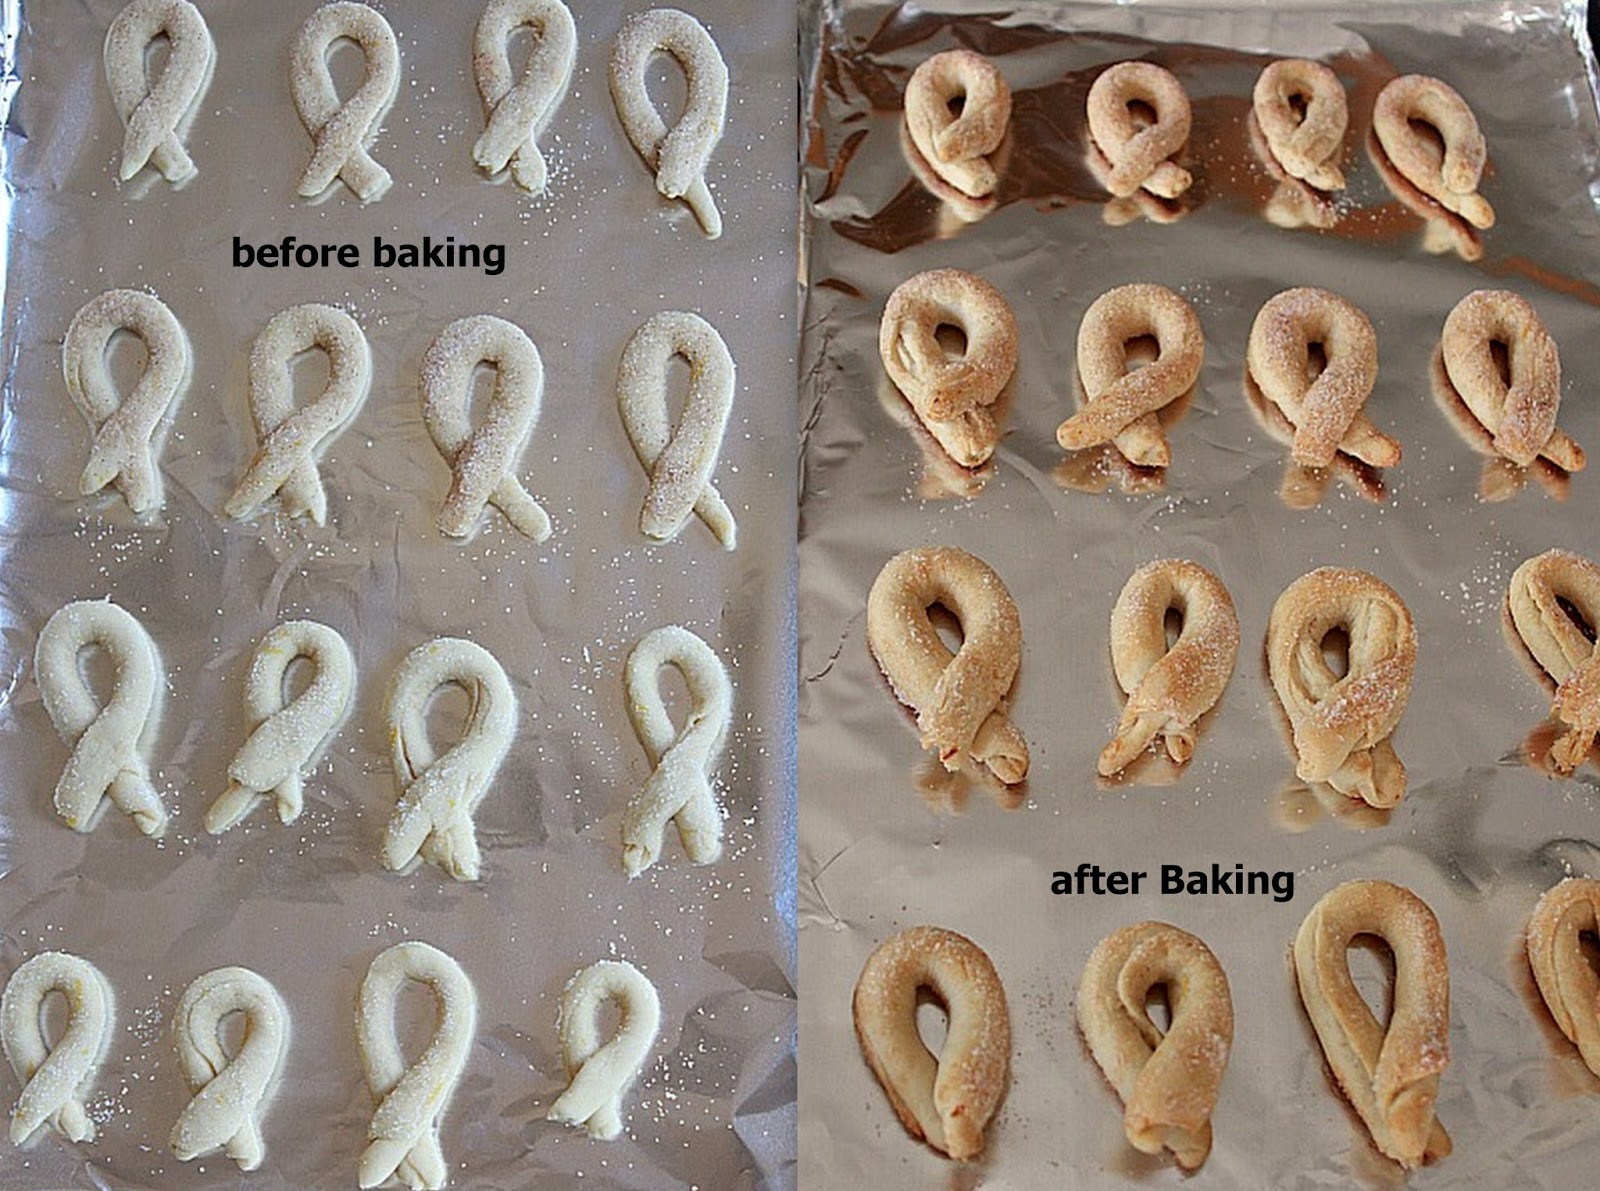
The bottom of the cookies get a deep brown color after baking 

They were really easy to make, and though it was suggested to let the dough rise from 1hr to 24hrs…I let it rise for 3 hrs and made it the same day. Instead of rolling the twisted dough in plain sugar I sprinkled some cinnamon into the sugar, thus making cinnamon sugar and rolled some in that.

As my parents preferred to have a less sweeter version , I rolled some cookies in plain sesame seeds. We loved both versions.

The cookies tastes best on the same day as they are baked.  They should ideally get a mild brown color but mine dint brown much. If you have eaten Little Hearts biscuits or Plamiers, then that’s somewhat how these cookies would taste. I personally enjoyed the mild flavor from the lemon zest and the subtle sweetness from the sugar. The sesame seeds on the cookies got toasted well and added a lovely crunch. 


And I went crazy taking pics and took quite a lot, so bear with me and hope you like them :-)


Here you see me getting all ready - my yeast is proofing, lemon is zested and flour is mixed with butter. I kept peeking at Aparna’s gorgeous pictures of the torcettini that she baked for inspiration while following the instructions in the recipe she shared :-)  


Torcettini di Saint Vincent

You'll need:
1/2 cup warm water, about 45C (110F)
1 1/4 tsp active dry yeast (or 1 tsp instant yeast)
1 1/2 cups all-purpose flour
1/4 tsp salt
1 tsp lime/ lemon zest or 1 tsp crushed anise seeds ( I used zest of a full lemon)
40gm 2 1/2 tbsp unsalted butter, cold and cut into small pieces
about 1/3 cup granulated sugar for rolling the cookies ( I used cinnamon sugar and sesame seeds)

Directions:
1. Dissolve the yeast in the warm water, in a small bowl and keep aside.
2. Put the flour and the salt in the food processor bowl (or a larger regular bowl if kneading by hand) and pulse a couple of times to mix.
3. Add the butter pieces and pulse until the butter is well mixed and the flour-butter mixture looks powdery.
4. Add the yeast-water mixture and pulse till it all comes together as a ball. Do not over process or knead.
5. Place the ball of dough in a oiled bowl, turning it so it is well coated with the oil. Cover the bowl, and let the dough rise quite a bit. This dough does not really double in volume, but it should look “puffy” after about an hour or so.
6. When you pinch off a bit from the top you can see the interior looking a bit like honeycomb. 
Press down the dough and deflate it, wrap it in cling warp and refrigerate it for at least one hour or up to 24 hours.
7. When ready to make the cookies, take the dough out and lightly roll it out into an approximately 6” square. If the dough feels sticky, scatter a little sugar on it. Using a pizza wheel cut the dough into four strips of equal width. Cut each strip into 6 equal pieces, by cutting across, making a total of 24 pieces. The measurements are not very critical in this part because this just makes it easier to have 24 equal sized bits of dough, as compared to pinching of bits of the dough.

8. Roll each piece into a pencil thick “rope” about 5” long. Sprinkle a little sugar on your work surface and roll the “rope” in it so the sugar crusts the dough uniformly. Form the “rope” into a loop crossing it over before the ends.
9. Place the Torcettini on parchment lined baking sheets, leaving 1 1/2" between them. Leave them for about 20 minutes or so till they rise/ puff up slightly. They will not “puff up” much, like bread, but the “puff” will be visible.
10. Bake them at 160C (325F) for about 25 minutes till they’re a nice golden brown. Cool the cookies completely, on a rack.

Store them in an air-tight container at room temperature. This recipe makes 24 cookies.


Some tips that might make a difference to your Torcettini –
1.  For a variation on these biscuits, you can make them chocolate flavoured.  If making chocolate Torcettini, remove 2 tbsp all-purpose flour and add 2 tbsp unsweetened cocoa powder.  Also add 2 tbsp powdered sugar and replace the lemon zest with orange zest while making the dough.
2.  Once your Torcettini have been shaped, don’t let them rise for longer than 20 minutes. If you do, your Torcettini will more bread-like on the inside due to the extra “rise”.
3.  To make sure the Torcettini dough does not rise for more than 20 minutes, it’s a good idea to work on shaping the 2nd batch while the first batch is in the oven.
4.  If you do not want to use parchment paper, you can grease you cookie sheets and place the shaped Torcettini dough on them directly. Just remember to take them off the sheets while they’re still hot. You will need a spatula to the dislodge them, and do so carefully so they don’t break. Once they’re cool, the caramelised sugar on the Torcettini make them stick to cookie sheets and they become difficult to dislodge without breaking them! 
(All the tips are copied exactly as mentioned in Aparna's blog )

These were really fun to make and my parents actually ate quite a few along with our evening tea. Thanks once again Aparna for such a perfect recipe and unique cookie. Do stop over at Aparna's space to check out what the others have shared.

So until next month's challenge, well we should just wait :-) Have a good day everyone.

-Manju


Apr 26, 2013

Chemmeen/Prawn Pollichathu - a guest post by Nisha


Today was quite a nice and warm day. We literally walked outside without a sweater after so many months , ya such simple feats as walking outside freely is a big deal in Minneapolis where the winters can be quite harsh for almost 6 months of the year. For the first time after moving to our new home we took a stroll around the community and met quite a few of our neighbors who were so friendly and eager to come over and say hello to the newcomers :-) Actually we were hot and tired by the time we came back home…and we loved it!

Today I’m going to introduce you all to a very talented blogger and I’m so happy I met her in this virtual world and was even more happy when she agreed to do a guest post for me – Nisha of Look Who’s Cooking Too. Her blog is a galore of a beautiful pictures and interesting recipes. She has a good sense of humour and I love the way she narrates her posts. She is a smart, pretty and friendly girl whom I really hope to meet some day. To pick one favorite dish from her vast collection is quite difficult as I absolutely love everything she shares and can literally spend hours on her blog. So don’t forget to check out her gorgeous space.

Today Nisha has a really interesting naadan dish for us all and I bet this dish is gonna blow your tastebuds away. Chemeen Pollichathu or Masala Prawns cooked in Banana leaf , a very popular Keralite dish!


Manju of Manju's Eating Delights and I don't go a long way back, but it feels like I've known her forever. I only recently started following her blog posts and I must say I'm hooked. We are Facebook friends and needless to say you invariably end up being part of each others food journey and even life. She's a pro at cake decorating (seriously, check out this CarouselCake she made for a birthday) and is a friendly and cheerful person. I hope that some day I get to meet her in person and maybe even taste a dish or two made by her. While she's busy setting up her home, I'm taking over her page today and sharing a lil something I made.

I am not too much of a seafood fan, or should I say, I WAS not a seafood fan, because these days I do indulge in a seafood of choice once in a while. Which is mostly fish that is masala-fried so much it hardly tastes like fish. I know its sacrilegious to even say that, but sadly that's what works. Prawns are a different story altogether. I have never had an aversion to it, well, my husband would roll his eyes at this. But I can usually handle any prawn prep, except when its just boiled, like in a prawn cocktail. Ok fine, you can say I'm a fussy eater and a pseudo foodie :)

Coming to the prawn pollichathu recipe, it’s an absolutely delicious prep and a crowd pleaser. Dont be put off by the crazy list of ingredients, it’s really not that difficult at all. Banana leaves impart that special taste to the whole prep, but I understand that it’s not readily available everywhere. I myself usually just use aluminium foil in its place,  but this time I wanted to give banana leaves a try and had to go all the way to the Indian grocery store to get myself a batch. I cleaned and froze a couple of them in zip lock bags for future use as well. 

Hope you enjoy this mallu dish, and thanks to Manju for having me over at her space.


Prawn/chemmeen pollichathu (serves 2 as side dish)


To marinate
Raw prawns- 250 gms
Pepper powder- 1/2 tsp
Turmeric powder- a generous pinch
Salt- to taste

For the masala
Coriander powder- 1/2 tsp
Kashmiri chilli powder- 1/4 tsp
Turmeric powder- a pinch
Pepper powder- 1/4 tsp
Fenugreek powder- a pinch
Fennel powder- 1/4 tsp
Garam masala- 1/4 tsp (optional)
Ginger-garlic paste- 1 heaped tsp
Oil- 1 tbsp
Shallots- 1/2 cup, finely chopped
Garlic- 5 pods, peeled and roughly chopped
Green chilli- 1, chopped (add more if you want it really spicy)
Mustard seeds- 1/4 tsp
Curry leaves- a sprig
Tomato- 1 medium, finely chopped
Thick coconut milk- 1/4 cup
Salt- to taste

Cookie tray
Banana leaves- to assemble
Twine

Mix together all the ingredients under the "to marinate" section and keep aside while you get the other ingredients ready. (*Refer notes)
In another bowl mix together the first 8 ingredients from the masala section to make a paste. Keep aside.
Heat half of the oil in a kadai and sauté the shallots, garlic and green chilli till the mixture turns light brown. Drain and keep aside.
Add the remaining oil (and a bit more if required) and splutter mustard seeds, followed by curry leaves.
Add the masala paste that you had previously mixed into the oil and sauté till the raw smell disappears. Be careful, as it may vigorously splutter.
Tip in the pre-cooked onion mix, tomatoes and salt and sauté till the mix becomes mushy and the oil starts separating. Keep cooking this on medium heat.
Pour in the coconut, bit by bit, and stir it into the masala.
Once it turns to a semi-gravy like consistency, add the prawns and mix it into the masala.
Cook the mix till the prawn is done, around 8 to 10 minutes. Be careful to not over cook the prawns which can make them rubbery.
The prawns will let out water. If there is still loads of water even after the prawns are cooked, remove the prawns from the masala, increase the heat to high and dry it off. The mix should not be watery, but like I said before, a semi gravy-like consistency.
Once the desired consistency is achieved, turn off the heat and keep aside.

Assembling:
Preheat the oven to 100C.
Layer the banana leaf on a cookie tray and place in the oven till wilted, around 10 minutes. This is done to make the leaves pliable to fold. Traditionally the leaves are just run through heat, on the stove top. But I have an electric glass hob and that wasn't possible, so I wilted them in the oven. Its not as perfectly done as the stove top method, but serves the purpose.
Take the leaves out of the oven and increase oven heat to 175C.
On to the leaf place the prawns (the ones that you removed from the masala) and top it with the reduced masala.
If the leaf is big enough, then fold it over and tie it with a twine. If its not big enough, then place another leaf on top and fold over the sides to make a parcel. Tie with the string.
Place the tray with the parcel back into the oven and bake for about 15 minutes.
Once done, take it out and after about 5 minutes open the parcel to reveal delicious, aromatic prawn pollichathu. Enjoy with rice or as a side to drinks.


Notes: 
You can follow the same recipe for any firm fish like pomfret, king fish or tilapia.
*The whole point of marinating the fish is to fry them before layering. I did it with good intentions, but time constraints meant I head to skip the step only to realise that it was not really needed in the first place. So by all means avoid the marination. The only advantage I can see is the frying gets rid of all the water content from the prawn and so when making the masala, the extra step of evaporating the water from the masala can be avoided.
If you can’t find banana leaves, use aluminium foil in its place.
Oil might seep out from the leaf. So you may want to line the tray with some baking paper or foil.
If you are using pre-cooked prawns, it would require even lesser cooking time.
You can replace tomato with 1/2 tsp of tomato paste.


I have only tried preparing this dish with fish , so when I was asked to chose which dish she should share for you all, I was simply excited about the Prawn pollichathu. Doesn't it look simply awesome...can't wait to give it a try soon. Thank you so much dear Nisha for such a lovely guest post.

Have a great weekend you guys and as for us, this weekend is blessed with good climate, so we are definitely not planning to sit a single minute at home as we are gonna fully enjoy the good weather we got after sooooo many months :-) See you all again soon.

-Manju


Apr 21, 2013

Pineapple Upside-down Cake


So it’s been 3 weeks now since we moved to our new place. I don’t think any month has gone by as fast as this one :-) Ever since we’ve moved in I’ve been dying to do one thing….bake something in the new oven. Finally I thought I will just try baking a box cake mix first. I had a Yellow Cake box mix in my pantry and though I wanted to jazz up the box cake a bit , I din’t want to use any sweet icing and all. And what do I see on my kitchen counter calling out to me….?

A lovely and perfectly ripe pineapple  :-) so Pineapple Upside-down Cake was my first thought.

It’s called an Upside-down cake b’coz the fruit layer along with some brown sugar glazed is placed at the bottom of the cake pan and the cake batter is then poured over the fruit-glaze layer and then baked. Later the cake is turned upside down and served as such with the fruit and sugar glaze on the top. 
Any fruits like cherries, peaches, cherries apples etc can be used for this cake and it’s a really good way to enjoy some cake without all the frosting and sugary icing.

So here’s what I did. I got my cake batter ready (it’s in the red bowl),  greased my 9” spring foam cake pan, made the brown sugar glaze and then skinned , sliced and cored my pineapple. Placed the brown sugar glaze on the bottom of the cake pan, arranged with pineapple slices on top, decorated with glazed cherries and poured the cake batter over the fruit and baked away!

I started making the cake around 6pm, so I got good snaps of the pineapple slices n all, but by the time the cake baked and cooled it was around 8pm and all the good sunlight gone, so I had to take a pic in tubelight (that’s the first pic). And no one wanted to wait till morning for me to take good snaps :-P So here’s few more I took the next day with what was left.

Juicy, moist, crumbly, almost pudding like are the adjectives the folks at home called while ooh-ing and aah-ing over the cake. The Pineapple slices were so sweet and juicy and the brown sugar glaze almost tasted like Indian Chikki.

The cake was super yumm…my parents usually don’t eat too much sweet stuff and they went for seconds and thirds. My dad’s a fan of my cakes and was eagerly waiting for the cake to be done and he took the first slice. The whole cake was over in two days  :-)

Pineapple Upside-down Cake

You’ll need
Yellow Cake box mix – 1 (I used Betty crocker brand, can use any vanilla cake mix)
Ripe Pineapple slices – 2-3 (or as required)
Glazed cherries – as required (optional)
Brown sugar – ¾ cup
Butter – 4 tblsp ( I had only 2 tblsp, so used that)

Directions
1. Preheat oven to 325F (or as per box mix instructions) and grease a 9” cake pan with butter and keep aside.
2. Prepare the cake batter as per box mix instructions.
3. Prepare the brown sugar glaze by adding brown sugar and butter in a saucepan and heat it until the butter melts and the glaze is smooth.
4. Pour the brown sugar glaze in the cake pan and spread it around the pan. Place the pineapple slices however you like over the glaze and decorate with glazed cherries.
5. Pour the cake batter over the fruit and bake at 325F for 55-60mins. (Mine was done at 55mins)
6. Let the cake cool for 15 mins over the counter and run a knife around the edges of the cake and invert the cake onto a plate or cake stand. Once the cake has cooled remove the cake pan. Serve and enjoy some delicious slices of a super yummy cake!


It’s a super easy cake to make and the tastes just heavenly and a perfect way to jazz up a simple box cake mix. Canned pineapple rings can also be used if you do not have a ripe pineapple.  Nuts like pecans or walnuts can also be used instead of glazed cherries or use both. And if you do not have a box cake mix, you can use any simple Vanilla cake recipe , here’s an Eggless Vanilla cake or Vanilla Sponge Cake that I shared earlier.

A reader on my facebook page suggested that the cake can also be called as Pineapple sunny-side-up cake :-) call it what you want, it’s simply yumm! Go and bake one right now and taste it for yourself. Don’t forget to share your feedback with me if you do :-)

-Manju


Apr 18, 2013

Sticky Toffee Pudding - a guest post by Vineetha


Hello people...it's almost Friday and boy am I waiting for the weekend. This week went all busy with work and I can't wait to just sit in my pajamas, push my feet up on my couch and watch TV all day...how I wish I could just do that you know. And some free food would be good too...Lol. Plus its gonna be snowing baaaaaad...I don't even wanna talk about it!
Have I told you that I have some seriously good and kind hearted blogger buddies who eagerly jumped in to help me with sharing some guest posts when I asked them as they knew I would be extra busy this month with house shifting, unpacking, getting used to the new bus route blah blah...?

Today let me introduce you all to a wonderful bloggy buddy and I'm just so glad I met her myself , Vineetha who blogs at Ruchi. I call her Vinee with Love ;-)
Initially Vinee was just another blogger in this vast world of bloggers who used to share her valuable comments & feedback for my posts and I too visited her blog and shared my feedback as well. What kick-started our friendship is after I made my Lil'Appu's first birthday cake and we had a small chain of discussion on the two tiered cake. And then whenever she made a cake on her blog she would ask me to stop by and I would do the same whenever I posted a cake and we both realised - WE LOVE CAKES, cake baking and decorating and shared the same enthusiasm and interest when it came to making cakes :-)
Its just so nice to meet a person to whom you can confidently share your passion and you know you will get some awesome ideas and suggestions. Who cares if we stay continents apart , we frequently message each other and also learn from each other about blogging, photography and its various technicalities.

Apart from cakes, she shares some amazing Food recipes as well, mostly Keralite dishes and several desserts and other cusines. Hope over to her blog to view all her lovely creations!
So when Vinee wanted me to make a choice on what she should share for us, I had no doubt in my mind and asked her to make a cake  And what a lovely cake she has come up with...Let's just drool at her pics for sometime before we read ahead now shall we? :-)
 

Manju's Eating Delights is one of my favorite blogs which I check out on regular basis whenever she updates it, we both share the same passion when it comes to baking and cake decoration and that's what brought us so close together. Whenever I update my FB status with cake related doubts or suggestion she never fails to respond and always pour down with her suggestions. The one thing which I like most about blogging is the way friends help each other with tips and suggestions and Manju is one among them. I owe it to Manju for making an About Me page and Recipe Index on my blog .

When she asked me to do a guest post as she is busy settling down in her new house I was so happy to help her out . I have been brainstorming for a recipe for few days now but she helped me out and choose that a cake would be apt as it speaks about friendship. I kept bugging her again whether she want this or that but unlike my hubby who never gives me an answer when I ask for a choice, she gave me a reply and made my job easier !
I have made this sticky toffee pudding before as well and usually if I am not very happy with the taste of a cake I never make it again, so should I say that this is a delicious cake/dessert indeed ? The plus point of this pudding is ,its a warm pudding so it can enjoyed and eaten even when the weather outside is chilly or freezing. 

Sticky Toffee Pudding  

Recipe adapted from -  BBC Good Food 

Ingredients
Plain flour -  1 1/2 cup (175 gm )
Baking powder - 1 tsp
Cinnamon powder - 1/2 tsp
Cloves powder - 1/8 tsp
Nutmeg powder - 1/8 tsp
Salt - pinch
Eggs - 2
Butter - 1/3 cup (85 gm)
Golden caster sugar - 3/4 cup ( 175 gm )
Dates (stoned)- 200 gm (I used medjool dates which has toffee flavour)
Black tea - 250 ml   (not too strong)
Baking soda - 1/2 tsp

For toffee sauce     
Light Muscovado sugar  -100 gm
Unsalted butter -100gm
Double cream -150 ml

Method
In a saucepan add  stoned date and  tea and cook for about 4-5 minutes until its soft.
Add baking soda to the mixture and  puree it in a blender.
Sift flour,baking powder,salt, cinnamon powder, nutmeg powder,cloves powder and keep it aside.
Cream  butter and sugar in an electirc beater.
Add slightly beaten eggs little by little and beat.
Add dry ingredients and beat in.
Finally add dates puree and fold in.
Pour the batter into a greased cake tin or pudding bakewares and bake them in a preheated oven at 180 degree C for 35 - 40 minutes or until a toothpick inserted comes out clean.

In the meantime place  light muscuvado sugar,butter and cream in a saucepan on a low heat until the sugar dissolves and the sauce gets a toffee flavour.
Serve the pudding with warm toffee sauce.If you are serving it later just pop the pudding in microwave for few seconds and serve with warm sauce.


What a fabulous recipe and the pics are even more gorgeous…Don’t you just wanna go and get baking this right away? I've never had a sticky toffee pudding before and I’m seriously tempted now :-) So go and give it a try and let us know how you liked it.

Have a great weekend you all!

-Manju