Showing posts with label dessert. Show all posts

Nov 11, 2020

Indian fusion Truffles | Diwali Truffles

Wishing everyone a wonderful Diwali this year. Despite all the pandemic chaos, lack of get togethers, parties or celebrations I still decided to celebrate by making some treats to share with neighbors and close friends. I love making Fusion desserts. An example are these Gajar Halwa Chocolates that I made couple years ago. This time I decided to try some Indian fusion flavored truffles using both white chocolate and semi-sweet chocolate.

I took a whole lot of pics, too many as usual, so I may papparize this post with some of those, let the pics do the talking huh... ;-)


I made one batch of white chocolate ganache and divided them to make two different flavored truffles: Kesar Pista and Rose

Similarly made another single batch of Chocolate Ganache and divided them to form 2 different flavored truffles : Almond Joy and Chocolate Orange


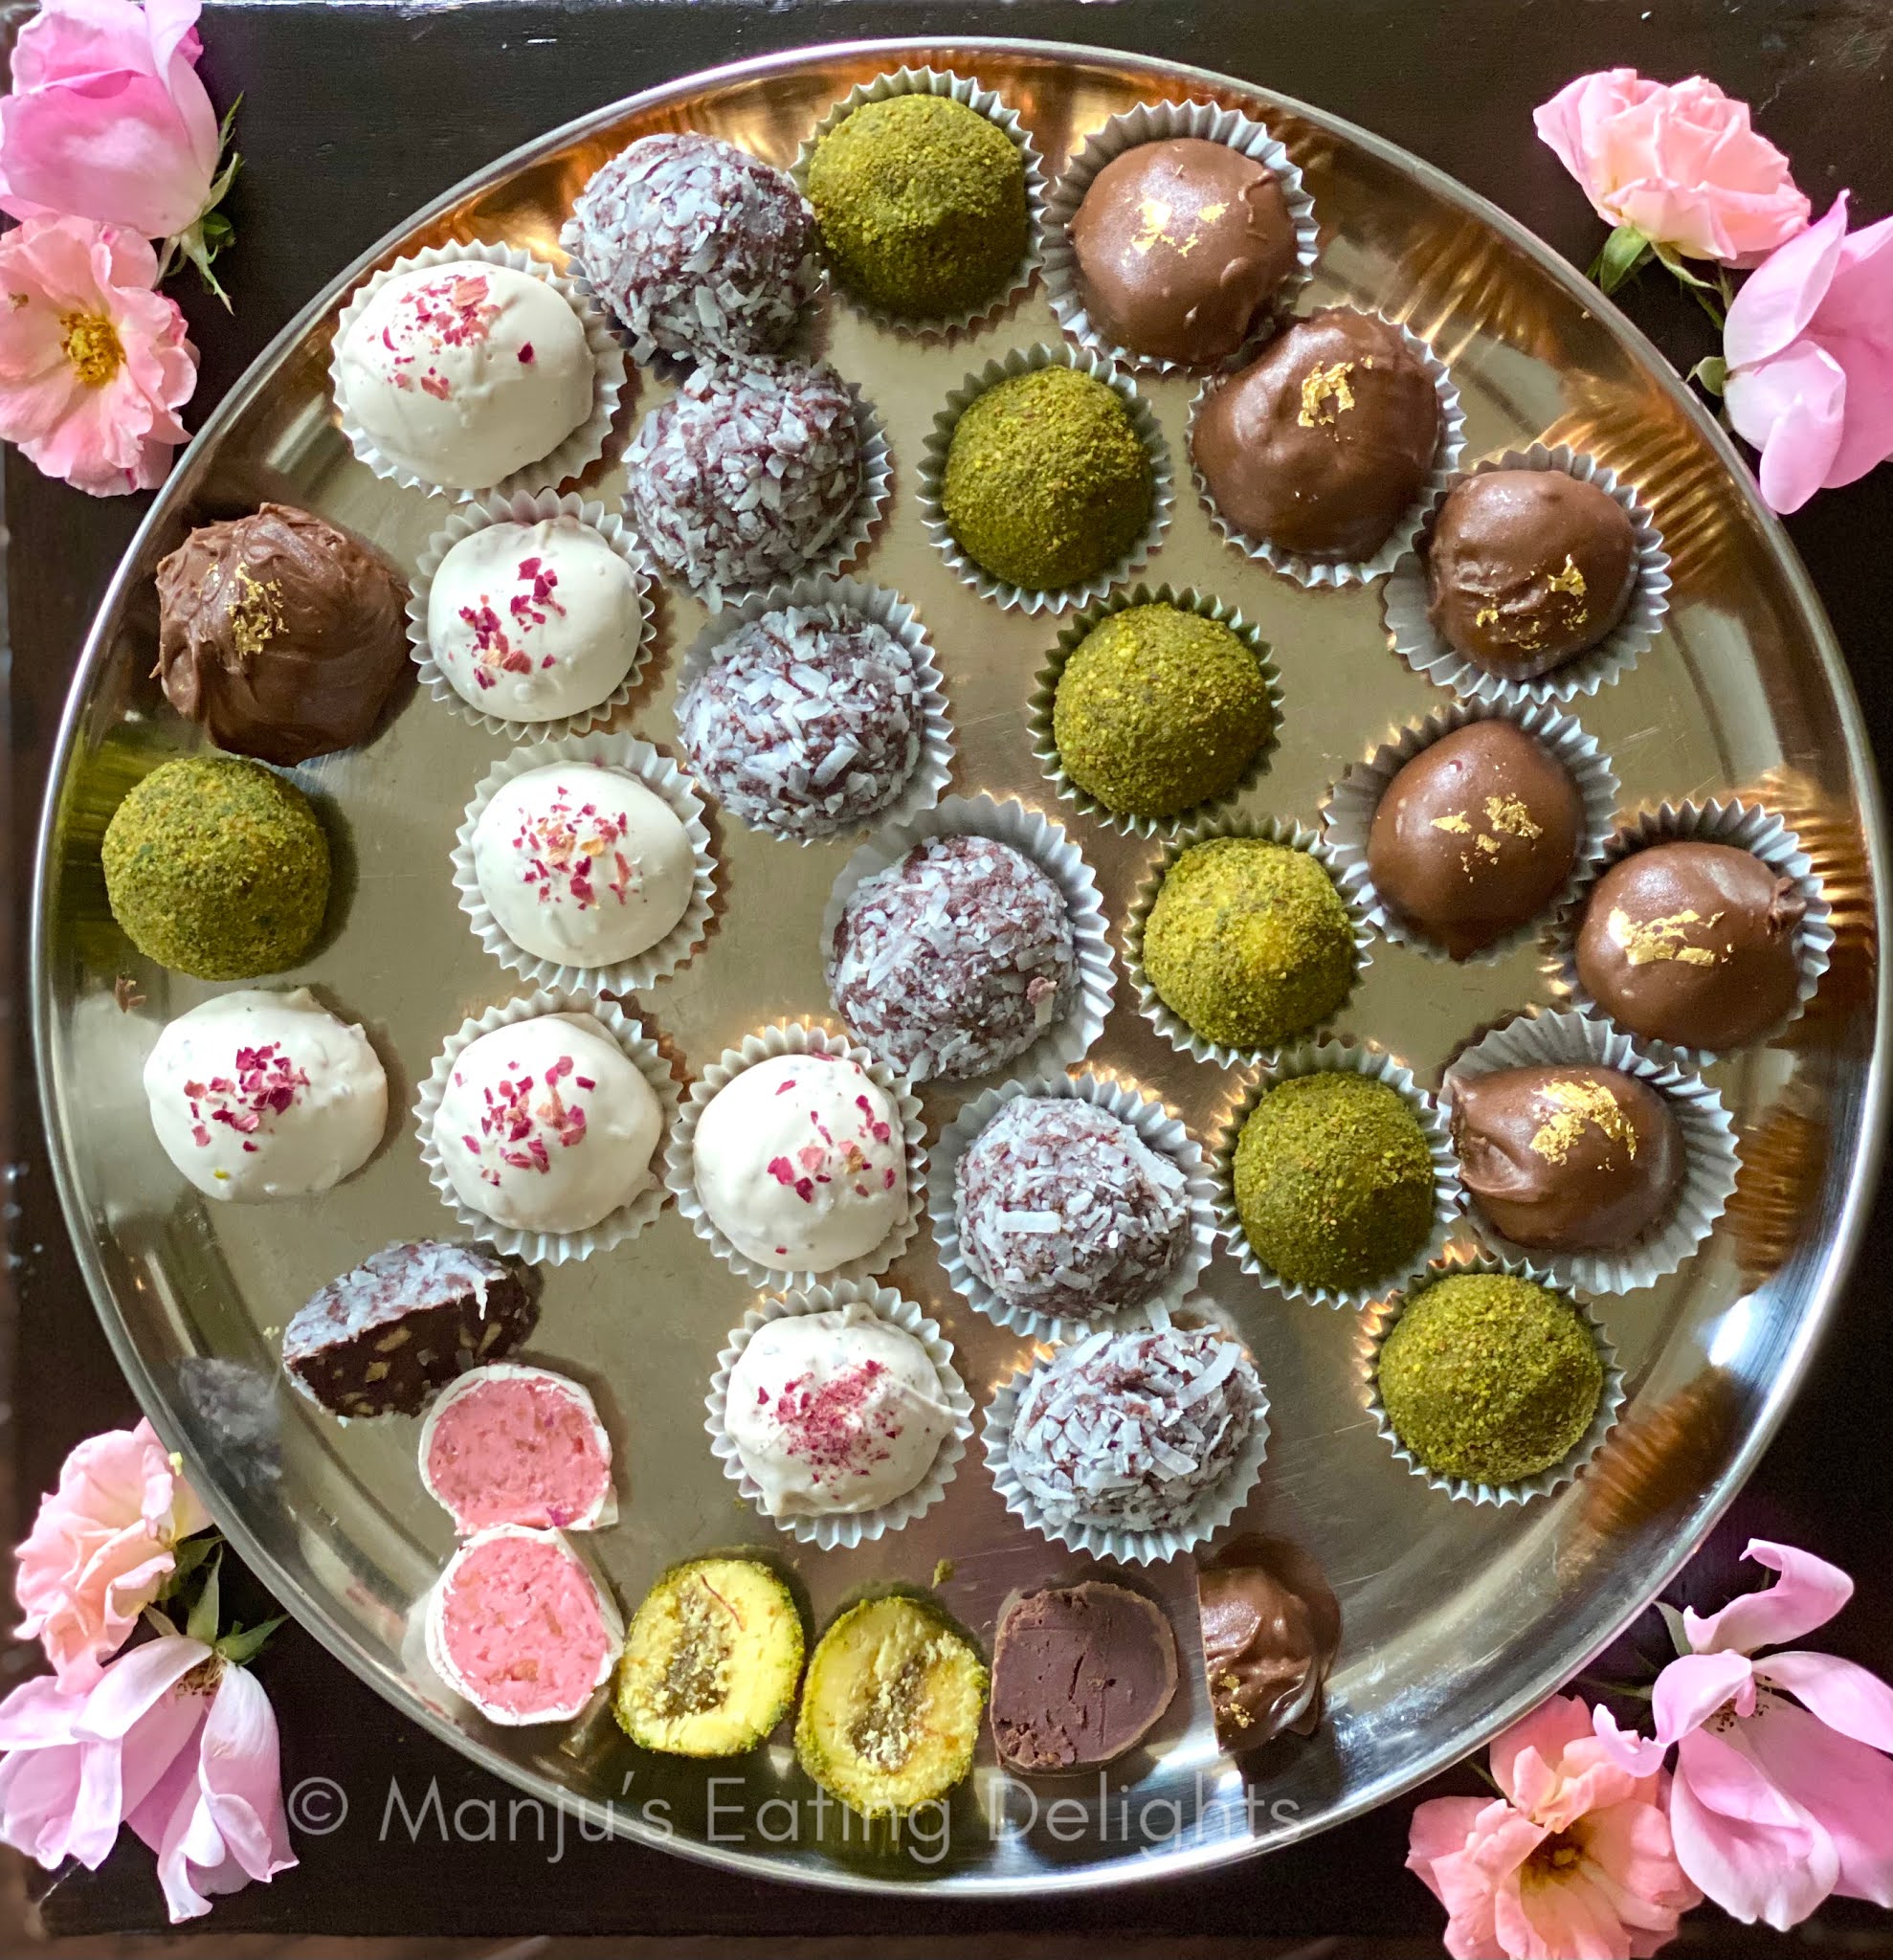
I personally felt each truffle flavor came out better than I had expected. Can't wait to try more flavors. Let’s get to making these shall we? :-)


White Chocolate Ganache for Truffles

You’ll Need

2 cups White chocolate chips

½ cup Heavy Cream

Directions

1.       Heat heavy cream in a saucepan until it just begins to boil and pour it over the chocolate chips.

2.       Let it stand for 2 mins and then mix gently until all the white chocolate chips melt and form a smooth flowy ganache.

3.       Divide the ganache in two bowls equally.


We will now make Kesar pista flavored truffles and Rose flavored truffles from each bowl of white chocolate ganache respectively.


Kesar Pista Truffles

(makes 14)


You’ll need

1 batch White chocolate ganache

1-2 teaspoons Kesar or Saffron strands

1 teaspoon Water/Cream

¼ teaspoon Kesar essence (optional)

Few drops of Yellow food coloring (optional)

For pista filling:

2 Tablespoons crushed pistachios

2 teaspoon powdered sugar

1 Tablespoon Almond flour

Few drops Water

For garnish

1 cup crushed pistachios

Directions

Prepare the kesar flavored ganache

1.       Crush kesar (saffron) slightly with your fingers.

2.       Soften the saffron by warming kesar and water in a microwave for 10 seconds

3.       Add this kesar to the slightly warm white chocolate ganache. (If more flavor is required add kesar essence.)

4.       Use yellow food coloring for a vibrant color (optional)

5.       Allow the ganache to cool and set in the refrigerator for 2hours.

Prepare the pistachio filling

1.       Mix together all the ingredients with few drops of water, just enough to form a smooth and sticky dough.

2.       Grease both palms with oil/ghee and form small ¼ teaspoon sized balls of the pistachio filling. This will be added to the center of the kesar truffles once the ganache sets.

Make the Kesar Pista truffles

1.       Once the ganache has set, use a teaspoon to scoop enough ganache to form the truffle.

2.       Grease both palms with oil/ghee and roll the truffle.

3.       Make a small indent in the center and place the pista filling in the center and roll back to form a smooth round truffle.

4.       Roll each truffle ball into the crushed pistachios and place on a plate.

5.       Refrigerate the Kesar Pista truffles to set completely.


Rose Truffles

(makes 14)


You’ll Need

1 batch White Chocolate Ganache

2 Tablespoons Gulkhand

Few drops pink food coloring

For garnish

½ cup white chocolate candy melts (outer coating)

crushed dried Red Rose petals 


Directions

1.       While the ganache is still warm, add gulkhand and few drops of pink food coloring and mix well to combine.

2.       Allow the ganache to cool and set for 2hours in refrigerator.

3.       Once the ganache has set, use a teaspoon to scoop out the ganache to form the truffles.

4.       Grease your palms with oil/ghee to smoothly roll the truffles.

5.       Melt white chocolate candy melts until smooth, roll each rose truffle with the white chocolate and place on parchment paper.

6.       Garnish with crushed dried rose petals.

7.       Refrigerate the Rose truffles to set completely.


Chocolate Ganache for Truffles

You’ll Need

2 cups Semi-sweet or Dark chocolate chips

½ cup Heavy Cream

Directions

1.       Heat heavy cream in a saucepan until it just begins to boil and pour it over the chocolate chips.

2.       Let it stand for 2 mins and then mix gently until all the white chocolate chips melt and form a smooth flowy ganache.

3.       Divide the ganache in two bowls equally.

We will now make Almond Joy flavored truffles and Chocolate Orange flavored truffles from each bowl of chocolate ganache respectively.


Almond Joy Truffles

(makes 12)


You’ll Need

1 batch Chocolate Ganache

2 tablespoon roasted and crushed Almonds

For garnish

½ cup sweet Coconut flakes


Directions

1.       Add the crushed almonds into the chocolate ganache while its still warm and mix to combine well.

2.       Allow the chocolate ganache to now cool and set in the refrigerator for about 2 hours.

3.       Once the ganache has cooled and thickened, scoop out enough ganache using a teaspoon to form small truffles as desired.

4.       Grease both palms with oil/ghee to smoothly roll the truffles.

5.       Finally coat the truffle balls into the sweet coconut flakes and refrigerate it again to set completely.


Chocolate Orange Truffles

(makes 12)


You’ll Need

1 batch Chocolate Ganache

1 Tablespoon fresh grated Orange zest

¼ teaspoon Orange essence

For garnish

½ cup Chocolate candy Melts (outer coating)

Edible Gold leaf


Directions

1.       Add the orange zest and orange essence into the chocolate ganache while it’s still warm and mix to combine well.

2.       Allow the chocolate orange ganache to now cool and set in the refrigerator for about 2 hours.

3.       Once the ganache has cooled and thickened, scoop out enough ganache using a teaspoon to form small truffles as desired.

4.       Grease both palms with oil/ghee to smoothly roll the truffles.

5.       Melt the candy melts and coat the truffle balls in the melted chocolate and place each truffle on a parchment paper.

6.       Decorate each truffle with edible gold leaf as desired.

7.       Refrigerate the chocolate orange truffles to set completely.


I do hope you will give these a try or create a whole new flavor of your choice and enjoy some and share some and have a wonderful and festive time!! Stay safe and have fun.


Regards,

Manju


May 5, 2020

Mexican Flan | Creamy and delicious | Low Fat recipe


I just came to know from my work colleague that today 5th of May is Cinco De Mayo. It's a historical military victory of the Battle of Puebla celebrated in some parts of Mexico and USA. So here's wishing all who are celebrating, a very Happy Cinco De Mayo. My office always celebrates all kinds of cultural festivals both regional and international and we would have been treated to some yumm Tacos and mexcian treats today had it not been closed to the quarantine. I do miss all that but here's some fun facts shared by one of my office colleagues about the festival.


And to celebrate I thought it's a perfect day to be sharing with a you a truly delicious Mexican dessert...Flan! And this coming Sunday is Mother's Day, so if not for Cinco De Mayo you can always prepare this delicious dessert for another fun celebration.

Mexican Flan is known by many names, Caramel Custard, Egg Pudding, Creme Caramel etc to name a few and it's basically a cooked vanilla egg custard/pudding with caramel sauce and best enjoyed chilled. It's always seen in most Mexican restaurant menu.


My Mom called it Caramel Custard and made it several times in our younger days. She used a deep bottomed steel bowl and made one large Flan with the delicious caramel running down it's sides. It was quite the magic act when she inverted the bowl and waited for the mild thud of the custard being released from the bowl into the plate below. We used to wait with keen anticipation and hope it would stay in shape and it always did...lol! I believe she used to steam her caramel custard instead of baking it, but it works just fine both ways. 


There are so many recipes for Flan, but I specifically wanted to try a low-fat version. Most recipes call for condensed milk or heavy cream etc and lots of sugar. It tastes divine no matter how it's made but I wanted something that we could indulge in but still not too high in calories. Eating Well had the perfect recipe and it took me less than 1 hour to put it together, bake the flan and refrigerate.  

Its best to either prepare the Flan at night and enjoy the next day, or make it in the morning and it'b be ready to indulge in by evening as it needs a few hours to set and get chilled before serving.


Mexican Flan (Low fat recipe)

Serves: 6
Prep time: 10 mins
Bake time: 35-40 mins
Serve: in about 4-12 hours (after chilling)

You’ll Need
For caramel sauce
⅓ cup sugar

For Flan
1 (12 ounce) can evaporated milk (1 ½ cups)
⅓ cup sugar
3 eggs, slightly beaten
1 teaspoon vanilla extract

6 small ramekins 
Rectangular baking tray
Hot water

Directions
1. Preheat oven to 325 degrees F.
2. Caramelize the sugar:  In a saucepan, spread ⅓ cup sugar evenly and cook over medium-high heat until sugar starts to melt. Once sugar starts to melt, reduce heat to low. Cook until all of the sugar is melted and golden brown, stirring as needed with wooden spoon.
3. Immediately divide caramelized sugar among six ramekins; tilt the ramekins to coat bottoms evenly. Allow to cool slightly. (the caramel hardens quickly so be as fast as possible taking care not to touch the piping hot caramel)
4. In a bowl, combine eggs, evaporated milk, 1/3 cup sugar and vanilla. (can use a magic bullet to mix everything together)
5. Place ramekins in a rectangular baking pan (I used my 9"x13" cake pan). Divide egg mixture equally amongst the ramekins. Place baking pan on oven rack and pour hot water into baking pan around ramekins to a depth of about ½ inch.
Baking the Flan in ramekins placed within baking tray filled halfway with hot water
6. Bake for 35 to 40 minutes or until toothpick inserted near center of each flan comes out clean. Remove ramekins from water. Cool on wire rack.
7. Cover  the top of ramekins and chill in refrigerator for 4 to 24 hours.
8. To unmold, loosen edges of the flan (from the sides and bottom) with a knife and invert a dessert plate over each flan; turn plate and custard cup over together. Remove ramekins from flans. Spoon out any caramelized sugar that remains over the flan.

Serve it just as it is or with some whipped cream or fruits.


Other delicious Mexican inspired treats on the blog include:


-Manju

Jun 10, 2014

Mango Falooda for a milestone of 5 Lakh+ hits!


Just after I had posted my Veggie Quesadilla I was checking some stats and realized, hey! we've crossed 5lakh+ views...and that is quite a feat. Considering how irregular my posts are here with past few months being crazy busy ;-P and plus I do hardly any social networking or engage with my readers other than the usual " {New Post} " updates on facebook. I occasionally add a pic or two to Instagram and Twitter and if I get time, try and pin my posts on my Pinterest boards...but I'm so lazy to do all this systematically and yet inspite of all this we've reached 5lakh page views....So big big thank you to you all!

I had made a superb mangolicious dessert for a casual dinner with my friends a weekend ago and thought it was perfect to share here with my joy of reaching a lovely milestone on the blog. 

I planned to make Chicken Biriyani with mixed veg Raita and papad for dinner. For appetizers we grilled some awesome tandoori chicken (marinated by my friend) and paneer-veggie tandoori kebabs (made by me). I can never let a dinner pass without dessert so I decided to make Mango Falooda that was flavored with cardamom and had some vibrant layers to it...

It had been a long time since I ate or made falooda and I just wanted to have something cool and refreshing and this was the perfect dessert. Trust me when I say it was enjoyed by all, b'coz from the kids to all the calorie conscious adults (my friends :-P ) ate up their whole glass full ;-)

(Pls pardon my out-of-focus pics, all my concentration was on how soon could I lick that glass clean ;-) )


A Falooda is a layered sweet drink or beverage. It uses ingredients like vermicelli, sago, jelly, basil seeds (sabja), fruits, nuts etc  that are layered together and finally served with chilled and flavored milk or icecream. I've seen it usually served with both a spoon and a straw where you eat the various layers with a spoon and drink up the sweet milk or melted icecream with the straw :-) I just love this almost 'trifle like' dessert and to give it a twist I made a smooth custard instead of flavored milk to blend with the layers.

Here are the simple set of ingredients that make up this pretty dessert. I layered each of these ingredients and then finally poured the mango custard on top with a scoop of vanilla icecream. It was the perfect combination of flavors.


I did not have nor could I find Basil (sabja) seeds at the store so I used Chia seeds instead. I'm not sure exactly how basil seeds would have tasted but chia seeds work just well and besides I've read of so many health benefits of chia seeds. I just added a tablespoon of the seeds and added enough water to immerse them. They bloomed beautifully and becomes almost jelly like and I must say was quite flavorless ;-)


You can make jelly from mango pulp as well for an all-mango dessert but i wanted some pop-of color and decided to use a strawberry instant jello mix. It worked well and the extra jelly we just ate it up later on.


I made two more glasses of Mango Falooda after dinner and refrigerated it for the next day (this was just for Manish & me :-P ) Oh! by the way, I ate up half that glass in between taking pics, the icecream had melted, the layers blended with each other and it was icy cold and totally yumm...I couldn't resist! :-P 


Mango Falooda
(makes 6-8 servings)

You'll Need
Strawberry Jelly (cut in cubes) - as needed
Fresh Mango (cut into cubes) - 1 Mango
Mango pulp - ½ cup
Chia seeds (soaked and bloomed in water) - 1 Tblsp
For vermicelli payasam/kheer
Falooda Sev or Roasted Vermicelli - 50 gms
Milk - 2 cups
Sugar - 3-4 tblsp (as preferred)
Cardamom powder - ½ tsp
For mango custard
Milk - 2 cups
Mango pulp - 1/2 cup
Custard powder - 1 tblsp
Sugar - 3-4 tblsp (as preferred)
Cardamom powder - ½ tsp
Vanilla Icecream - one scoop each


Directions
1. Soak the Chia seeds in water enough to immerse it and as it thickens slightly add more water to loosen it. Refrigerate until needed.
2. If making instant Strawberry jelly, follow the instructions from the pack and refrigerate to set for few hours. (I reduced the water by ½ cup to get a thicker jelly)
3. Make Falooda Sev/Vermicelli payasam
Heat a pan and add falooda sev/roasted vermicelli with 2 cups milk. When it starts to boil, add the cardamom powder and sugar and stir and continue to cook until the sev is soft and the payasam/kheer becomes thick. Add more sugar as desired. Refrigerate until chilled.
4. Make Mango Custard
Mix the custard powder with some milk without any lumps and keep aside. Start to boil 2 cups milk in a pan. When milk starts bubbling add the custard powder and sugar and mix well making sure no lumps form. Stir until it slightly thickens, turn off flame, add powdered cardamom powder. Once the custard cools, add the mango pulp and mix well. Refrigerate until needed.
Make sure the custard is of pourable consistency and not thick like pudding. Add more sugar as desired.

Assemble
In a tall glass add 1 tsp each of vermicelli payasam, strawberry jelly, chia seeds and mango cubes. Add enough mango pulp to cover the fruit and then add a teaspoon of crushed almonds and  pour enough Mango custard to fill. Top with a scoop of vanilla icecream and serve immediately!

Notes:
1. I used canned mango pulp, you can make it fresh mangoes as well.
2. I flavored the vermicelli payasam and mango custard with cardamom, you can skip it if you do not like the flavor, though I don't see any reason why you won't :-)


I tried a gif image just for fun to see the glass getting layered...next time i should remember to keep my camera still to get a better effect. What do you think? :-)


Do try it out, you'll love it. My calorie conscious friends will agree too :-P hehe...

-Manju

Feb 12, 2014

Valentine's day Ideas :-)


Valentine's Day is just around the corner, infact it's this Friday (Feb, 14th). I bet some of you already know how you plan to spend this day of Love. Do we really need a special day to spend with our loved ones, you may ask....I have no real answer to that but I'm absolutely smitten about the idea and love to celebrate it. 
This year we are planning to spend it with friends...a grand dinner and then mayb a movie or some games. Anyways Valentine's Day is all about spending time with loved ones and I absolutely love that idea ;-)

This year I haven't come up with any new dishes but I want to share what I have done over the years and hopefully these will inspire you too to make a grand dinner or special dessert for that special someone in your life incase you haven't planned yet.

My most popular post and favorite Valentines Day dinner of all has been this special candle light dinner that I cooked all by myself at our home for my sweetheart 2 yrs ago. 
My baby was still too little to go out for a late night dinner so the best option was to keep it at home...Enjoy a romantic dinner while the baby sleeps ;-). Read all about it here.
These are the dishes I cooked up (yes all home-made):
                     Thai Fish Balls with Lime-Cilantro Mayo dip
Main course : Jerk Chicken served with Coconut Rice and Mango-Peach Salsa


Last year we did not make dinner plans, but instead my lil'boy and me got up really early and made a scrumptious breakfast before going off to work and daycare respectively :-) And yes, everyone got little V-day gifts as well!!


Here are few more ideas on how you can make something special to show your love in the form of food :)

Planning Banana bread for a V-day brekky? Well then you must try this fun and totally V-day worthy Banana bread with a hidden heart and wow your loved ones!! 


If your family prefer spicy dishes, make them a heart shaped Tuna Cutlets using a heart shaped cookie cutter ;-) Its super yummy and a winner recipe. If you do not eat non-veg, make a veggie version with your own recipe. 

Another cool idea I thought of was to fancy up even your glass of simple water with pretty Heart shaped Ice-cubes infused with fruits, citrus-peels or mint leaves. It definitely adds a sparkle and flavor to that glass of water!! 

One pot meals are always an easy option and there's no compromise on taste. Try out these simple rice dishes and pair it with wine and/or any decadent dessert of your choice. Keep it simple yet classy! 

Rich & Creamy Chocolate Pudding can never go wrong for a V-day dessert...it's so easy to make. And better yet, its Eggless :-)

Well, If it was upto me, I still have several more dishes that I can scoop out of my blog and share here as V-day special, but I'll leave that to you :-) Do feel free to check  out My Recipes list and pick out your favorite recipes and cook it up and enjoy your day.....

Happy Valentine's Day to all my readers! May you have a beautiful day and year ahead filled with Love and Happiness :-)

-Manju