Nov 30, 2011

Chakka Kumbilappam or Steamed Jackfruit Dumplings


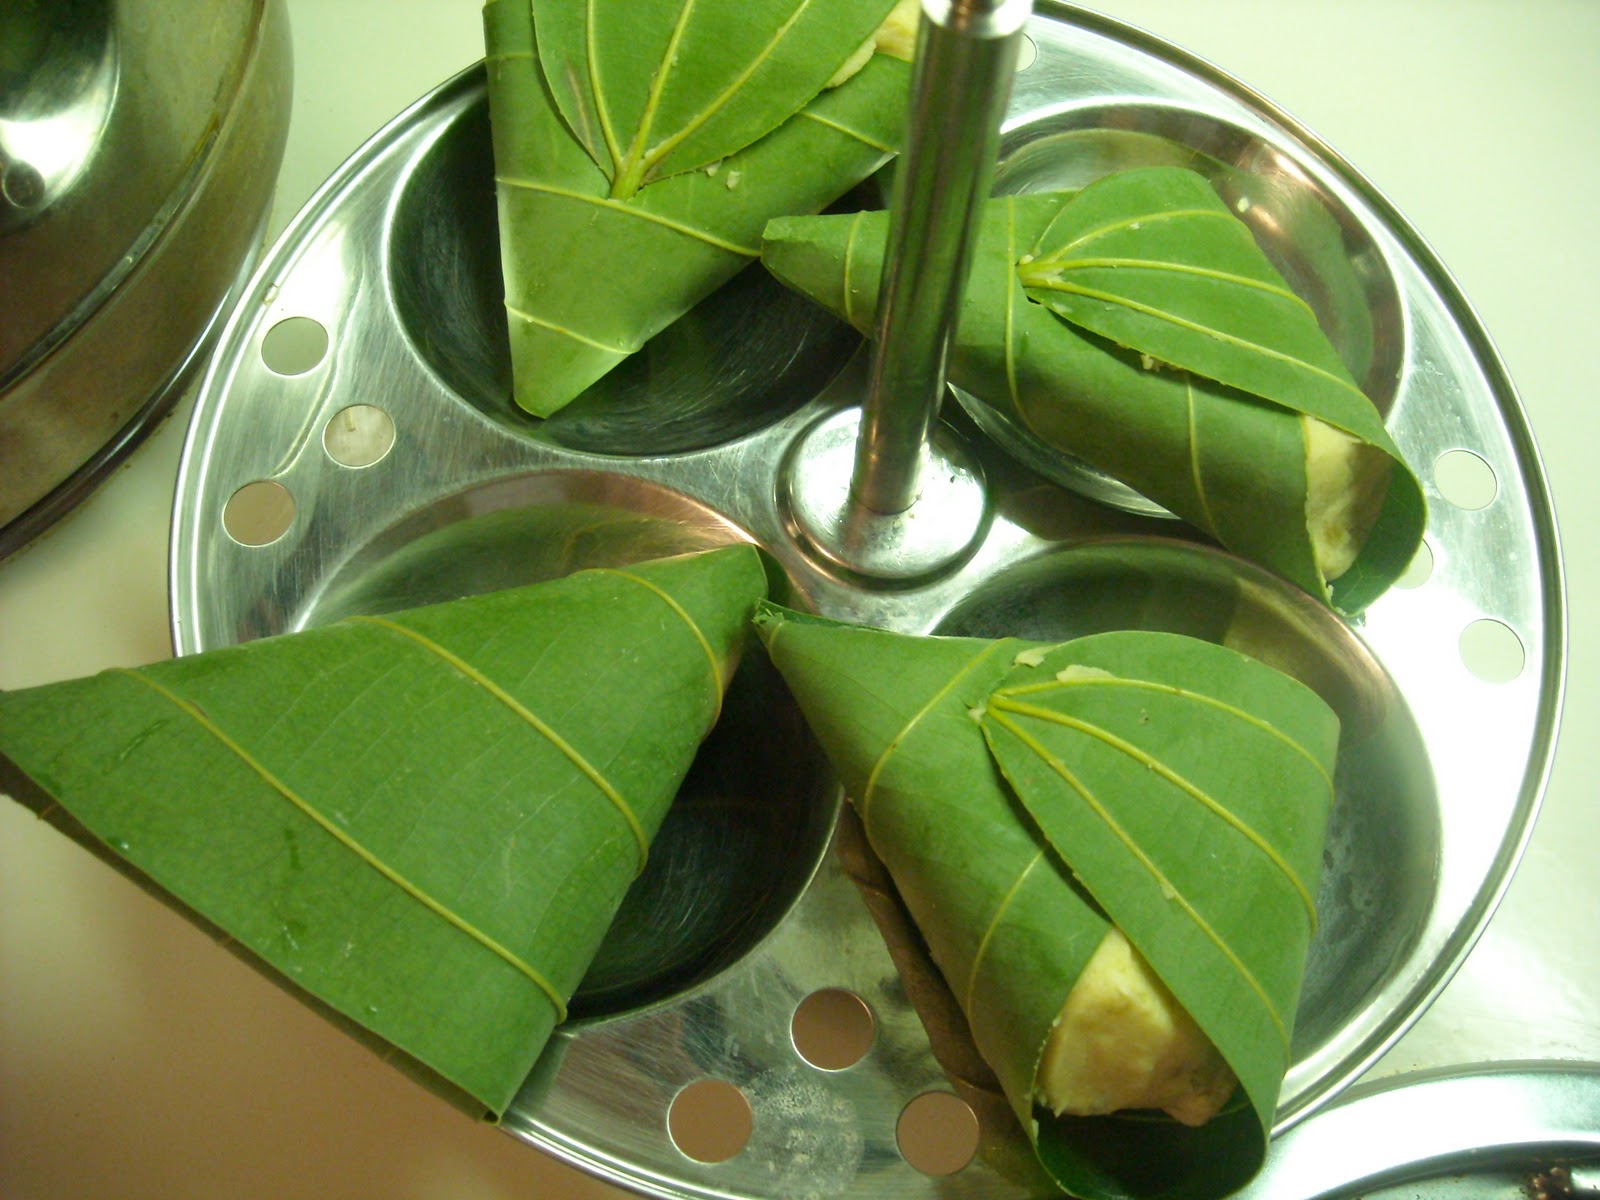
Kumbilappam is an authentic Keralite snack item. Kumbilappam genarally means Conical (kumbil) - Dumpling (appam). Its a steamed and sweet dumpling.

Here I present Jackfruit or Chakka Kumbilappam where a dough is prepared by mixing Jackfruit jam (Chakka Varatti) along with Rice flour and few spices to form a dumpling and is steamed using fresh Bayleaves (Vazhana ella) or Banana leaves ( Vazha ella). The jam is prepared by cooking ripe Jackfruit  along with Jaggery and reduced to form a thick jam like consistency.
The distinct conical shape can be obtained mostly if Bayleaves are used. The leaves are folded to form a conical shape, the dough is stuffed into the cone shaped space and then closed using the stem of the leaf.


What makes these dumplings special is the aromatic smell (almost Cinnamon like) infused into it by the Bayleaves while it steams. Dry bayleaves are commonly used in Indian cooking which provides a lovley smell and flavor to savoury dishes. 
I love these dumplings mainly because its healthy, sweet and really easy to prepare. This is a perfect snack for Jackfruit lovers. Sometimes banana is also added to the dough to add more sweetness and of course the flavors of banana and jackfruit make quite a unique combination.


According to my MIL , they used to eat cylindrical shaped dumplings , which is called Theralli during their childhood when they used to go for temple festivals (ulsavam) and it used to be a craze back then. But instead of Jackfruit it was made only with Banana, grated coconut and some spices in a Rice flour based dough.


I made these the traditional way , but I'm sure it can be made creative by adding some nuts or raisins or some other fruit jam in the dough for trying out different varieties. I had some jackfruit jam (Chakka Varatti) which was made at home in India and used that to make instant Dumplings.

This recipe make about 8 - 10 dumplings depending on the size of the leaf. I have provided step by step pics to help you all understand how this amazing snack item is prepared.

Chakka Kumbilappam Recipe
Recipe source: My MIL
You'll need
Chakka Vazhatti (Jackfruit jam) - 4-5 tblsp
Rice flour - 2 cups
Grated Coconut - 1 cup
Jaggery - 1 cup or 1/4 kg (scraped)
Cardamom (Elaichi) powder - 1/4 tsp
Cumin powder - 1/4 tsp
Dried Ginger powder - 1/4 tsp
Water - enough to make a smooth dough

Directions:
1. Mix all the ingredients together to form a smooth dough. ( To be honest I used less Jackfruit jam, so my dough looks almost white, if more jam is used , your dough would look more brownish)
Make small balls from the dough and keep aside.

2. Take a Bayleaf and hold it such that the stem of the leaf is facing up. Roll or twist the bottom of the leaf to form a cone and push the dough into the cone shaped space and close it by pushing the stem of the leaf into the centre of the cone (as shown)

3. Place all the cones in a steamer and steam for 15- 20 minutes. ( I used my idli steamer and placed the dumpling cones on each idli stand)

To make the Theralli or Cylindrical shaped dumplings: 
1. Take the Bayleaf and place some dough in a cylindrical shape at one end (not the stem end) of the leaf , fold the leaf and place another cylindrical shaped dumpling on the folded tip.
Again close with the stem of the leaf. Steam as mentioned above.


Suggestions:
1. If you do not have Chakka Vazhatti, you can prepare an instant version :
    a. Grind together 3-4 ripe Jackfruit bulbs.
    b. Melt 1 cup jaggery ,add this jackfruit pulp and 3-4 tblsp Ghee (Clarified butter) .
    c. Keep stirring on medium heat and reduce the pulp to a thick paste.
    d. If you like you may add 1/4tsp Cardamom powder for taste.
    e. Instant jam is ready.
    Add this Jackfruit-Jaggery jam to the dough and follow the rest of the steps.
Chakka Vazhatti is also made in the same way but it is made to reduce to such an extenet that its almost dry (with no more moisture) and this can be stored for months together after its cooled.


Enjoy these dumplings with a nice hot cup of tea and coffee. Its best when served warm. As I mentioned before its really healthy and tasty.
The sweetness from the jackfruit and jaggery , the coconut and the small hint of the spices added and most of all, the cinnamony smell of the bayleaves in the dumplings make this an irresistible combination.

Have a beautiful day!!


Sending this post to:
1.  Christmas Delicacy event hosted by Julie.


-Manju


Nov 26, 2011

Fish Biriyani...simply awesome!!


Biriyani is a rice dish flavoured with spices and cooked with chicken or fish or meat or simply veggies. It is a very flavorful and aromatic dish .
I simply love Biriyani and my mom makes the most awesome Chicken Biriyani I have tasted until now.
Being health conscious she doesn't use too much butter or ghee in her preparation, but the spices , chicken and the flavored rice mixed together simply compensates for all that. Though I haven't mastered her biriyani yet, I also try to make biriyani now and then whenever we get cravings to have something Gourmet I would say!! :-)

2 things that make this Biriyani recipe special is the fact I made my own biriyani masala powder (as I din't have any store bought powder at hand ) and its the first time I'm making biriyani with Fish :-) And something about having made everything homemade made this biriyani so much more tastier. It was a bit on the spicier side , but then we love having spicy food once in a while!


This biriyani was the result of an instant craving to have something special for lunch. Something special means always BIRIYANI :-) But I had no chicken in the freezer and we weren't in the mood to go and buy some, but I had some Tilapia fillets and there was no thinking twice, Fish Biriyani it is....I have eaten fish biriyani only twice , one was Shrimp and another time it was King fish. Both tasted awesome and unique in its own way. 


The aromatic whole spice flavored Rice, the spicy fish and masala , the carmelised onions , small crunch from the cashew nuts and sweetness from the fried raisins all makes this dish a fantastic combo!!

The recipe description may look lengthy, but that's only because I have tried to cover each small detail of the preparation process. Most of the ingredients are commonly found or used in most Indian households, specially the spices used. I have also provided Easier versions wherever possible. But trust me, the end result is amazing and you'll love it. And like my mom I have made it with very little butter and oil.

Again, this Biriyani recipe is totally mine and I'm sure there may be several other ways to prepare it. Suggestions are always welcome!!

Fish Biriyani Recipe
Recipe source : My own
You'll need
For the rice:
Basmati rice - 3 cups
Butter - 2 tblsp
Whole Cardamom ( Elaichi) - 3nos.
Whole Peppercorns - 6-7nos.
Cloves - 4-5nos
Cinammon sticks - 1 or 2 ( one inch pieces)
Saffron - 1 pinch
Star Anise - 1
Bayleaf - 1
Water - 6 cups
For marinating the fish:
Fish Fillets (Tilapia / Salmon / King Fish ) - 2-3 lb [Cleaned and cut into small pieces]
Red chilli powder - 1 tsp
Pepper powder - 1 tsp
Turmeric powder - 1/2 tsp
Fenugreek powder - 1/4 tsp
Salt - to taste
Homemade Biriyani masala powder: (My version)
Cardamom seeds ( Elaichi) - 2 ( only seeds of 2 whole cardamom pods)
Whole Peppercorns - 5nos
Cloves - 5nos.
Cinammon sticks - 1 (one inch piece)
Dry Red Chilli - 2-3
Star Anise - 1/2 piece
Whole Corriander seeds - 1 tblsp
Jeera or Saumf - 1/2 tsp
Cumin seeds - 1/2 tsp
Turmeric powder - 1/2 tsp
Curry leaves - 3-4 leaves
For masala gravy:
Red Onion - 1 large ( thinly sliced)
Green chillies - 2-3 (cut lenghtwise) - optional
Ginger- Garlic paste - 1 tblsp
Tomatoes - 2 large
Yoghurt - 2 heaping tblsp
Mint leaves - 1/2 cup
Cilantro - 1cup
To Garnish
Red Onion - 1/2 large ( cut into thin rings or slices)
Cashew nuts - 1 tblsp
Raisins - 1tblsp
Oil (Canola / Vegetable Oil ) - as needed for frying
To color the rice yellow: ( optional )
Turmeric powder - 2 tsp
Water - 2 tblsp


Directions:
For cooking the rice:
1. Wash and soak the Basmati rice in water for 30 - 45 mins.
2. Drain the rice and spread out the rice on a clean washcloth or in a collander to dry.
3. In a deep cooking pot melt 2 tblsp of butter and put in all the whole spices except the Saffron and saute for a minute.
4. Add the rice and fry the rice by folding over gently for about 2-3 minutes.
5. Now add in the 6 cups of water , put in the Saffron strands , salt and cover the pot and cook until the rice is well cooked.
For making the Fish masala:
1. Grind together all the ingredients for the homemade biriyani masala powder and keep aside. ( Easier version : Use store bought Biriyani masla powder)
2. Grind together the tomato, yoghurt , mint and cilantro leaves without water and keep aside.
3. Marinate the fish with all the spices (red chilli powder, pepper powder, turmeric powder, fenugreek powder) and salt and mix well with some water so that the spices stick on to the fish. Refigerate for 30 mins.
4. In a non-stick skillet, on medium heat, add 2 tblsp oil and shallow fry the fish and keep aside.
5. In the same skillet add another 2 tblsp oil and saute the red onions, green chillies and ginger-garlic paste.
6. Add the Biriyani Masala powder and saute for 2 minutes.
7. Reduce the heat and add the tomato-yoghurt grinded mixture , add salt and stir the masala gravy until the gravy thickens. ( If the gravy is thick enough , you need not saute for too long)
8. Add the fried fish pieces into this gravy and mix gently.
For the garnish:
1. Slice the red onions into thin rings or cut the onion in half and slice thinly.
2. Heat some oil on high heat , in a frying pan and fry the onions until carmelised well.
3. In the same oil fry the cashew nuts and raisins and keep everything aside separately.
For setting the Biriyani:
1. Preheat the oven and set it to 200F.
2. If you'd like to color some rice yellow, roast the 2 tsp of turmeric powder until the raw smell comes off and mix with water and slowly sprinkle the turmeric water on about 1 cup 3-4 large scoops of the cooked rice and gently fold the rice over until all the rice strands are colored yellow. ( Easier version : Use yellow food color)
3. In a large oven proof vessel (like a dutch oven) make layers of rice, fish masala and garnish.
Procedure: Mix 3 large scoops of white rice with 1 large scoop of yellow rice , top the rice with 2 tblsp fish masala with 3-4 fish pieces , top it with the fried onions, cashew nuts and raisins. Again add the rice and
continue this layering until all the rice and fish masala is over and make sure the last layer ends with rice topped with the garnish.
4. Cover the vessel with a air tight lid and place it in the oven for 15 mins.
5. Biriyani is ready. Serve it with some cool Raita, spicy mango pickle and Papad...Yummmmy!!


Suggestions: 
a. While the rice is soaking in water , you can marinate the fish and start with the masala gravy preparation.
b. If you do not want to layer the rice with the fish, cook the rice and fish with masala mixed together. This makes the preparation faster.
c. You can moderate the amount of biriyani masala powder added , if you do not like too much spice.


Sending this post to:
1.  Christmas Delicacy event hosted by Julie.

2. Food of the Month - Contest hosted by Amy


-Manju


Nov 22, 2011

Irish Soda Bread & a Versatile Blogger Award !!


Hope you all had a very Happy Thanksgiving !! Did you all go shopping for the Black Friday doorbuster sales? We did ,and had an awesome time. We left from home at 10pm on Thursday and was back home only at 7am today. Give me any excuse for shopping :-)

Also I'm so happy to announce that I have received my first ever blogger Award !
Christy of My Kitchen Flavors - Bon Apetite has been so kind enough to send me a Versatile Blogger Award. Thank you so much Christy, you simply made my day!!

Today I thought of sharing a simple and easy bread recipe called the Irish Soda bread.
Irish Soda bread, as the name suggests used Baking Soda as the raising agent instead of yeast. It can be made plain, or filled with nuts or dry fruits or even made savoury using caraway seeds or crushed peppercorns. I made a sweet soda bread by adding dried Cranberries and we had it for breakfast along with some butter and a nice hot cup of tea. Later on we had it with some Red Wine and that combo was good too ;-)

The first channel I ever saw after having reached US was the Food Network channel. I love watching cookery shows but to have an entire channel showing food shows 24x7 was like a dream come true.


On one such occasion I happened to make note of this Irish Soda bread recipe by Ina Garten featured on her Barefoot Contessa - Back to Basics show. It looked so easy to prepare that I was just tempted to make it one weekend. The moment I woke up I went to go over the recipe again, make changes as per my requirements and bake away. When Manish woke up, the house was smelling heavenly and he couldn't wait to eat!!


Though I followed the recipe by Barefoot Contessa, I found her amount for the bread dough too much for the both of us, so I took a risk and made several changes from the original recipe, but it turned out pretty good nevertheless! And as she suggests in her show, its a much easier version of making bread where there is no kneading, no waiting for the yeast to rise and so on.

Irish Soda Bread Recipe
Recipe source: BarefootContessa-Food Network

You'll need
All purpose flour - 3cups
Baking soda - 1tsp
Baking powder - 1tbsp (optional)
Sugar - 1/2 cup
Egg - 1
Buttermilk - 1.5 cups
Butter - 1/2 stick
Orange extract ( or Orange zest) - 1/2 tsp
Cranberries - 2 cups ( or as per your choice)
Salt - 1/2 tsp

Directions
1. Preheat Oven to 375F
2. Whisk together the dry ingredients: All purpose flour, baking soda, baking powder, sugar and salt.
3. Break the butter into cubes and mix it well into the dry ingredients forming a coarse texture.
4. Beat together the egg with the buttermilk and mix it slowly into the dry ingredients and blend it all together with a blender making a smooth and lightly wet and sticky dough.
5. Add the cranberries and orange extract/zest and mix well.
6. Lightly flour your working surface and place the dough on it, add more flour over the dough and mildly knead the dough until smooth.(Do not over knead).
7. Lightly brush the top of the dough with little melted butter to give a nice brown crust.
8. Place the dough on a baking sheet and make an X shaped cut in the centre of the dough (this allows the dough to rise and spread well) and place it on the middle rack of your oven.
9. Bake for 40-45 mins until a toothpick inserted into the dough comes out clean and also the loaf should sound hollow when tapped.
10. Remove and place it on a cooling rack for 15-20 mins. Cut the loaf into slices and serve warm with butter.

Suggestions: You can even make chive butter biscuits with the same batter by dividing the batter into smaller portions for the biscuits. ( you can adjust the amount of sugar as per your wish)


Again coming back to my award, it would have never been possible to maintain this blog if it hadn't been for the support and interest you all have shown in my little space here. I enjoy each minute here and want to share more and more recipes with you all. So a big Thank you to all of you , my friends!!

I'd love to share this award to the following bloggers whom I think are doing an awesome job with their blogs and are very versatile in their approach:
1. Shirley of Enriching your Kid
2. Sonali Pradhan of Only Fish Recipes
3. Khushi of A Girl's Diary
4. Aarthi of Yummy Tummy
5. Vardhini of Zesty Palette
Do accept the award by copying and pasting it on your blog and share it with 5 other bloggers.
(Award displayed above)

Have a great day everyone and do try out this easy Irish Soda bread!!

I'm sharing this post with:
1. Breakfast Club # 17 event hosted by Krithi , started by Helen of Fuss free flavours .
2.  Bake Fest #1 Event hosted by Vardhini of Zesty Palette.
3. Global Food Festival hosted by Kalyani of Sizzling Tastebuds


-Manju


Nov 21, 2011

Pineapple and Strawberry Pachadi


Pachadi is a typical Kerala side dish where a fruit or vegetable is cooked and is then added to yoghurt once the cooked mixture is fully cooled.  Almost like a Raita you can say!
Fruits like Apple, Pineapple, ripe Palntain etc or Veggies like Bittergourd , Pumpkin , Ladys finger etc can be used to prepare Pachadi and depending on the main ingredient the taste is amazingly different.

The recipe I'm about to share was a total experiment and I'm glad it turned out wonderfully well. We had bought a whole Pineapple a few days back and had been using it little by little to make Pinappale pachadi , Pineapple pulishery and also enjoying it as a fruit. But few more slices were left behind which was not enough to make a full fledged curry and no one was in the mood to eat it plain.
Finally I thought might as well make a small pachadi and finish it off when I thought why not add some Strawberries too.....that would add some volume to the dish and also might taste different.

The sweetness from the Pineapple , the slight tarty sweetness from the Strawberries, the tangy creamy Yoghurt and the mild hint of spice from the dry red chillies added during tempering made this an exceptional side dish for lunch, I could almost eat it like a dessert :-)
Hoping your tastebuds are flowing by now, lets check out the recipe now, shall we !!

Pineapple and Strawberry Pachadi Recipe
You'll need
Ripe Pineapple - 2-3 round 1" slices, cubed
Strawberries - 2-3 cubed
Small red onion or Pearl onion - 1 (thinly sliced)
Mustard seeds - 1 tblsp
Grated coconut - 2 tblsp
Yoghurt - 1 cup
Salt - to taste
For tempering:
Oil - 1 tblsp ( Canola / Veg oil)
Mustard seeds - 1 tsp
Dry Red Chillies - 1-2 (broken in half)
Curry leaves - 2-3 leaves

Directions:
1. Chop the pineapple and strawberries into small bite sized cubes and keep aside separately.
2. Using a mortar and pestle gently crush the grated coconut and mustard seeds until the seeds split in half and keep aside. (If you do not have a mortar and pestle just gently pulse once in a mixer grinder)
3. In a kadai or non-stick pan heat the oil on medium heat and crack the mustard seeds , dry red chillies and add the curry leaves.
4. Saute the small red onion (pearl onion) for a minute and add the Pineapple first.
5. Gently saute for 2 minutes or until the juices from the pineapple start coming out. (You may add little water if the pineapple is not ripe enough)
6. Keep the heat on low and add the crushed mustard seeds and crushed grated coconut and add required amount of salt and saute until the mixture is just warm.
7. Finally add the strawberries and turn off the heat. (The strawberries need not be cooked. The heat from the mixture will automatically cook the strawberries slightly)


8. Once the mixture is fully cooled add the yoghurt and mix well and check the seasoning.


Serve this with rice and some spicy curry or fish fry...yummm! My mouth is definitley watering and I totally enjoyed sharing it with you all too....
For those who like the dish more sweeter you can add some sugar or jaggery. You should be able to bite the pineapple and strawberries , what I mean is don't overcook it. The veggie version are usually made by roasting the veggies and then adding to yoghurt.
Do try this dish and let me know if you enjoyed it as much as I did....

And don't be scared to experiemnt with your dishes, you might just end up creating something Exceptional !!
Stay tuned for more and Have an awesome day!


Sending this post to:
1.  Christmas Delicacy event hosted by Julie.


- Manju

Nov 19, 2011

Chicken in creamy Yoghurt and Cashew sauce


Its the first day of snow here. Seasons Greetings everyone!!

Unfortunately I'm not yet in the mood to enjoy the weather as I've been down with a pretty bad cold since a week and what makes it even worse is not being able to hold my baby :-( ,  lest he should fall sick. So patiently waiting for the virus to run its course and hopefully I'll get well soon. :-)

But any weather is good for some yummy Chicken curry , and for a twist I added some yoghurt and cashew which made the gravy even more rich and creamy. We served this to some friends who came to visit and they loved it. So I thought it would be worth sharing with you all.

Chicken in creamy Yoghurt and Cashew sauce
Recipe source : My own
You'll need:
Chicken (Bone in) - 2 lbs ( cut into bite sized pieces)
Red Onions - 1 large / 2 medium sized ( thinly sliced)
Green chillies - 3-4 nos. ( slit lengthwise)
Ginger-Garlic paste - 1.5 tblsp
Roma Tomatoes - 2-3 large
Turmeric powder - 1/2 tsp
Red Chilli powder - 1 - 2 tsp
Corriander powder - 1.5 tblsp
Garam masala - 1 tsp
Pepper - 1 tsp
Yoghurt (low fat or full fat) - 1/2 cup
Cashew nut - 8-10 nos.
Salt - to taste
For Tempering:
Oil (Canola/Vegetable oil) - 2-3 tblsp
Mustard seeds - 1 tsp
Dry Red chilli - 2-3
Curry leaves - 1sprig or 5-6 leaves

Directions:
1. Wash and clean the chicken pieces.
2. Using a grinder or food processor puree the tomatoes and keep aside.
3. In a deep non-stick pan or skillet, heat the Oil, and then crack mustard seeds and add the dry red chillies and curry leaves.
4. Add the thinly sliced onions, green chillies, Ginger-Garlic paste and little salt and saute the mixture until the onions turns nice and pink and soft. (Adding salt will help saute the onions faster)
5. Add the dry spice mix - turmeric powder, red chilli powder, corriander powder, garam masala and pepper and stir fry again for 2 mins. (Make sure to not burn the spice mix so keep on medium heat)
6. Now add the tomato puree and mix well and cover and cook for another 1min.
7. Add the chicken pieces and little more salt , mix well again and cover and cook on medium heat for 15-20 mins (or until the chicken is cooked well) , keep stirring in between to make sure the gravy does not stick to the bottom of the pan.
8. Meanwhile using a food processor / grinder , grind the cashew nuts using little water into a thick paste.
9. Also add the yoghurt and beat it well in the grinder.
10. Once the chicken is fully cooked , reduce the heat to low , and add this yoghurt and cashew sauce.
11. Stir well and cook for another 1-2 mins on low heat.
12. Serve hot with Roti , Naan or Rice...Enjoy!

Suggestions:
a. You can use boneless chicken also for this recipe.
b. You may garnish the dish with some Corriander leaves.
c. You can add more yoghurt if you want more gravy or if you think the dish is still spicy.
d. You need not add water while cooking the chicken as some water from the chicken itself will be released during cooking providing enough gravy for the dish.


Guess what we ate this delicious dish with? :-) DOSA !!! yummmm.....
So I guess it goes well with anything , Enjoy !!

Sending this post to:
1.  Christmas Delicacy event hosted by Julie.

2. Food of the Month - Contest hosted by Amy


- Manju

Nov 16, 2011

Potato Stew


This is a recipe that I'd been wanting to post since the day I started this blog. But apparently the pics I had taken wasn't something I wanted to share.
But I did share this Potato stew with PaalAppam to a colleague of mine and she absolutely loved it and wanted the recipe , and she mentioned that she had been craving it all month after having eaten it :-)
I must say I felt immensely happy to hear that. So I promised to share the recipe even if the pics aren't so great ! Also I never got time after that day to make this dish again and take new pictures...

So here's Potato Stew, kerala style which goes really well with some typical Kerala breakfast items like PaalAppam, IddiAppam (String Hoppers)  etc and also with Chapathi or Rotis.


The spice from the Ginger and Green Chillies, the sweetness from the Coconut milk and the yummy Potatoes makes this dish irrestible. Also I like to add some corriander powder and Garam masala for some spice , which further elevates the taste of this simple yet delectable dish. And to make it more healthy I sometimes add cubed Carrots or Green Peas !
Now, I have seen many stew recipes where the gravy is more coconut milk based , but I like to add only enough coconut milk to get a slight coconutty flavour and subside the spiciness of the garam masala. So you can adjust it as per your taste.

Luckily for some reason I had taken few step by step pics, atleast that should help you understand how to go about making this dish, which is really easy by the way, but the visual aid should help a bit more!
Once again this is from my Mother's recipe list and as always its the best!!

Potato Stew Recipe
Recipe source : My mom
You'll need
Potatoes - 2-3 medium sized (cubed)
Carrots - 2 medium seized (cubed)  [Optional]
Red Onion - 1 large or 2 medium sized (cubed)
Green chillies - 2-3 (cut length wise)
Ginger - 1" or 1.5 inch thick ( chopped thinly)
Garlic - 2 cloves (chopped)
Turmeric powder - 1/4 tsp
Corriander powder - 1 tblsp
Garam Masala powder- 1 tsp
Warm water - 2 cups (or as preferred for gravy)
Coconut milk - 1cup
Salt - to taste
For tempering:
Canola oil - 2 tbsp ( any vegetable oil is fine)
Mustard seeds - 1 tsp
Dry Red Chilli - 2-3
Curry leaves - 1 sprig (4-5 leaves)

Directions:
1. Heat the oil in a non-stick pan or kadai and crack the mustard seeds. Then add the dry red chillies and curry leaves.
2. Add the ginger and garlic and saute for a minute.
3. Add the red onions, green chillies and add some salt and saute until the onions turns soft and pink.
4. Toss in the potatoes and carrots , add some turmeric powder and cover and cook until potatoes are slightly soft.

5. Add the corriander powder and garam masala powder and the 2 cups of water , stir the mixture and let it boil for few minutes or until the potatoes are fully cooked. 

6. Finally reduce the heat and add the coconut milk .

7. Check the seasoning and turn off the heat after 1 minute. Serve hot.
Suggestion : You can add some peppercorns and cardamom (elaichi) while tempering for some added spice and flavor.


For those who have read my post on PaalAppam, I have mentioned that Appam with Potato Stew is one of my favorite breakfast dishes...and it still remains my favorite of all times!!
Now my colleague who is also a very good friend, also agrees that its awesome :-) Need I say more !!

Have a beautiful day!

-Manju