Oct 20, 2015

Tutti-Frutti Shortbread Cookies and the blog's 4!


Last Thursday on Oct15th, my little blog turned a chubby 4 years old. I like to think the blog's growing and getting chubbier with each new blog post that I lovingly feed it with :-)

I want to write a lot, but I'm out of words, all I know is that there is something about writing this blog, sharing recipes and pictures with everyone that keeps me going.  It brings me out of my laziness and keeps my mind active and creative, so I'm glad the blog's growing with each passing year.


These days I’m not too regular with updating the blog and I apologize for that. But with family visitng us over the summer and trying to make the best use of the lovely warm climate, we spent a lot of time with outdoor activities and lots of interstate trips, that we've hardly had any time to just sit with our laptops :-D
Now even after my in-laws have gone we are still busy with so many Fall activities, that blogging is definitely taking a back seat…but in whatever free time I can spare I will still continue to blog, share my thoughts, recipes , fun treats and ideas.  It’s something I want to do and really enjoy doing!


We travelled a lot this year to visit family and friends within the US and had made one such fun trip few months ago to visit some close friends in Texas. It was a short trip but filled with lovely memories of catching up on old tales and meeting our friends and their families. As we were meeting them all after a long time, I decided to bake some bunch of treats for them as they keep asking when will they ever get to taste the goodies I bake and I thought this was the perfect chance. 

These colorful Tutti-frutti Shortbread cookies were one of them. They are so yumm and melts in your mouth , it’s my personal favorite treat to gift anyone. Now with the holiday season coming along, I’m sure some of you might actually enjoy making these and gifting your loved one or even yourself with the little buttery bites. So on the occasion for my blog’s 4th birthday I decided these are just perfect to share with you all!!

Tutti Frutti Shortbread Cookies (Eggless cookies)

Makes around 18-20 cookies

You’ll Need
2 cups All-purpose flour
1 cup Unsalted Butter, room temperature (use good quality Butter)
½ cup Powdered (confectioners or icing) sugar
1 teaspoon pure Vanilla extract
½ or 1 cup colorful Tutti-fruitti candy (or any glazed fruits chopped finely)
¼ teaspoon Salt

Directions
1.  In a separate bowl whisk the flour with the salt and tutti-fruitti and set it aside.

2.  In the bowl of your electric mixer (or with a hand mixer), beat the butter until smooth and creamy (about 1 minute). Add the sugar and beat until smooth (about 2 minutes).  Beat in the vanilla extract. Gently stir in the flour mixture and tutti-fruitti just until incorporated. 
Roll out the dough to form a log and flatten both ends, wrap in plastic wrap, and chill the dough for at least an hour or until firm. 

3. Preheat oven to 350 degrees F with the rack in the middle of the oven.  Line a  baking sheet with parchment paper.

4.  On a lightly floured surface cut the dough from one flat end into ¼” thick rounds (just like cutting a sausage or a carrot into rounds ;-) ) 

5.  Place on the prepared baking sheets and place in the refrigerator for about 15 minutes. (This will firm up the dough so the cookies will maintain their shape when baked.)
Bake for 8 - 10 minutes, or until cookies are very lightly browned. Cool on a wire rack.

UPDATE: For me it had to bake for about 10-12 mins, but keep checking after 8 mins and do not over bake, the cookies might feel soft when just out of the oven, but they will firm up once they begin to cool! Enjoy...

Recipe Source: Joy of Baking


One of Manish's friends wife who tasted these said they were so good and just melted in your mouth almost like eating Mysore Pak ( a popular sweet dish made in India) I was so happy and I'm glad they enjoyed it. 

These cookies being eggless as well, they are perfect for any occasion, be it an Indian festival or some other Holiday. And in my opinion they are easier to make than Mysore Pak :-P So do give it a try and enjoy them !

-Manju
Oct 13, 2015

Rotating carousel cake - a little video !


I know we are deep in Fall right now but I love to remember the warm n sunny summer we had this year. My sister and her hus came over to visit us for a whole week 1st week of July and then Manish’s parents stayed over with us for 2 whole months and later his sister and family with their 2 month-old baby boy, Dhyan came over and stayed for a month. So we had a lovely family time throughout this summer and my lil’Appu couldn’t have been more pleased with so many people to pamper and play with him. He loves his lil’nephew and always tells everyone he meets that he has a brother…Awww!

Manav, my lil'Appu's birthday falls on July 11th and this year his grandparents were here with us on his birthday and we wanted to make it a special one.


Having a summer b’day is so much fun and we love keeping outdoor parties. We decided to do a colorful Carnival themed birthday for him this year with a whole bunch of games which the kids actually had to play to win their Prizes ;-) I’ve shared a full detailed post on the fun birthday party here.


Let me mention in advance that this is not a recipe post. It's just a post where I'm bragging about how we managed to make a rotating carousel cake and me trying some Ganache techniques...Lol! If still interested read away....

The first things that come to my mind when I think of a Carnival are Carousels and Ferris wheel rides. After going back n forth with what sort of cake to make, I decided to do a Carousel cake. I have earlier once made a Carousel cake for a girly birhday but my boy loves carousels too, so I decided to go with the same plan. My friends agreed to help make a Ferris Wheel to add to the cake table décor, so I was just thrilled.


Now if you have been following my blog for a while you know only too well how I love to go a bit crazy with my cakes :-) I had bought a rotating turntable a while ago to try an experiment on making a moving cake…u know a 4D kind of cake.

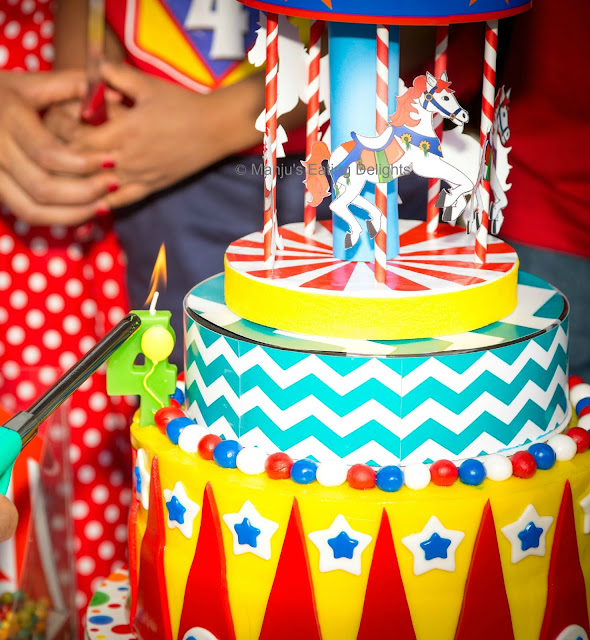
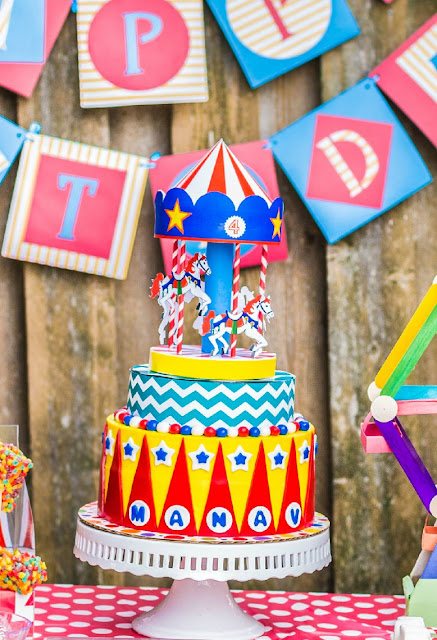
I did not make a tiered cake, nor did I want to spend a lot of time making the carousel edible. So I converted the rotating turntable to act like a second tier and completely constructed the carousel on top using Styrofoam blocks and printed paper. Each horse on the carousel is hand cut out…I must say all that cutting made my fingers quite numb!


I spent quite a lot many days getting the right designs designed up on my laptop and then printed out for the carousel and cutting them up and sticking it all together.  As he was turning 4 that was printed out on the top portion of the carousel.
We wanted to place a flag on top of the carousel tent, but that did not work out well.

The picture shown below shows how exactly the carousel parts came together. The first pic is the initial portion of the carousel and this was stuck onto the rotaing turntable which was covered with a Teal chevron patterned photo paper...I loved using photopaper, it was shiny and glossy and kept its shape. The conical carousel tent, horses and the bunting around the cone are all done using photpaper with deigns I made and printed out.


Appu was sitting beside me all the time while I worked on the carousel and he was quite thrilled. He was more overjoyed when I started the rotating turntable….he kept saying, “look mummy, the horses are jumping!” ;-) Yaaay! we had a rotating home-built carousel!

Now the only thing left was to bake the cake and ofcourse decorate it. Since the theme was about being colorful and fun and we already had the carnival element(the carousel) to go on top of the cake, I decided to make a colorful Polka Dot inside surprise cake.


The Polka dots were actually colorful cake balls which I was able to quickly make thanks to my electric cake ball maker. This gadget was a time saver I should say and was a cheap Thanksgiving purchase.
I went for fun, bright and boyish colors (if you can say so) – Red, Green, Yellow, Blue & Orange.

Once the cake was baked and cooled, I filled it with Vanilla Buttercream and frosted using yellow colored White Chocolate Ganache. 

Colored ganache is a big rage these days and a really nice option for those who do not enjoy the taste of Fondant but still want a really neat and smooth finish for their cakes. So I’ve always wanted to try this technique and it was a breeze I should say and I loved the end result and besides it tastes like white chocolate, what’s not to like about that! I used a premium quality White Chocolate and it set up beautifully.
Oh! And I tried a method called the Upside-down technique to get straight edges around the cake. Have to say I did not like the idea of having to flip my heavy cake up and down, so I’m not a fan of this technique and will have to try something else to get those neat sharp edges.  (Only a cake fanatic would understand all the things I just said in this paragraph…Lol!)

The decoration was so simple, all I had to do were cut out triangular red colored Fondant strips that was the same height as the cake and align then around the cake.
I cut out Manav’s name and placed them in round fondant circles.
Finally I placed the carousel (with the rotating turntable) on another cake board which was then placed on the cake and decorated around the cake board with colorful fondant balls. 

The pic below makes the cake look lopsided as the the table itself was sitting on a downhill portion of our backyard :-P


And thus my Roating Carousel Cake just rotated away the entire time it sat out at the party and I have to say it was quite the center of attraction!
Here's a fun little video I made showing the rotating cake and the cake table decoration and the games we put together! Hope you enjoy watching it. It's my first attempt at making a video, so your feedback is highly valuable :-)


-Manju