Mar 30, 2012

Vanilla Sponge Cake with Raspberry Mousse - a birthday special !!

Happy Birthday to you
    Happy Birthday to you
        Happy Birthday dear MMMMM
            Happy Birthday to you!!

It was Hubby dears birthday yesterday and though we were having a really busy time I wanted to make it special by baking a cake.
I thought hard for weeks and actually saw THE cake I wanted to bake for him , but then it was supposed to be served chilled and everyone at home is down with the weather, so I thought maybe next time and went for a simple cake that can be enjoyed chilled or even at room temperature.
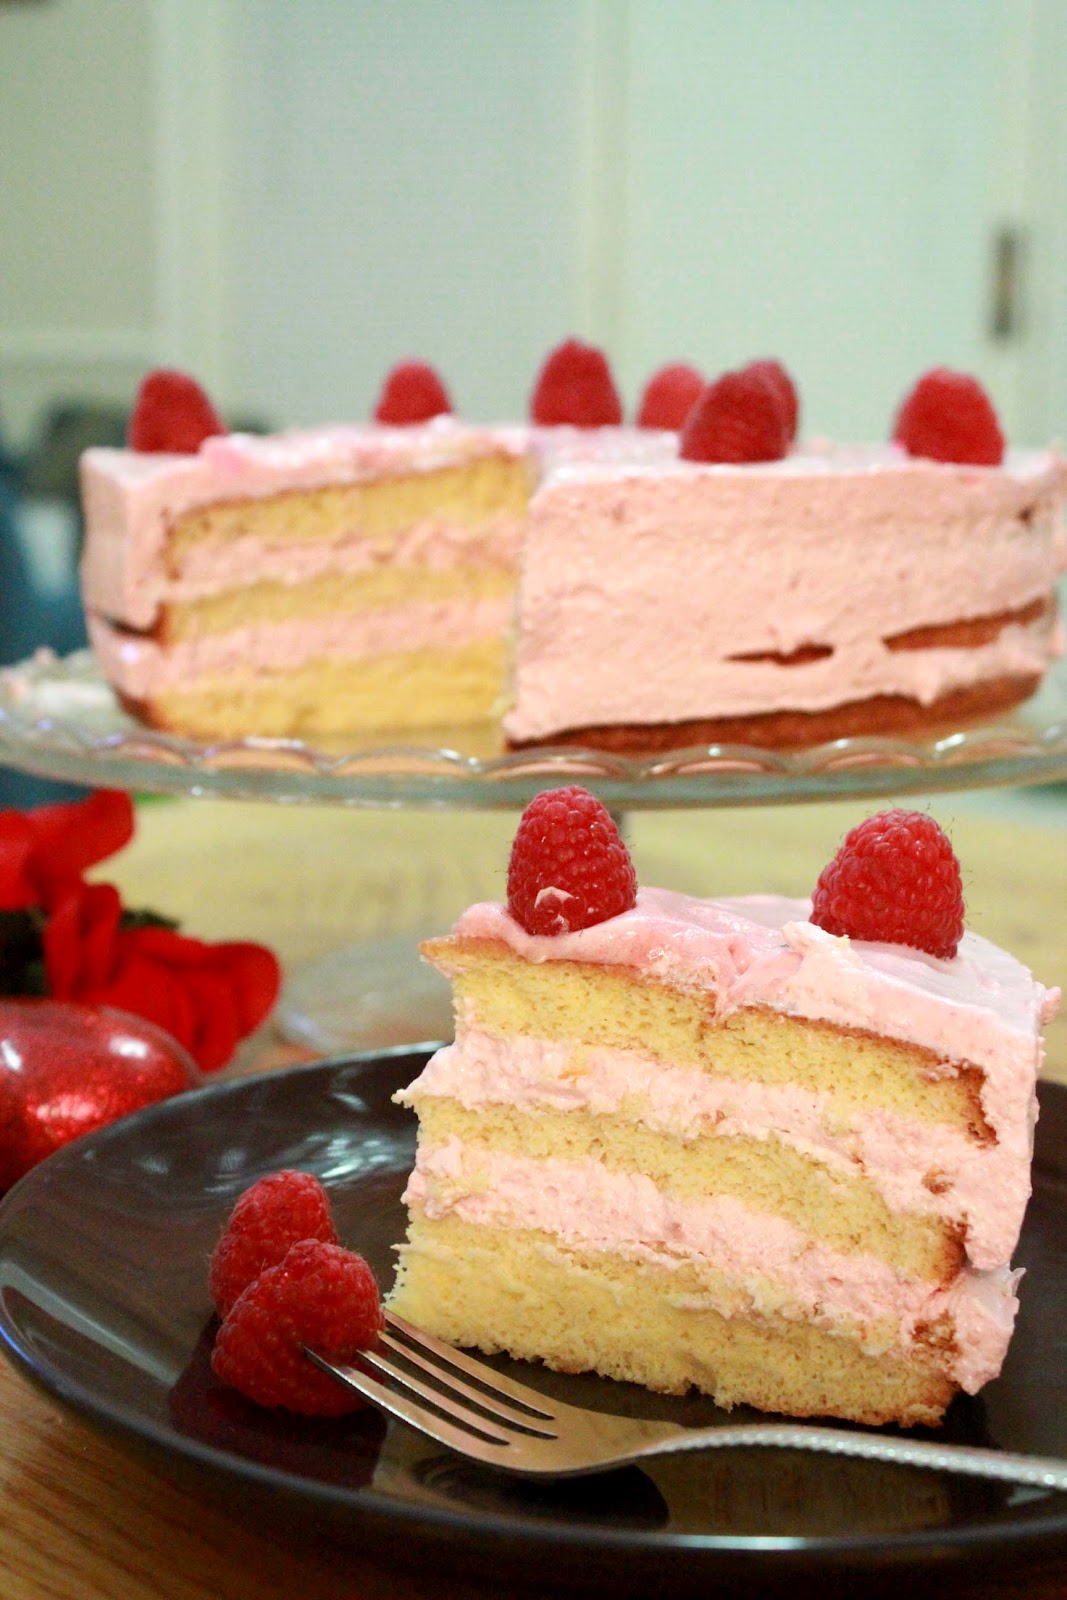
He really enjoys fruit flavors , apart from chocolate, so I went for a simple vanilla sponge cake layered with Raspberry mousse filling. Oh! And let me mention, I was looking for any excuse to use my new springform pan , which I got to do with this cake!

I took the sponge cake recipe from my favorite site on baking , Joyof Baking  (modified a bit depending on ingredient availability) and the Raspberry mousse was just my own recipe after having checked a dozen recipes online and I kept my fingers crossed hoping it would come out well , which it did ;-)
I followed the sponge cake recipe exactly (except for adding lesser eggs and not using cream of tartar) and it still came out perfect, soft and spongy. This recipe is a keeper!

Please pardon the pics and the way the cake looks, as they were all taken after the cake cutting at midnight and the candle wax literally frosted the entire cake by the time he blew them all out ;-D , but it was so much fun and he had a good facial with the cake on his face, you know what I mean, right ?!!
I have explained the procedure very much in detail , for my future reference and well as yours, so don't worry about the lengthy description. 

Vanilla Sponge Cake with Raspberry Mousse Recipe
Vanilla Sponge Cake
You'll need 
Sifted cake flour - 1 cup (100 grams)  [ To make 1 cup cake flour : mix 3/4 cup all-purpose flour + 2 tblsp cornstarch]
Eggs - 6 large , egg yolk and whites separated (I used only 4)
Granulated white sugar - 1 cup (200 grams)  [ divided into 1/4 + 1/4 + 1/2 cup each]
Pure vanilla extract - 1 tsp
Water - 1 tblsp
Zest of 1 medium lemon
Cream of tartar - 3/4 teaspoon ( I did not use this)
Directions
1. Preheat oven to 350 F  and place rack in center of oven.
2. Grease a 9inch cake pan with butter on all sides. (Actual recipe states to not grease , but I greased it anyway) 
3. Separate the eggs while they are still cold, and cover the whites and yolks with plastic wrap to prevent a film from forming on the egg yolks and the whites from drying out.
Let the yolks and whites reach room temperature before using (this will take about 30 minutes).
(Having the yolks and whites at room temperature will ensure that the eggs reach their full volume when beaten.)
4. Sift the cake flour and then whisk the flour with 1/4 cup of granulated white sugar. 
5. Measure another 1/4 cup of granulated white sugar and set aside for beating with the egg whites.
6. Place the final 1/2 cup of granulated white sugar in your electric mixer fitted with the paddle attachment (I used a hand mixer). Add the egg yolks and beat on high speed for about five minutes, or until they are thick, fluffy and light colored (when you slowly raise the beaters the batter will fall back into the bowl in a slow ribbon).
At this point beat in the vanilla extract, water, and lemon zest.
7. Sift in the flour/sugar mixture over the batter but do not fold in. (You will fold the flour mixture into the batter along with the beaten egg whites.)   
8. In a clean bowl, whip the egg whites until foamy using hand mixer. Add the cream of tartar and continue beating until soft peaks form ( I did not do this).
Gradually add the 1/4 cup of granulated white sugar and continue beating until the egg whites are shiny and stiff peaks form.
Gently fold a little of the whites into the batter to lighten it, and then add the rest of the whites, folding just until incorporated. Do not over mix or you will deflate the batter. Pour the batter into the tube pan, evenly spreading the cake batter with your spatula.
9. Bake in the preheated oven for 30 - 35 minutes or until lightly browned and a toothpick inserted in the middle comes out clean.
Remove from oven and immediately invert over a greased wire rack and keep it like that until fully cooled - for about an hour.
Raspberry Mousse
You'll need
Fresh Raspberries - 12oz , washed ( I used the Driscolls brand found in target , two 6oz medium packs)
Granulated White Sugar - 1/2cup - 1cup (you may regulate based on taste)
Water - 2 tblsp
CoolWhip - one 8oz pack ( I used the Lite Cool whip)
Unflavored Gelatin - 2 1/4 tsp
Water - 3 tblsp
Directions:
1. Bloom gelatin in a bowl with 3 tblsp of water and keep aside.
2. Keep aside 10-12 raspberries for decoration on the cake and In a saucepan on medium heat , add the remaining raspberries, 2tblsp water and sugar. Keep stirring and once the mixture starts to boil , using a potato masher, mash the raspberries.
3. Keep boiling until the sugar-raspberrty mixture has thickened such that if you run a spoon through the mixture it should draw a line.
4. Pour the sugar-raspberry mixture through a strainer and strain the mixture well by pressing it down with a spatula or spoon, until you get all the good syrup. Discard the seeds left behind in the strainer.
5. When the mixture has cooled down a bit, add the gelatin and mix well. (Gelatin should be added while the mixture is still mildly warm and not cold)
6. Finaly in a large bowl fold together the cooled raspberry syrup with the coolwhip (whipped cream) and fold until incorporated well.
Assembling the Cake:
1. Depending on the no. of layers you want , cut the sponge cake using a long serrated knife. I cut the cake into 3 slices.
2. If placing the cake on a cake stand, rub some butter on the centre of the stand and place the topmost surface of your sponge cake as the bottommost layer , with top side up.
I placed my Springfoam pan around this cake slice by tightening the sides of the pan.
3. Divide the raspberry mousse into 3 equal parts such that you have enough for the 2 middle layers and some for frosting on the top.
4. Using a spatula scoop out the raspberry mousse on the first layer and then place the midlle sponge cake layer and again scoop out the mousse filling and spread evenly.
5. Finally place the sponge cake's bottommost layer on the top with the bottomside up, so that the top looks smooth and flat and add the remaining raspberry mouse over the top.
6. You may frost the sides too, as you wish.
7. Refrigerate for upto 1-2 hours for the mousse to set .
8. Before slicing , using a butterknife gently go around the cake releasing it from the sides and open the springform pan and gently lift it out.
Suggestions:
1. If you want the sponge cake to be more moist, I would recommend gently brushing the cake with raspberry/strawberry juice or simple sugar syrup (the recipe for which you can ealsiy find online)
I did not feel it needed to be very moist as the mousse provided a good amount of moisture and the sponge cake blended very well with the mousse.
2. You can make your own whipped cream using 2 cups of whipping cream added with desired amount of powdered or confectioners sugar.

I know I could have made a neater looking cake, my frosting would never win a competition, but it was all I could do in the limited time I had after returing from work and tending to the baby , but I was very satisfied with the results. Manish actually thought it was some design, how sweet!  :-)
And how can I forget my sweetypie lil baby, who was such a doll and never troubled me throughout the process.
All in all the cake was really yummmm, the sweet sponge cake and the creamy, fruity raspberry mouse was a perfect flavor combo...Tha B'day boy was very happy and enjoyed a really big slice all to himself :-)


-Manju

Mar 26, 2012

Chocolate Pudding

Hello my lovely readers. Hope you all are having a great time wherever you are! I was having some issues with blogger due to which I couldn't blog for so many days and also full time work, a sick baby and regular chores has been taking up most of my time :-)

Chocolate Pudding, the ultimate comfort food in Desserts!! Do you agree???
I personally love it both warm and chilled and my all time favorite flavor is ...no doubt...Chocolate!!
Well that being said, would you believe that this is the very first pudding I ever made and the only reason to do so was to finish off 1 cup of heavy cream that I had left over. Actually the original recipe calls for whole milk or 2% mils milk , but I dint have either , so I used a combination of Skim milk with Heavy cream :-)

I took the pudding recipe from Ria's recipe here as hers was the only one I could find for a small quantity and her recipe was easy peezy. The only changes I made was I added extra cocoa powder for a deeper chocolate flavor and used skim milk+heavy cream for the milk in her recipe, and it was perfect, creamy and chocolaty !! 

Chocolate Pudding Recipe
You'll need
Milk - 1.5 cups ( I used 1 cup heavy cream + 1/2  cup skim milk)
Sugar - 1 cup ( you can regulate depending on the sweetness you prefer)
Cornstarch / Cornflour - 1 tblsp (I used cornstarch)
Cocoa powder - 4 tblsp ( original recipe- 3tblsp)
Vanilla essence - 1tsp

Directions:
1. In a saucepan, boil together all the ingredients except for vanilla essence until the sauce thickens.
2. Add in the vanilla once the mixture has cooled.
3. Pour into ramekins or desired dessert bowls.
Suggestions:
a. If serving chilled, cover the ramekins or dessert bowls with a plastic wrap (touching the surface of the pudding to avoid forming a layer) and refrigerate for few hours. 
b. You can also serve this pudding slightly warm (personal choice)
Tips:
To avoid any lumps in the pudding, mix or whisk together the cocoa powder and cornstarch with little milk until all lumps are removed before adding to the entire mixture before boiling. 
I made this mistake by adding everything in together and my pudding was filled with little chocolaty lumps, which we both enjoyed by the way ;-) 
The pudding was really good , I couldn't wait till the pudding was chilled, so I enjoyed a bit while it was warm. Manish waited patiently until it was chilled and really enjoyed it. My little one was very curious while I was taking the snaps and had to be constantly distracted to keep him away from my pudding ;-)  
I used Raspberries to decorate , but I found the ones I bought having too much hair on it, which I dint like much (atleast on the pic), but what to do, I din't make them :-)
This was like the easiest dessert I have ever made and the tastiest too, mayb that was coz I din't have to spend hours preparing it, by which time I would be too tired to enjoy what I made ;-) Try it out , you'll see what I mean.

-Manju

Mar 15, 2012

Mini Bundt Apple Pies....a cute twist to a classic dessert!

Spring is in the air and we can finally walk outside without a big load of sweaters and jackets on our shoulders! My son is seeing what the real world looks like (outside of his home, malls and grocery stores) for the very first time and you should see how he looks around, curiosity filling in his eyes, at the trees, birds, squirrels and at other kids playing in the park. How I love that look! :-)

Now to my recipe , Mini Bundt Apple Pies. I'm not sure if anyone else has ever heard of or made an Apple Pie in a Bundt pan! So do I get a patent for creating these cuties??!! :-D
Well I made these a couple of weeks back when winter was still in the air and the thought of some nice and warm homemade pie just could not be neglected. And I had a whole bag of crispy n juicy Red Fuji apples!

This was my second try at baking pies. Well for an amateur at making pies from scratch, I never thought my crust would come out so good and I have to be honest that it took me sometime to get this done, as the pie dough kept breaking while rolling and the cookie cutter I used did not create a circle that was big enough to fill in the mini bundt pan....So lots of trials and errors later I was able to utilize the whole pie crust dough I made, to prepare 5 mini bundt pies :-)

I took the recipe for the Apple Pie filling from the blog Baking Bites , it was just a random search and I found the recipe easy and it turned out great!.
The recipe for the Pie crust is from my own recipe for the Lattice crust on my Cherry and Blueberry Pie., but I added more butter and less sugar ;-)
Mini Bundt Apple Pies Recipe
You'll need
Pie Crust
All purpose flour - 1 cup
Sugar - 2 tblsp
Cold Butter (cut into small cubes)  - 4 tblsp
Ice water - 5-8 tblsp (just enough to get the dough into shape)
Pie Filling
Apples - 4 small or 3 large ( I used Red Fuji apples)
Ground Cinnamon - 1/2 tsp
Ground Nutmeg - 1/4 tsp (optional)
Brown sugar - 2/3 cup
Cornstarch - 1 tblsp
Vanilla extract - 1/2 tsp
Salt - 1/4 tsp ( I just added a pinch)

Directions
For Pie Crust 
1. Knead together the all purpose flour, cold butter and sugar with ice cold water.
2. Make a smooth pie dough , cover it with plastic wrap and place it in the fridge or freezer until chilled well. (about 30 minutes to an hour).
For Pie Filling
1. In a large skillet over medium heat, melt the butter. Add in apples and sautee for 4-5 minutes, until they just start to soften.
2. In a medium bowl, whisk together cinnamon, nutmeg (optional), brown sugar, cornstarch and salt. Add to apples and stir to coat.
3. Cook until sugar is bubbling, apples are very tender and the mixture starts to thicken, 5-8 minutes.
4. Remove from heat and stir in vanilla. Set aside to cool to room temperature.
To prepare Mini Bundt Apple Pies
1. Preheat oven to 400F.
2. Cut the pie crust dough in half and roll out one half of the pie crust dough on a lightly floured surface until they are about 1/8-inch thick.
3. Cut dough into rounds about 1- 1.5 inches larger than the size of the mini bundt pan that you will be using ( you can also use muffin tin or mini pie pan).
4. Press dough into pan and up the sides. (I spread some melted butter around the side of each pan round)
5. Roll out remaining half of the pie crust dough on a lightly floured surface. Cut smaller rounds into remaining dough to form the tops of the pies.
6. Use a tablespoon to spoon out the cooled apple mixture into each prepared pie crust. ( I used about 3 tblsp in each ) Some liquid will have been released from the apples, so evenly distribute this as well.
7. Top pies with a second round of dough and press down the edges with a fork to seal. Also press the fork down the centre of the pies to release any steam which may come out.
8. Bake for 16-20 minutes, until pastry is golden brown. Allow pies to cool in pan for 10 minutes, then gently loosen and transfer to a wire rack to cool before serving.
Suggestions and Tips:
1. Prepare the Pie dough first before preparing the filling, that'll give you enough time to help the dough to get chilled (I used the freezer to chill - around 20-25 mins)
2. Make sure your first pie crust round (which will form the base for you filling is larger than the diameter of each individual rounds of  your pie pan) . This is very IMPORTANT!!!  (Mine wasn't upto the mark, so a bit of my pie filling poured out while baking)
3. You can use any fruit filling.

The actual recipe was for preparing 6 mini pies, so I had some leftover apple pie filling...which we both gladly licked up to the last drop! :-) The pie crust was so buttery and soft yet crispy , almost the texture of sugar cookies and the pis pie filling was exceptional.
You could add some whipped cream into the bundt holes or any left over pie filling and enjoy this really cute dessert! We really enjoyed these and I'm sure you will too.

-Manju


Mar 12, 2012

Thai Fish Balls with Lime-Cilantro Mayo dip , an awesome WIN and 10,000+ hits people!!!

But first let me talk about what I won :-) I'm so excited about getting it and I have to be kicked for not mentioning it the day I came to know about it.


It hasn't been long since I have been following Anzz @ Anzzcafe.com , who has a gorgeous blog and lovely words for everyone who leaves her a comment. I was infact amazed by the fact that she individually replies to each and every comment she gets. She was hosting her very first event, a special on Valentines Day and had a giveaway too :-) and guess what was her giveaway prize....The first book of the first Masterchef of India, Pankaj Bhadouria and I won it, Yippeeeeee !!!
:-D You can check out the details here ans she got such a beautiful round of entries...
We also got this beautiful Paticipation Award! Thank you so much Anzz, and you all must give her blog a look, you'll love it!

Oh! and as I'm writing this post I noticed this little space of mine has crossed 10,000+ hits!!! THANK YOU , all of you, for all your support and interest here and definitely I will be partying with you guys by coming up with more and more interesting dishes!! I know this calls for a celebration and we shall, soon....
Now continuing with my Valentines Dinner specials, here is this superb dish which I found online and it can be served as an appetizer or prepared as a main course ,Thai Fish Balls! The name says it all. Actually the original recipe was for Thai fish cakes, but I just jazzed it up a bit and made small balls and served them with cute little toothpicks inserted in each for easy eating :-) 


Thai Fish Balls Recipe
Recipe source : Delia Online
You'll need
Any white fish (Cod, Tilapia, Catfish)-  1 lb (cut into chunks)
Fresh Corriander leaves  - 2-3 level tblsp 
Fresh Lime juice - 1 tblsp 
Spring Onions - 2 , very finely sliced into rounds (including the green parts)
Thai Red Curry Paste  - 2 heaped tblsp (I used store bought) 
Green Chilli -1 ,de-seeded ( you can use more if you like more spice)
Oil for frying (Peanut oil recommended) - I used Canola
Salt - to taste
Directions:
1.Simply place the chunks of fish, the coriander leaves, lime juice, spring onions, curry paste, chilli and a little salt in a food processor and pulse ( or mildly blend ) till you have a nice minced texture (don't blend it to a purée)  
2.Transfer to a mixing bowl. If needed use your hands to mix everything well.
3. Next take tablespoon sizes of the mixture and form them into balls, squeezing the mixture together. 
4. When all the fish balls are ready, put them on to a plate, cover with clingfilm or plastic wrap and leave them in the fridge for a couple of hours to firm up.
5. Heat oil in a deep pan, and once hot enough, fry each fish ball until nice and golden brown.


Lime-Cilantro Mayo Dip Recipe
Recipe source : My own
You'll need:
Mayonnaise - 1 cup ( I used light Mayo)
Lime juice - 2 or 3 tblsp (make sure the Mayo does not get too watery)
Fresh crushed Black Pepper - 1/2 tsp
Fresh Cilantro (thinly chopped) - 2 tblsp 
Salt - to taste
Directions:
Mix together all the ingredients and make sure its still creamy and seasoned well.


Don't they look so cute :-) This recipe is a keeper and you must try it!
Its a really easy dish and I'm sure you can try as many variations as you want, as long as it compliments with the fish. I used Cod fish, you can use Tilapia / Catfish as per you wish. And the dipping sauce was entirely my idea, I dint have time to prepare any extraordinary Thai dipping sauce, so went for a simple and good old Mayo sauce (I'm sure you can substitute Mayo with Sour Cream or even Yogurt). You must and you will definitely try this, its tangy, creamy, peppery and oh so fresh with the cilantro!!

The combination of the two was so good that Manish literally inhaled this dish and it was his most favorite among all the other dishes I served that night!!
I just can't wait to get a hold of that book I've won...I have read a lot of great reviews about her recipes and I simply can't wit to try some :-)


See you again soon!!!


-Manju

Mar 6, 2012

Jamaican Jerk Chicken

Jerk Chicken , the first time I saw or heard of this dish was on the show Chopped on Food Network , where this contestant chef (Ric Orlando) prepared this dish as his entrée course using Quail from the mystery basket. Even the judges on the show were quite amazed that he was able to pull it off with such less time and so many ingredients and to their surprise it tasted great J!
I’m sure you would also be surprised if you saw the ingredient list of this delicious Jamaican / Carribean preparation. But the preparation is so simple!

I was simply excited to prepare this dish , as it uses some new and some familiar ingredients , all used in a combination that I would have never tried by myself otherwise.
I paired this spicy chicken with some Coconut Rice with Peas (as suggested in original recipe) for our special Valentines Dinner and the combo was a match made in heaven. The spicy chicken with the cool , mildly sweet coconut rice is perfect! I will be adding the recipe for the Coconut rice in another post soon.
But let me tell you, this dish can be very spicy for those who do not eat spicy dishes often , but for me and my hus it wasn’t overly spicy ( mayb that’s because there was brown sugar in the marinade J )

Jerk seasoning is easily available at most grocery stores, but I wanted to make the whole thing from scratch. It’s a spicy marinade (Dry or wet) mixture and the main spice quotient comes from the hottest pepper in the world – Habannero. These peppers are the most intensely spiciest peppers!! You can de-seed them if you do not want all that spice.
Its best if you marinate the chicken overnight or atleast for 2-3 hrs in the fridge for the flavors to fully get into the chicken. (I’ve read that you can use this marinade for fish , meat etc preparations too) .
I have followed the exact recipe given my Nigella Lawson on the foodnetwork website , with inclusion of a few ingredients that I saw commonly used in few other sites. And I must say, she knows more to cooking than cookies and cakes, the dish was extremely good and something totally different from what I've eaten so far! (I have copied the recipe almost exactly from foodnetwork site as I followed it exactly and there was no information to change)

Jamaican Jerk Chicken Recipe
Recipe source: FoodNetwork (recipe by Nigella Lawson)

You'll need

Chicken Thighs/Breast/Drumstick/Wings - approx 6-8 pieces
Ground Allspice - 2 teaspoons
Dried thyme - 2 teaspoons dried thyme
Cayenne pepper - 2 teaspoons cayenne pepper
Ground ginger- 2 teaspoons ground ginger
Ground nutmeg - 2 teaspoons ground nutmeg
Ground cinnamon - 2 teaspoons ground cinnamon
Garlic -2 cloves (peeled)
Ginger - 2 inch piece (Original recipe: 1 1 3/4 piece gingerroot, peeled and cut into chunks)
Dark brown sugar - 2 tablespoons  (I used regular brown sugar)
Dark rum - 1/4 cup  (I used Red wine) - You can skip this entirely if you'd like
Lime juice - 1/4 cup
Soy sauce - 1/4 cup
Cider vinegar - 1/2 cup  (I used regular vinegar)
Red chiles -2 whole ( I used dry red chillies)
Onion - 1/2 large Cubed (Original recipe: 1 onion, peeled and quartered)

Habbanero Pepper - 1 whole (de-seeded , if you prefer a mild spice)
Spring onions - 2-3 stalks


Directions
1. Slash the chicken thighs/breasts/drunstick ,  each cut about 3/4-inch deep diagonally . Put them a ziploc bag or in a rectangular dish, slashed-side down.
2. Put all the other ingredients in the processor and blitz to a dark, earthy paste and pour and spread over the chicken pieces and leave to marinate  in refrigerator for 2 to 4 hours or in the refrigerator, (covered), overnight. (I placed it overnight in ziploc bags).
 most of the ingredients for the marinade (I forgot the onions here ;-) )
 Just before pureeing
ready to get in the oven!
3. Preheat oven to 400 F. Double-line a shallow roasting pan with aluminium foil. Tip into it the chicken with its marinade, slashed side up and roast for 30 minutes.
4. Take the pan out of the oven, just to pour off excess watery juices. Use a pastry brush and spoon to place any paste back on the chicken and cook for a further 30 minutes, by which time the chicken will be cooked through and tender with a thick fiery crust.
Garnish with Spring Onions!


My pics here don't do much justice to the actual look of this dish, its really a nice and dark brown and it smells awesome, wish I could capture that too on a pic ;-) There was a hint of spice that hits you when you are halfway chewing , but when paired with a nice combination of rice, it simply balances it out!
This a must try dish and something very unique...

-Manju